
How to Add Film Grain to a Video: A Measured Guide
You shoot a clean clip, add film grain in your editor for a bit of warmth, and export. The file that was 2 MB is now 18 MB. Nothing else changed. That isn’t a bug: film grain is random detail at every pixel, and a codec spends real bits on detail it can’t predict. I measured what film grain costs here, at four strengths and on two kinds of footage. A fixed pattern cost 51 times the clean file, a moving one 4,331 times.
What you’ll get from this:
- what the FFmpeg
noisefilter’s strength and flags change - the measured size cost of film grain at CRF 23
- how to add film grain cheaply, keep it on luma, and take it back off
What film grain is
Real film carries silver halide crystals in the emulsion, and they show up as a random texture on every frame. Sensor noise is different: heavier in the shadows, coloured, and worse as ISO rises. Film grain is mostly a brightness texture, and people add it to soften digital footage that looks too clean or too plasticky.
A plastic look usually means a denoiser flattened real detail along with the noise, which is a different repair. If that’s your problem, the guide to reducing video noise and grain covers removal. This article is about adding texture and paying for it knowingly.
FFmpeg’s noise filter has two controls that matter:
allssets strength from 0 to 100. It’s amplitude, not “how film-like it looks”.allfsets the pattern. No flag gives a fixed pattern that stays put. Addtand it regenerates every frame, so the grain crawls; adduand the distribution becomes uniform.
Every run below uses all_seed=42 so results repeat exactly. Without a fixed seed, two exports of one clip differ in size and comparisons stop meaning anything.
How to add film grain with FFmpeg
One filter does the job. This is the version I’d hand to someone who wants texture without wrecking the file:
ffmpeg -i input.mp4 -vf "noise=alls=16:all_seed=42"
  -c:v libx264 -crf 20 -preset medium -c:a copy grainy.mp4
Drop the t flag and the grain sits still. Keep allf=t+u and it changes every frame. -crf 20 holds quality steady and -c:a copy leaves the audio untouched.
That exact command ran on a 4 second, 1280×720 test clip with audio. The 1.88 MB input came back at 17.6 MB with moving grain at strength 16. The same strength as a fixed texture came back at 2.99 MB. One flag apart, and six times the file.
What film grain costs, measured
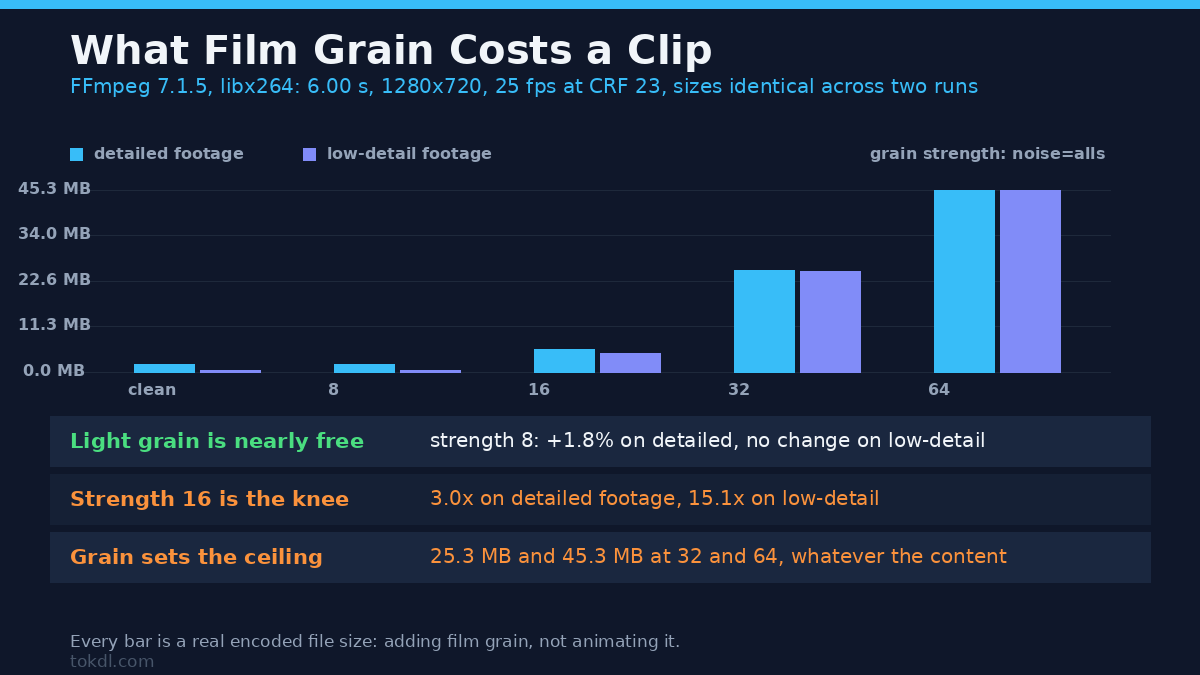
Here’s the strength curve. Every file is a 6.00 second, 1280×720, 25 fps clip at CRF 23 with libx264, and every size is byte-identical across two runs with the same seed.
| Noise strength | Detailed footage | Low-detail footage |
|---|---|---|
| clean (no grain) | 1.90 MB | 0.30 MB |
| 8 | 1.93 MB (1.02x) | 0.30 MB (1.0x) |
| 16 | 5.60 MB (3.0x) | 4.53 MB (15.1x) |
| 32 | 25.30 MB (13.3x) | 25.03 MB (83.5x) |
| 64 | 45.28 MB (23.9x) | 45.27 MB (151x) |
Three things stand out. Light grain is nearly free: strength 8 moved the detailed clip by 1.8 percent and left the smooth one unchanged. From strength 16 upward the curve turns into a wall. And the last two rows land at almost identical sizes, 25 MB and then 45 MB, although one clip is eight times heavier before grain. Once film grain reaches a real strength, it sets the bitrate and the picture underneath barely matters.
That has an edge for delivery. If a clip is headed for a platform with a size cap, grain is the first thing to reconsider, not the last. The guide to compressing video without losing quality covers the general case; this is the specific tax that catches people out.
The trap: moving grain costs thousands of times more
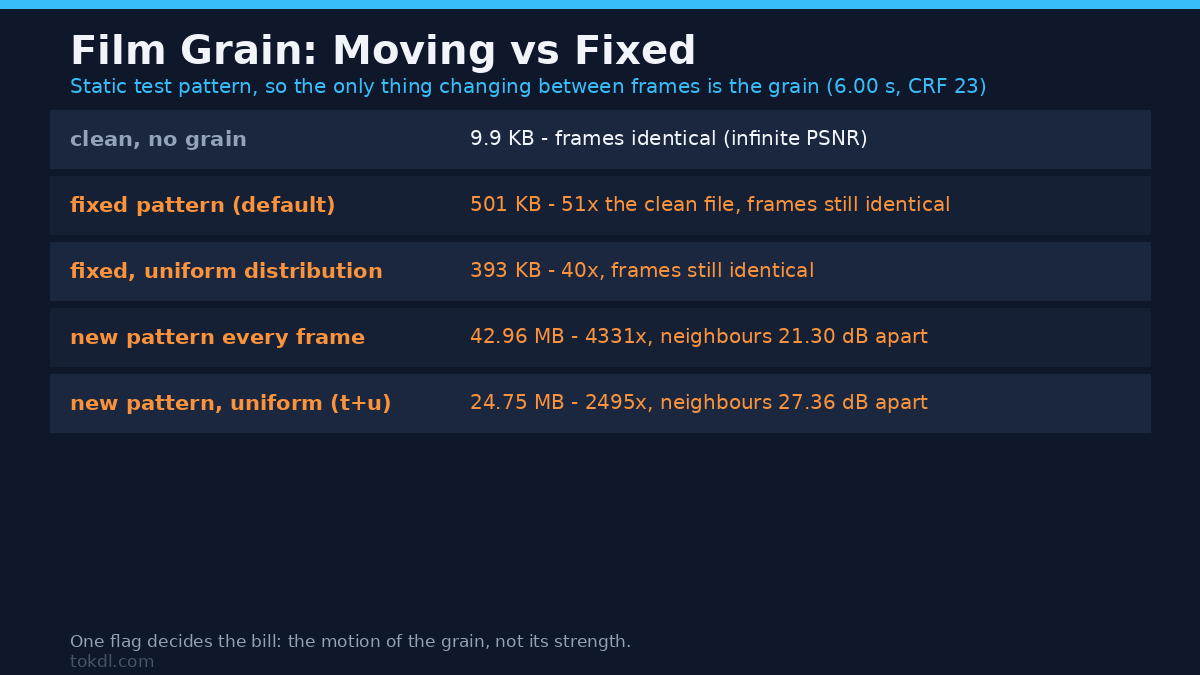
The strength curve hides the bigger story. To separate the grain’s cost from the picture’s, I used a static test pattern, so the only thing changing between frames is the grain. Neighbouring-frame PSNR shows how far each frame moved; an infinite value means the two frames are identical.
| Grain setting (strength 32) | File size | Frame 25 vs 26 |
|---|---|---|
| clean, no grain | 9.9 KB | identical (infinite PSNR) |
| fixed pattern (default) | 501 KB (51x) | identical |
| fixed, uniform distribution | 393 KB (40x) | identical |
| new pattern every frame (allf=t) | 42.96 MB (4,331x) | 21.31 dB |
| new pattern, uniform (t+u) | 24.75 MB (2,495x) | 27.36 dB |
A fixed grain pattern still costs 40 to 51 times the blank picture, because that texture is new detail the encoder has to carry. A pattern that regenerates every frame costs 2,495 to 4,331 times, and neighbouring frames differ by 20 to 27 dB. Every pixel becomes a fresh value no motion vector can predict.
So the motion is the bill, not the strength. Two clips at identical strength 32 sit 86 times apart in size depending on one flag letter. If you don’t need grain that crawls, drop t. Reach for moving grain only when you want it, and price it before you commit a long timeline.
Adding film grain at a fixed bitrate: what the picture loses
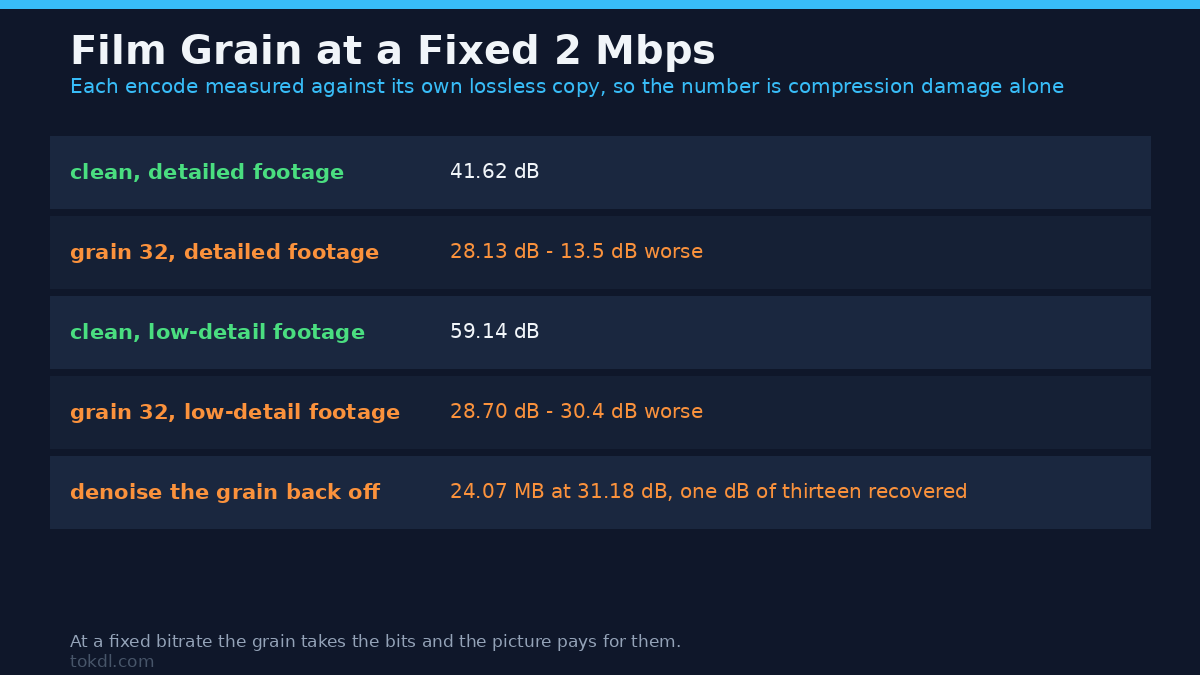
CRF holds quality and lets the file grow. Most delivery targets fix the bitrate and let quality give way. I encoded the same clip at a hard 2 Mbps with and without grain, then compared each result against its own lossless copy, which isolates compression damage from the grain.
| 2 Mbps encode | Quality vs its own lossless copy |
|---|---|
| clean, detailed footage | 41.62 dB |
| grain, detailed footage | 28.13 dB |
| clean, low-detail footage | 59.14 dB |
| grain, low-detail footage | 28.70 dB |
The two clean encodes sit 17 dB apart, because smooth footage compresses easily and detailed footage doesn’t. Add grain and both land near 28 dB. The grain eats the budget, and the smooth clip that had room to spare pays as much as the busy one. If you’ve added grain, exported to a fixed bitrate and found the picture soft afterwards, this is why: the bits went to the noise. The difference between a quality target and a bitrate target is worth reading separately, and constant quality vs average bitrate works through that comparison.
Keep the grain on the luma channel
You can add noise to brightness alone and leave colour untouched, using the per-plane controls c0s (strength) and c0f (flags) for the first plane.
ffmpeg -i input.mp4 -vf "noise=c0s=16:c0f=t+u:all_seed=42"
  -c:v libx264 -crf 20 -preset medium -c:a copy grainy.mp4
At strength 32 on the detailed clip, luma-only grain came to 19.84 MB against 25.30 MB for all planes, about a fifth cheaper, and it read back at 31.87 dB against the clean copy instead of 30.29 dB. Your eye reads film grain as brightness texture, while coloured grain in the chroma planes looks like blotching, so skipping chroma buys a smaller file and a cleaner look.
Or add film grain in your editor instead
DaVinci Resolve, Premiere Pro and CapCut all ship a film grain effect, and most editors let you overlay a grain clip on the track above with a blend mode such as Overlay or Soft Light at low opacity. The overlay route has one advantage: the grain lives in its own clip, so you can dial the layer and reuse it across a sequence instead of baking a filter into every export.
Whatever route you take, the size consequence is the same: compare the exported size against a clean export of the same edit. If grain was the only change, the fix is a lower strength or a fixed pattern, not a different tool.
How to take film grain back off
You can run a denoiser over a grainy export, and FFmpeg will do it:
ffmpeg -i grainy.mp4 -vf "hqdn3d=3:3:6:6"
  -c:v libx264 -crf 20 -preset medium clean_again.mp4
It won’t get you all the way back. My strength 32 grain file was 25.30 MB and measured 30.29 dB against the clean original; after the denoise pass it was 24.07 MB and 31.18 dB. That’s one decibel back out of the 13 the grain had ceded, and the file barely shrank. A denoiser aggressive enough to flatten grain also softens the detail around it, which is why you set the strength right on the way in.
Common mistakes
- Cranking strength and judging it in the preview. The timeline preview is a proxy, often a tenth of the export size, so it hides both the grain and the bitrate it will cost.
- Leaving the moving flag on for a whole timeline. One short shot can wear moving grain; across ten minutes you’re paying thousands of times the clean file for texture nobody examines frame by frame.
- Adding film grain before hitting a size cap. If the target is 25 MB, grain can push a clean 3 MB export straight past it, and re-encoding to fit then strips the grain you paid for.
- Graining footage that’s already noisy. Phone footage shot at high ISO is noisy before you touch it, and grain on top doubles the texture and the bitrate.
Check the cost on your own file
These numbers come from FFmpeg 7.1.5 with libx264 on a 1280×720 source; exact figures shift with resolution, content and encoder, but the shape doesn’t. Reproduce it in three steps:
- Export cleanly and note the size from
ffprobe -v error -show_entries format=size -of default=nw=1 output.mp4. - Add the grain and export again with identical settings.
- Compare the two. If the second is more than about double the first, you’ll want a lower strength or a fixed pattern before you upload.
Run each comparison twice. A single export can swing by a fifth on wall-clock time on a busy machine; the sizes here repeated byte for byte, but timing never does.
FAQ
Is film grain the same as video noise?
No. Sensor noise is usually coloured and sits in the shadows, and it’s a defect you want gone. Film grain is a brightness texture across the frame, and it’s a look you add on purpose. Both are random per-pixel detail, which is why they cost an encoder the same way.
What strength should I use?
Start at 8 and walk upward. Strength 8 barely moved my file size, while 16 tripled it on detailed footage. Most clips don’t need more than a light pass to lose the plastic look.
Why did my export get so much bigger after adding film grain?
Because grain is detail the encoder has to preserve. At a fixed quality setting it spends whatever it takes to keep that detail, so the file grows. At a fixed bitrate it can’t, so the picture softens instead. Either way, the grain is the cause.
Does film grain survive compression?
Partly, and what survives often looks worse than grain. A heavy encode turns fine per-frame noise into blocky mush, which reads as an artifact. Adding grain and then compressing hard is the worst of both.
Can I remove film grain later?
You can reduce it. A denoise filter recovered about one decibel of the thirteen my grainy clip had lost against the clean original, and it left the file nearly as large. Setting the strength right up front is cheaper than fixing it afterwards.
Does film grain make a video look more expensive?
It can soften hard digital edges and hide banding in gradients. It can just as easily read as a filter, especially if the grain sits still while the picture moves, which is what the cheap fixed pattern does. Judge it at full size in the export.
The short version
Film grain is random per-pixel detail, so an encoder pays for every bit of it. Light grain at strength 8 is close to free. From 16 up, the file size climbs in multiples, and on a fixed bitrate the picture pays in quality instead. The setting that catches people out is the pattern flag: a still texture costs 40 to 50 times a blank frame, while a pattern that regenerates each frame costs thousands of times more. Fix the seed so exports repeat, keep grain on luma, start low, and check the exported size against a clean export of the same edit. For the encoder mechanics, the FFmpeg H.264 encoding guide is the reference I keep open, and the noise filter documentation lists every flag used here.