
How to Add a Vignette to Video: Darken the Edges Without Crushing Them
A vignette is the cheapest way to make a flat frame look intentional. It pulls the eye toward the middle by darkening the edges, and every editor ships one. Then you render, open the file, and the corners look wrong. Sometimes it’s a grey smear that reads as a mistake. Sometimes it’s four solid black wedges that weren’t in the preview.
I spent this run measuring the FFmpeg vignette filter against flat grey fields at seven brightness levels, on landscape and on vertical frames. The numbers explain both failures, and they show that the centre of your frame is never touched. Everything depends on two settings most people leave at their defaults, and one of them can paint 7.8% of a 1080p frame pure black at any angle.
Here’s what you’ll learn: how the falloff looks, which angle gives a usable edge, why the aspect setting kills corners on landscape video, what dither and mode change, and the exact vignette command I ran on a real clip with a measured result.
What a vignette does to the pixels
In a lens, vignetting is an optical fact. Light reaches the corners at a steeper angle than the centre, so they land dimmer, and the drop follows the cosine to the fourth power, the cos4 law. Editors add it back on purpose.
As an effect, a vignette is a multiplier. The filter measures each pixel’s distance from the centre and scales the pixel down as that distance grows. Zero distance means no change, which is why the middle of the frame survives every setting I tried. On a flat grey source the centre read 128 at angle PI/8, PI/6, PI/5, PI/4 and PI/3. Not 127. Not 126. 128.
The shape matters as much as the strength. On a 1920×1080 frame with the default aspect of 1, the falloff is a circle measured in pixels. The left and right edges sit 935 pixels from the centre, while the top and bottom edges sit only 515. At the default angle the left edge fell to 61 and the top edge held 104. That’s physically faithful, since a real lens behaves the same way, but it surprises people who expect an even ellipse around a widescreen frame.
Angle by angle, measured
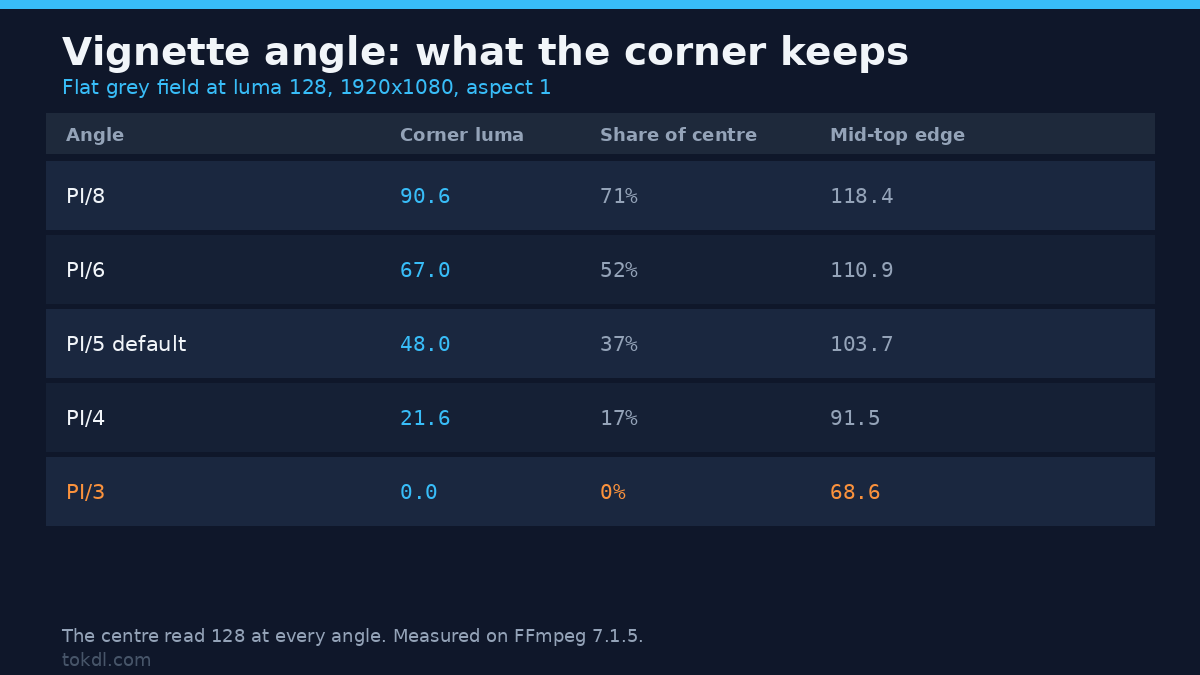
Angle is the strength control for the vignette filter, and the default is stronger than most tutorials admit. I rendered a flat grey field at luma 128 through the filter at five angles and read a 40×40 block in each corner, plus the mid-edge points, on a 1080p frame.
| Angle | Corner luma | Share of centre | Mid-left edge | Mid-top edge |
|---|---|---|---|---|
| PI/8 | 90.6 | 71% | 97.9 | 118.4 |
| PI/6 | 67.0 | 52% | 77.9 | 110.9 |
| PI/5 (default) | 48.0 | 37% | 61.0 | 103.7 |
| PI/4 | 21.6 | 17% | 35.9 | 91.5 |
| PI/3 | 0.0 | 0% | 3.2 | 68.6 |
The default PI/5 isn’t a gentle effect. It leaves a corner at 37% of the centre, which is a strong, obvious darkening. If you want something you have to look for, PI/8 is the setting, and even that takes 29% off the corner. PI/3 clips the corners to zero, on a mid-grey source, before any encoding.
So the useful range is narrow. PI/8 for a hint, PI/6 for an obvious but soft edge, PI/5 when you want people to notice. Past PI/4 you’re not adding a vignette any more, you’re painting the corners out.
The aspect setting that paints black corners
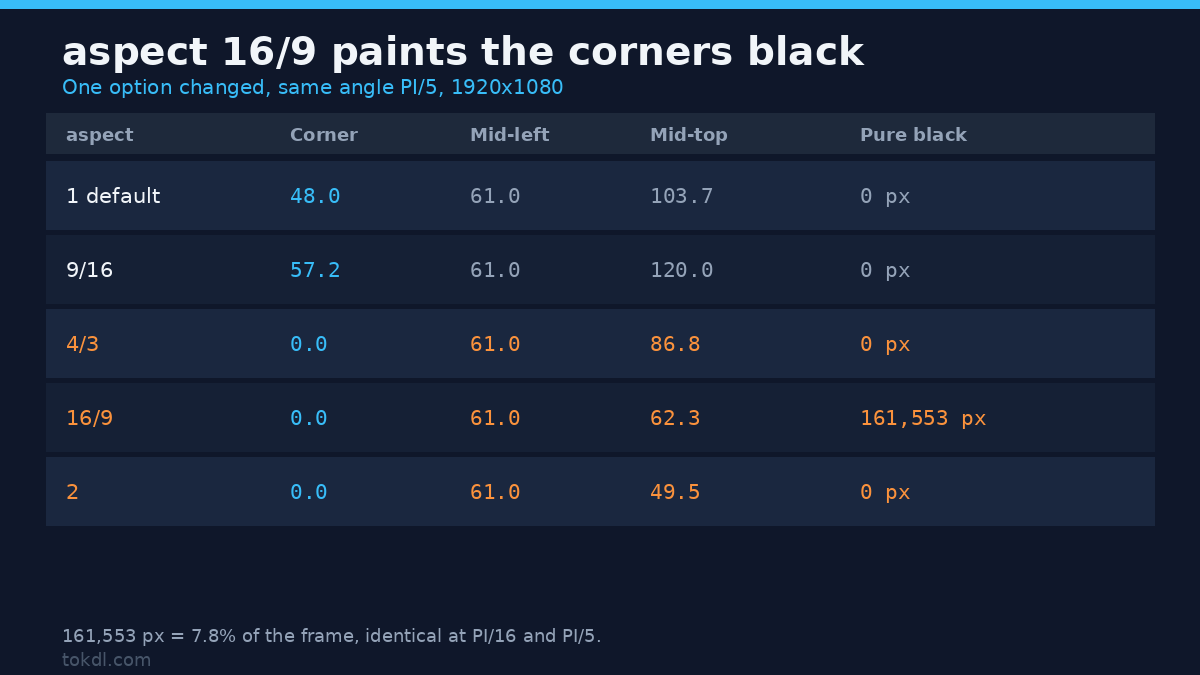
The filter has an aspect option, default 1/1, and the documentation barely explains it. Since the falloff is a circle in pixel space, the obvious fix for an uneven frame is to set aspect to the frame’s own ratio. That’s what I tried first, and it’s the setting that produces the black wedges.
| aspect | Corner | Mid-left | Mid-top | Edge gap | Pure black |
|---|---|---|---|---|---|
| 1 (default) | 48.0 | 61.0 | 103.7 | 42.7 | 0 px |
| 9/16 | 57.2 | 61.0 | 120.0 | 59.0 | 0 px |
| 4/3 | 0.0 | 61.0 | 86.8 | 25.8 | 0 px |
| 16/9 | 0.0 | 61.0 | 62.3 | 1.3 | 161,553 px |
| 2 | 0.0 | 61.0 | 49.5 | 11.5 | 0 px |
Look at the 16/9 row. The edge gap collapses to 1.3, so the four mid-edges are finally even. The cost is 161,553 pixels that come back as pure black, 7.8% of the frame, in four wedges along the corners. That count didn’t move when I tried PI/16, PI/12, PI/10, PI/8, PI/6 or PI/5. It’s the same 161,553 pixels every time, because the corners land outside the radius the filter maps and get written as zero.
I rendered it and looked, because a number that stable is either a real clamp or a measurement artefact. It’s real: the ellipse edge is a hard boundary with solid black on the far side, like a bad matte.
On landscape, leave aspect at 1 and use angle for strength, unless you want black corners on purpose. On a vertical frame the arithmetic flips, because the frame ratio is below 1. On a 1080×1920 clip, aspect 1 gave a mid-left of 103.7 and a mid-top of 61.1, so the long edges darkened more. Setting aspect to 9/16 evened them at 103.7 and 103.0, lifted the corner from 48.0 to 83.6, and produced no black pixels at all. Vertical is where the aspect option earns its keep.
Forward, backward, and the dither you should leave alone
The mode option reads like a choice between two strengths. It isn’t. Walking out from the centre along one scanline, forward mode gave 128, 120, 98, 68, 37. Backward gave 128, 136, 164, 228, 255. Backward brightens toward the edges and clips: 395 pixels on that line sat at pure white. It’s the inverse of a vignette, not a softer version of one, and it won’t cancel a lens vignette either, because the clip destroys whatever was in the corners.
Dither is on by default and should stay on. Turning it off on a flat field widened the longest run of identical pixel values from 34 to 88 pixels, and lifted the mean plateau from 3.0 to 11.7. The number of distinct levels stayed at 82 either way. What dither buys you isn’t more gradations, it’s broken-up banding: the same steps, scattered into noise the eye reads as texture instead of rings.
Brightness decides how much a vignette costs
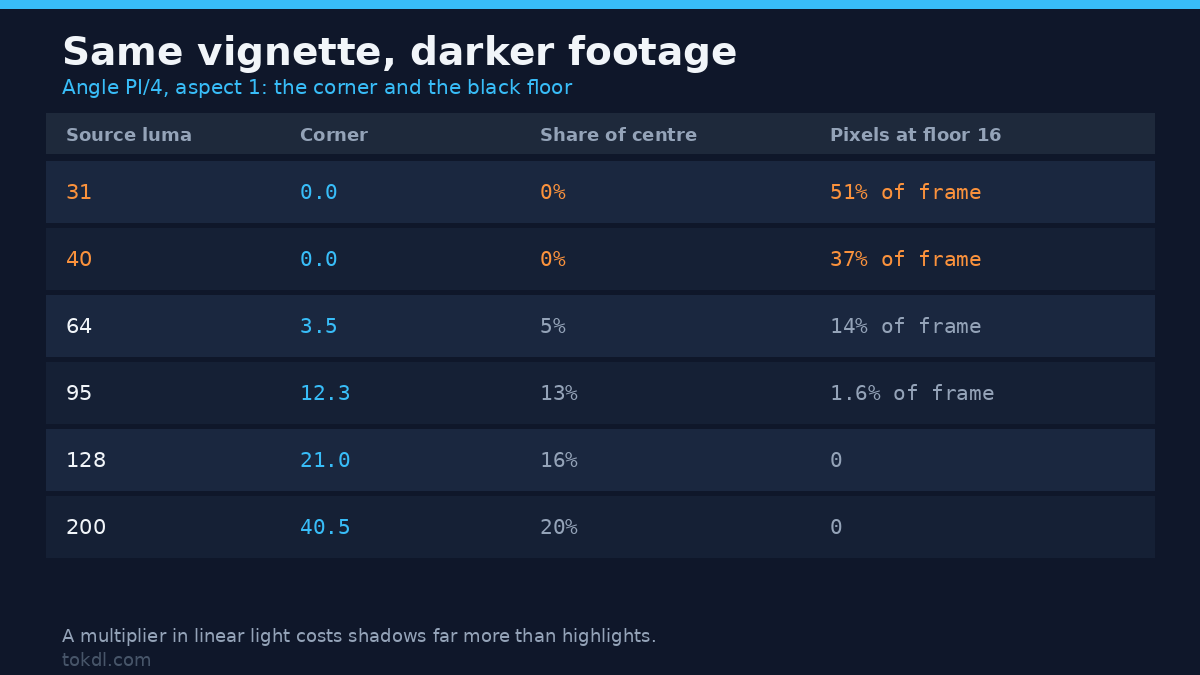
This is the part that changed how I’d use the filter. A multiplier sounds linear, but the result isn’t, because the multiply happens in linear light and then gets written back into 8-bit values. I ran the same PI/4 vignette over seven flat fields and compared the corner to the source.
| Source luma | Corner luma | Corner share | Pixels at the 16 floor |
|---|---|---|---|
| 31 | 0.0 | 0% | 51% |
| 40 | 0.0 | 0% | 37% |
| 64 | 3.5 | 5% | 14% |
| 95 | 12.3 | 13% | 1.6% |
| 128 | 21.0 | 16% | 0% |
| 160 | 29.3 | 18% | 0% |
| 200 | 40.5 | 20% | 0% |
On a bright field the corner keeps 20% of its value, on a mid grey 16%. On a field at luma 40 it keeps nothing, and 37% of the whole frame sits at or below the broadcast black floor of 16. That’s the difference between a moody edge and a hole. If your footage is already dark, the angle that looked fine on a test chart will eat your corners, and no bitrate brings them back. Drop to PI/8, or skip the effect on that shot.
Stacking two vignettes makes it worse in a way that’s easy to miss. If the camera already vignetted the frame, adding another one multiplies the loss. Two PI/6 passes took the corner from 75.2 to 41.2, which is 45% darker than a single pass. Not twice as dark, but far more than most people expect from “a little more”.
The vignette command I ran
Everything above comes from stills. To check it survives a real encode, I built a 5 second 1080p clip with stereo audio and ran this exact command:
ffmpeg -i input.mp4 -vf "vignette=angle=PI/6:aspect=1" -c:v libx264 -crf 20 -c:a copy output.mp4It exited 0, the output probed at 5.000 seconds with H.264 video and AAC audio intact, and the corner luma of the first frame moved from 118.7 to 60.8 while the centre stayed at 127.5. The filter cost 2.21% in file size against the same encode without it at CRF 20, 4,396,447 bytes against 4,301,492. Dark corners don’t make a file smaller, because the gradient itself costs bits to describe.
Keep -c:a copy so the audio isn’t re-encoded for no reason, and put the filter before the encoder settings as shown so the chain reads in the order it runs. For the subtle version, change one value to angle=PI/8.
If you’re working in an editor instead
Premiere, Resolve and CapCut all ship a vignette control with an amount slider and a feather or softness slider, and the measured lesson carries over unchanged. Set the strength first, then the softness, and check the result on a scope rather than on your preview panel. A corner that reads 37% of centre is a strong effect. If your viewer is crushing blacks, the same corner can look like a tasteful edge on your monitor and like a black frame on a phone.
Common mistakes worth avoiding
Treating the default as subtle. PI/5 leaves 37% of centre brightness in the corner. It’s a statement, not a finishing touch.
Using aspect to even out a landscape frame. The mid-edges line up and the corners go solid black, 7.8% of the frame, at every angle.
Adding one to dark footage. At PI/4, a field at luma 40 lost 37% of the frame to the black floor. Shoot it brighter, lift it first with a proper color correction pass, or use a weaker angle.
Reaching for backward mode as an undo. It brightens to clipping, and 395 pixels on one scanline hit pure white. Removing a lens vignette is a correction job, not this filter.
Denoising after the vignette. The darkening compresses the corner into fewer code values, which is exactly where noise reduction has the least to work with. Clean the noise first, then vignette.
Questions I get about vignettes
Does a vignette work on vertical video? Yes, and it behaves differently. On a 1080×1920 frame with aspect 1, the long edges darken more than the short ones, which is what a lens does. Setting aspect to 9/16 evens the four edges and lifts the corner to 83.6, with no black pixels.
Will the same angle look the same at 4K? The angle is relative to the frame, not to a pixel count, so the percentages should carry over. I measured at 1080p only, so treat 4K as untested and check one frame.
Can I undo a vignette after rendering? Not cleanly. It’s a destructive multiply, and backing it out means brightening the corners, which clips anything that was already near white. Keep a copy of the graded master before you apply it.
How does this compare with adding grain? They solve different problems, but both are measured effects with real numbers behind them. The film grain guide uses the same flat-field method, and the two stack badly if you push both. For the shape side of the argument, the aspect ratio guide covers how 16:9 and 9:16 framing interacts with edge detail.
The short version
A vignette multiplies the frame by distance from the centre, so the middle never changes and the corners take everything. Use angle for strength, keep aspect at 1 on landscape video, leave dither on, and check a corner value instead of trusting the preview. On a 1080p frame, PI/8 keeps 71% of the corner and PI/5 keeps 37%, which is the whole difference between a grade and a smudge.
I’d rather ship a frame with 5% too little effect than a file with black wedges in the corner. If you only remember one number from this run, make it the 161,553 pixels that aspect 16/9 writes as pure black: it’s the one setting that looks right on paper and fails on delivery. The filter documentation lives at ffmpeg.org, and the angle table above is what I’d check it against.