
How to Fix Audio Clipping: Repair Distorted Sound Without Re-recording
You record a take that sounded fine in the room, you raise the level in your editor to match the rest of the video, and the result crackles. That crackle is audio clipping, and it’s the one audio defect a level change can’t undo. The peaks were cut off when the file was written, so there’s nothing left at the top of the waveform to turn down or up.
This guide is about repairing audio clipping that’s already in the file. It shows you how to confirm that the defect is audio clipping and not hiss or a bad microphone, what FFmpeg’s de-clipper does to the samples, and where the repair stops working. If your problem is level rather than damage, the fix lives in normalizing audio instead.
What you’ll learn
- How to tell audio clipping from noise, using two numbers FFmpeg prints for free.
- What a de-clipper reconstructs, and what it only smooths over.
- Two traps that turn a repair command into a fresh defect.
- The recording habit that costs about 3 dB of loudness and keeps the waveform intact.
What Audio Clipping Does to a Waveform
Digital audio has a ceiling. A sample can sit at full scale or below it, never above, so a signal driven past that ceiling doesn’t get louder, it gets flat-topped. The converter writes the same maximum number for every sample that wanted to go higher, and the smooth curve turns into a plateau with hard corners. Those corners are the harmonics you hear as grit.
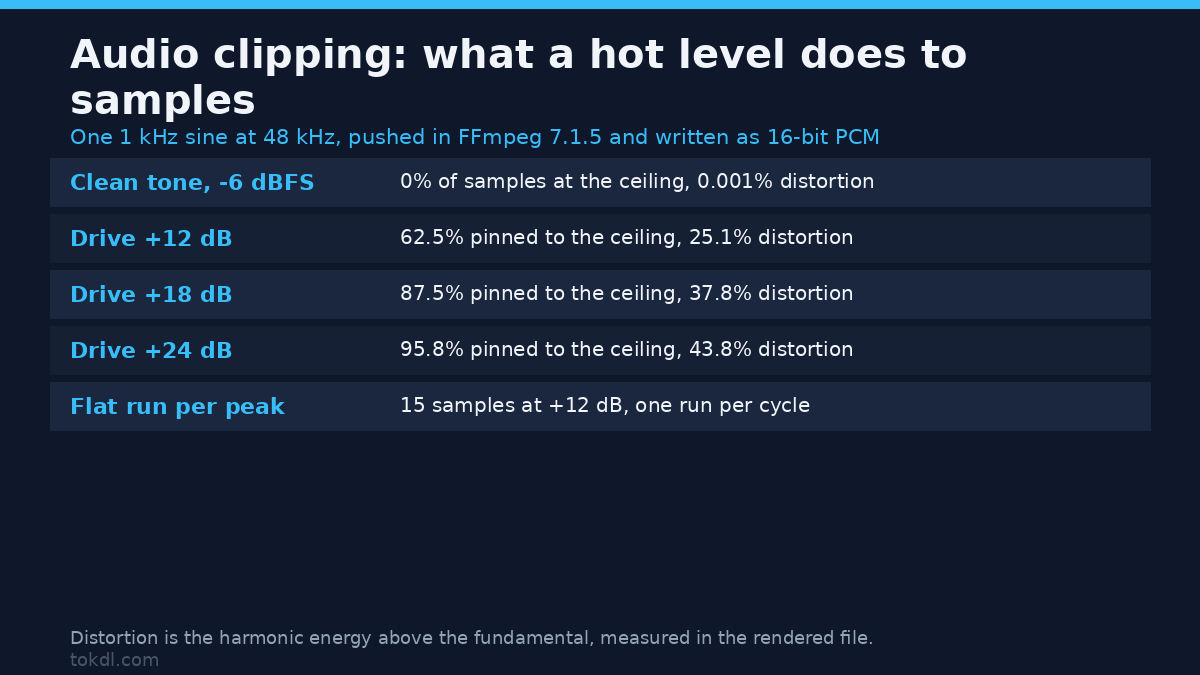
You can watch it happen on a clean test tone. Take a 1 kHz sine at 48 kHz recorded at −6 dBFS, push it with FFmpeg, and write it back as 16-bit PCM, which is what a converter does when its input overloads:
ffmpeg -i tone.wav -af volume=12dB -c:a pcm_s16le hot.wavMeasured on this machine (FFmpeg 7.1.5), the tone comes back with 62.5 percent of its samples pinned to the ceiling. Push harder and the plateau widens: 87.5 percent at +18 dB, 95.8 percent at +24 dB. Total harmonic distortion climbs with it, from 0.001 percent on the clean tone to 7.2 percent at +7.5 dB, 14.3 percent at +9 dB, 25.1 percent at +12 dB and 37.8 percent at +18 dB.
The shape of the audio clipping matters more than the percentage. Clipped audio from a sine produces one flat run per cycle, all the same length: at +12 dB the runs are exactly 15 samples each, 6,000 of them. A real recording is messier, because only the loudest moments reach the ceiling, so its runs are shorter and uneven: on a three-partial test tone the flat runs at +12 dB average 3 samples with a maximum of 5.
How to Confirm Audio Clipping in 30 Seconds
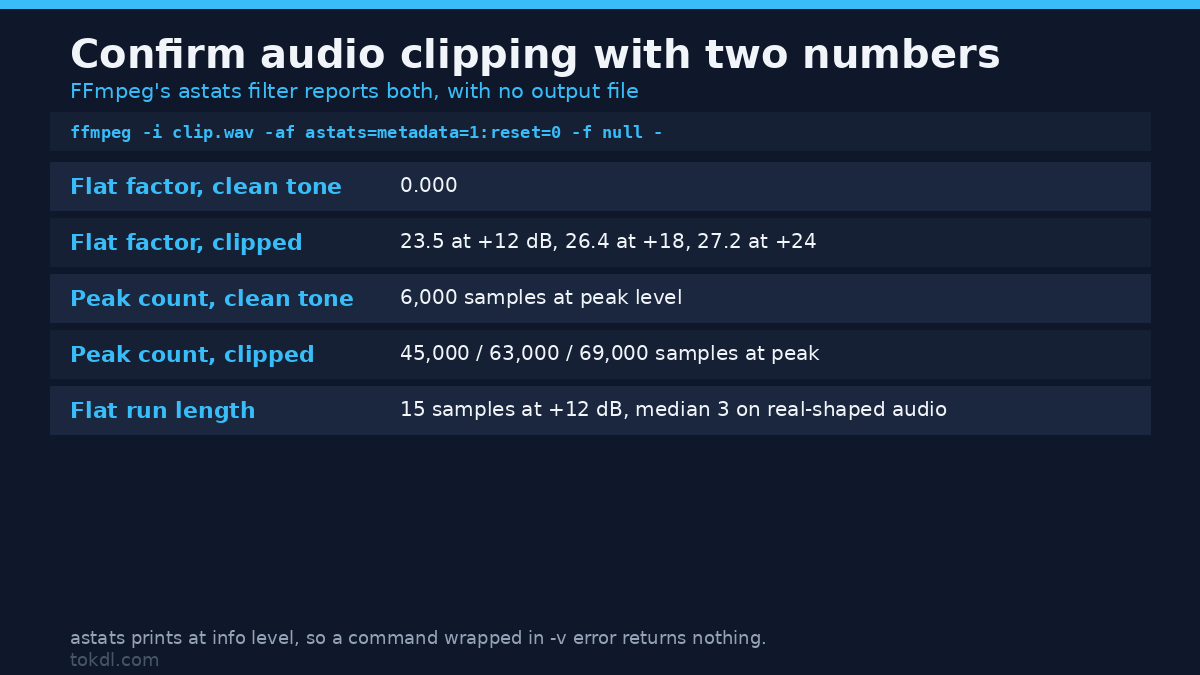
Before you repair anything, prove that audio clipping is the defect. FFmpeg’s astats filter reports two numbers that matter here. Run it on the file with no output:
ffmpeg -hide_banner -i clip.wav -af astats=metadata=1:reset=0 -f null -Read Flat factor and Peak count: the peak count says how many samples are pinned to the ceiling, and the flat factor says how much audio clipping is behind them. On a clean tone the flat factor is 0.000, and six thousand samples sit at the peak level. On the clipped copies of that same tone it reads 23.5 at +12 dB, 26.4 at +18 dB and 27.2 at +24 dB, while peak count jumps to 45,000, 63,000 and 69,000. A flat factor above zero means samples are sitting on the ceiling in groups, which is the signature of audio clipping rather than loudness. If the flat factor is 0.000 and the file still sounds rough, the problem is noise or a bad gain stage, and the fixes in removing background noise are the right ones.
Repair: What FFmpeg’s adeclip Can and Can’t Do
FFmpeg ships a de-clipper called adeclip, documented at ffmpeg.org. Samples detected as clipped are replaced by interpolated samples built with autoregressive modelling. It doesn’t recover the lost data, it draws a plausible curve across the plateau using the samples on both sides.
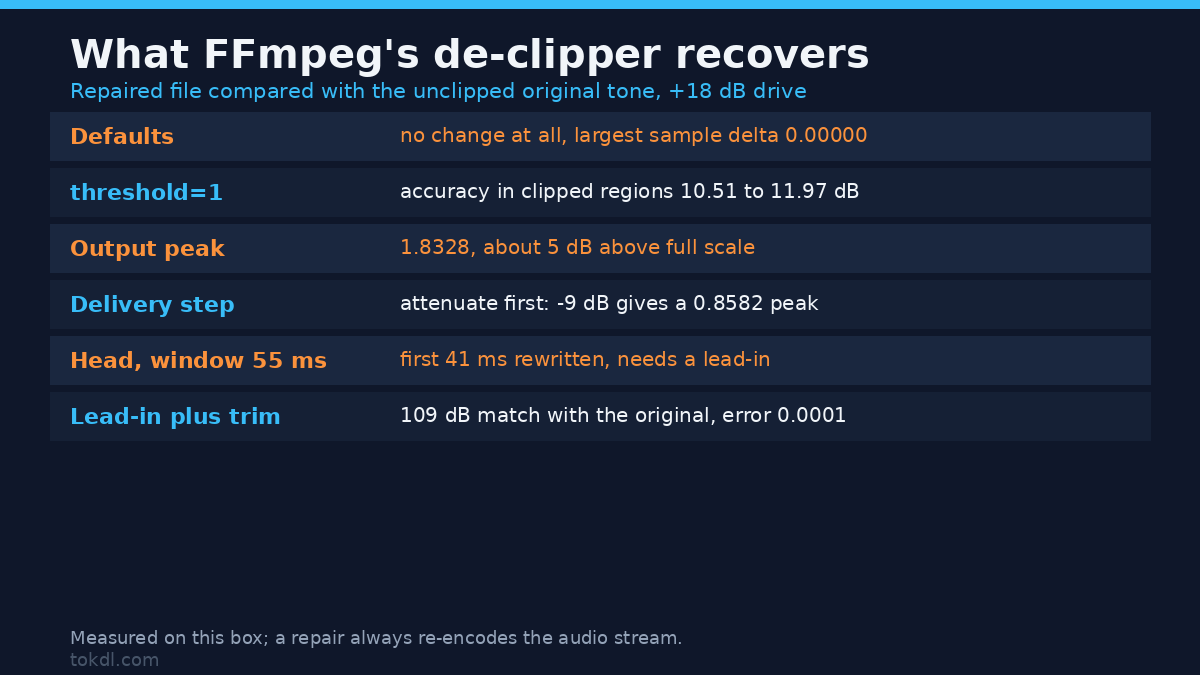
ffmpeg -i hot.wav -af adeclip -c:a pcm_f32le repaired.wavTesting that command against a known ground truth is where it gets interesting. I built a three-partial tone, kept the unclipped original as the reference, clipped a copy at +18 dB, repaired it, and measured how close the repaired samples came to the original. With the default parameters the output was byte-identical to the input outside the first 42 milliseconds: the filter changed nothing, and accuracy in the clipped regions stayed at 10.51 dB. The default threshold of 10 didn’t detect any clips in that file.
The threshold option is the lever. The documentation notes that higher values make clip detection less aggressive, and the measured sweep agrees, with one twist: only the most aggressive setting fired on this content.
| adeclip setting | Largest sample change | Output peak | Accuracy in clipped regions |
|---|---|---|---|
| defaults | 0.00000 | 1.0000 | 10.51 dB, unchanged |
threshold=1 |
0.83283 | 1.8328 | 11.97 dB |
threshold=1:arorder=25 |
0.07234 | 1.0723 | 10.71 dB |
hsize=100 |
0.00000 | 1.0000 | 10.51 dB, unchanged |
window=100:threshold=1 |
1.22660 | 2.2266 | 10.51 dB, unchanged |
The single combination that helped, threshold=1, bought about 1.5 dB of accuracy in the clipped regions, which is real but modest, and it came with two side effects worth understanding before you use it.
Trap 1: the repair damages the head of the file
Run adeclip on a file with no clipping at all and it still rewrites samples. On the default window of 55 milliseconds it replaced samples 1 through 1978, which is 41 milliseconds of audio, with something close to silence: where the input read 0.2328, the output read 0.0002. Against the untouched original that head region scored 0.14 dB of accuracy, while everything past it matched to within 0.00004. Drop the window to 25 milliseconds and the damaged region shrinks to 18.7 milliseconds.
The fix is a lead-in. Prepend one copy of the audio, repair the doubled file, then trim the first copy away:
ffmpeg -i in.wav -i in.wav -filter_complex "[0:a][1:a]concat=n=2:v=0:a=1[a]" -map "[a]" -c:a pcm_f32le twice.wav
ffmpeg -i twice.wav -af adeclip -c:a pcm_f32le twice_rep.wav
ffmpeg -i twice_rep.wav -af "atrim=start=3:duration=3,asetpts=PTS-STARTPTS" -c:a pcm_f32le out.wav
With that sequence the repaired file matched the original at 109 dB of accuracy with a maximum error of 0.0001, which is a clean pass.
Trap 2: repaired peaks sit above full scale
Repairing audio clipping means pushing samples above the old ceiling, because that’s where the missing peaks were. With threshold=1 the repaired file peaked at 1.8328 against a source ceiling of 1.0000, so it carries samples about 5 dB above full scale. Writing that straight to 16-bit PCM re-clips every one of them and hands you a second generation of the exact defect you paid to remove. Attenuate before the integer write:
ffmpeg -i hot.wav -af "adeclip=threshold=1,volume=-9dB" -c:a pcm_s16le deliver.wavThat version measured a peak of 0.8582 with zero samples pinned to the ceiling. One more restriction: a filter and a stream copy can’t run in the same command. Adding -af adeclip next to -c:a copy exits with code 218 and writes no file, so repairing clipped audio always means re-encoding the audio stream.
The Cheaper Fix: Stop the Peak Before It Clips
Repairing audio clipping is the expensive path. Prevention costs one filter and a little loudness. Take the same tone, drive it 9 dB up, and catch the peak with a limiter instead of letting the converter flatten it:
ffmpeg -i tone.wav -af "volume=9dB,alimiter=limit=0.891:level=disabled" -c:a pcm_s16le limited.wavThe limiter version measured 0.002 percent distortion with no flat-topped samples, against 37.8 percent for the same take with audio clipping at the same drive level. It’s quieter, at −4.02 dB RMS against −0.47 dB, so you’re trading roughly 3.5 dB of loudness for a clean waveform. In a video mix that trade is worth it. Set the ceiling to −1 dBFS or so, leave True Peak headroom if the file is going to a streaming platform, and the encoder in your audio codec choice never sees an overloaded sample.
When Repairing Audio Clipping Is the Wrong Answer
If audio clipping has caught more than about half the samples, the waveform is closer to a square wave than to music, and no interpolator can guess what used to be inside a plateau that wide. My +21 dB test file had 60.8 percent of its samples on the ceiling, and accuracy in those regions sat at 8.5 dB before any repair and 10.5 dB after. That’s a smoothing operation, not a restoration.
Purpose-built editors go further than FFmpeg, because they offer visual rebuilding rather than a single autoregressive pass. Audacity’s Clip Fix and the de-clip modules in commercial restoration suites let you drag the reconstructed curve by hand after the automatic pass. I can’t measure those tools on this headless box, so treat their quality claims as unverified here. When not to bother: a recording clipped this hard sounds wrong in a way that survives repair, so if the take can be recorded again, do that first.
Common Mistakes When Repairing Audio Clipping
- Normalizing a clipped file and calling it repaired. Peak normalization lifts the ceiling without restoring the shape, and loudness normalization makes the damage noisier by raising everything around it. Audio clipping is a repair job, and it belongs before any normalization pass.
- Trusting an exit code. The default
adecliprun exits cleanly and changes nothing, so the audio clipping stays in the file. Check the file that came out, not the number that came back. - Repairing the lossy file instead of the master. If the clip is baked into an AAC or MP3 encode, repairing the decoded audio leaves the codec’s own artifacts behind.
- Skipping the check afterwards. Re-run
astatsand compare the flat factor. If it hasn’t moved, the filter detected nothing.
FAQ: Repairing Audio Clipping
Can audio clipping be repaired? Partly. A de-clipper interpolates across the flat sections, which measurably reduces the distortion on mildly clipped material, and it can’t recover peaks hidden inside a wide plateau. The wider the flat run, the less there is to recover.
Does FFmpeg’s adeclip fix clipped audio by default? Not on the test files here. With the default threshold of 10 it detected no clips and left the audio unchanged beyond its own window priming. Only threshold=1 made it act, and that setting pushes peaks above full scale.
Why does my repaired file sound quiet? The reconstruction added peaks the file didn’t have, so the average level dropped. Measure with loudnorm, then normalize once at the end.
Can I repair clipped audio without re-encoding? No. Filtering and stream copy are mutually exclusive, and the combination exits with 218 and writes nothing.
Is a limiter the same as clipping? No. Clipping discards everything above the ceiling, while a limiter reduces the gain of the loudest moments before they reach it. At the same drive level here, that was 37.8 percent distortion against 0.002 percent.
Conclusion
Audio clipping happens at the moment of capture or conversion, when a signal driven past full scale gets its peaks flattened onto the ceiling. You can prove it in 30 seconds with the flat factor and peak count that astats prints, and you can measure how serious the audio clipping is by comparing harmonic distortion against a clean reference. What you can’t do is undo it: FFmpeg’s adeclip interpolates across the plateau, and in these tests it needed its most aggressive detection setting to act at all, then pushed the rebuilt peaks above full scale.
So treat the samples as evidence and the recording as the fix. Keep peaks near −12 dBFS while you record, catch the loud moments with a limiter instead of a converter’s ceiling, and check the flat factor before you publish, the same discipline you’d use in sample rate checks. The files you never clipped will always sound better than the ones you reconstructed.