
How to Remove Background Noise From Video (Free Tools, 2026)
You record an interview in a kitchen, play it back on a laptop, and the refrigerator owns the soundtrack. The picture is fine. The sound is the problem.
Most room noise is steady: a fan, a hiss, an electrical buzz, an air conditioner cycling. Steady noise is the easiest kind to remove, because software can learn its shape from a second of silence and subtract it from everything else. Noise that changes shape, like a dog or passing traffic, is a different problem and often not solvable after the fact.
You can remove background noise from video three ways: one command line, a free audio editor, or a switch inside the editor you already own. This guide covers all three, the settings that actually matter, and the cases where the honest answer is that the recording can’t be rescued.
The Short Answer
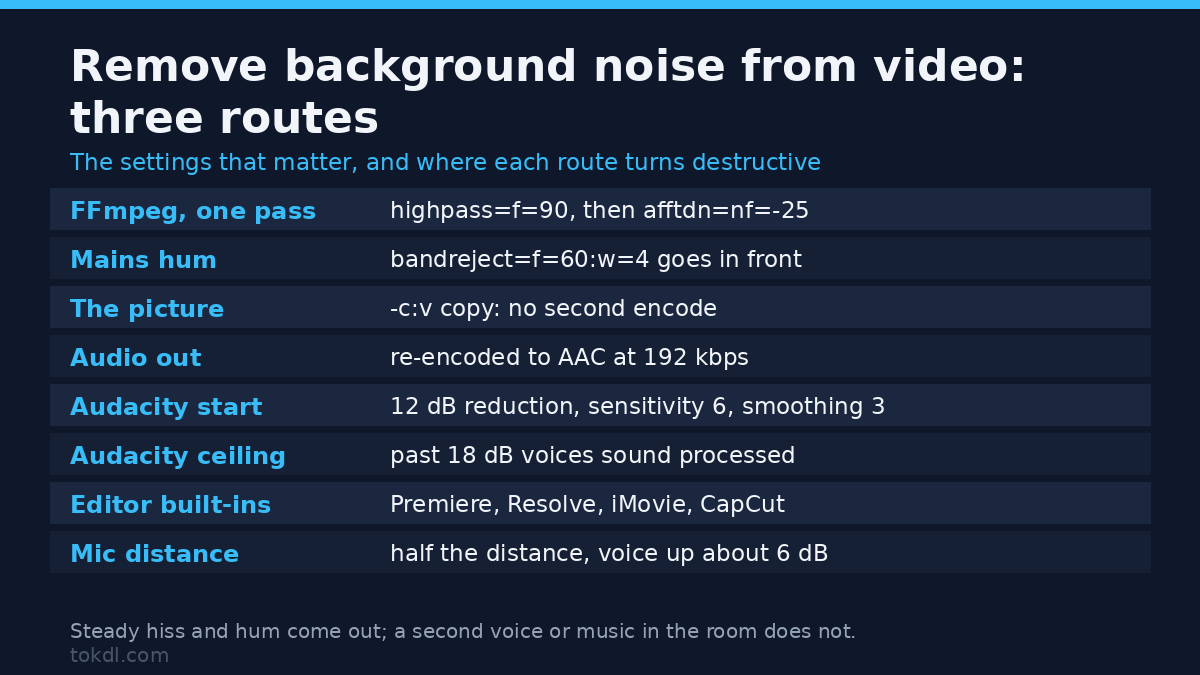
A high-pass filter followed by a denoiser will clear a steady hum or hiss in a single pass, and both run in one FFmpeg command. Start with the filter at 90 Hz and a noise floor near -25 dB, process a twenty-second sample, and listen before you touch the whole file.
If the noise is a voice, a television, or music leaking in from another room, no denoiser will separate it cleanly. Those sounds share the same frequency range as a human voice, so subtracting them also subtracts the person you’re trying to keep.
Before You Start: What You Need
Four things, and none of them cost money: a copy of the file, so the original stays untouched; headphones, because laptop speakers hide exactly the frequencies you’re trying to clean; a quiet stretch of twenty seconds you can listen to on its own; and an honest answer about what the audio is for. The file copy matters most, because a badly denoised track can’t be undone.
On the software side, FFmpeg is free and runs on Windows, macOS and Linux. Audacity is free and needs no commands at all. The editors most people already own, including Premiere Pro, DaVinci Resolve, iMovie and CapCut, have a noise control built in, usually one switch deep inside an audio panel.
Before you touch anything, check whether the noise is in the recording or in your playback setup. Put on headphones and listen to a section where nobody speaks. If the hum disappears there, the file is fine and you’re chasing a ground loop on your own desk.
Method 1: Remove Background Noise From Video With FFmpeg
This is the fastest route, and it leaves the picture untouched. FFmpeg cleans the audio stream and copies the video stream bit for bit, so there’s no second round of compression on the image.
ffmpeg -i input.mp4 -c:v copy -af "highpass=f=90,afftdn=nf=-25" -c:a aac -b:a 192k output.mp4Read the command left to right: -c:v copy keeps every video frame exactly as it was recorded, and highpass=f=90 discards everything below 90 Hz, which is where rumble, handling noise and desk vibration live. afftdn=nf=-25 is the FFT denoiser, told that the noise floor sits about 25 dB below the signal. The audio is then re-encoded to AAC at 192 kbps.
Now the order of work. First, copy the file to a new name and keep the source. Second, add -t 20 to the command so it stops after twenty seconds, and run it on that sample.
Third, listen to the clip on headphones at a normal volume, not at full volume. Fourth, change one number at a time until the noise is gone and the voice still sounds like a voice. Fifth, run the final command on the full file.
If the noise is a single tone rather than a hiss, a notch filter is more precise than a denoiser. Mains hum at 60 Hz or 50 Hz survives most denoisers because it’s a pure tone and not broadband noise. Add a band reject in front of the denoiser:
ffmpeg -i input.mp4 -c:v copy -af "highpass=f=90,bandreject=f=60:w=4,afftdn=nf=-25" -c:a aac -b:a 192k output.mp4Keep the band reject narrow. Four hertz around 60 Hz removes the hum and leaves the lower harmonics of a male voice intact; thirty hertz removes the hum and the chest of the voice with it.
The two dials you’ll actually turn are f on the high-pass filter and nf on the denoiser. Raising f from 90 to 150 makes the result thinner but kills more rumble. Lowering nf from -25 to -35 tells the denoiser the noise is quieter than it really is, which cleans less and damages less.
There are also filters for stubborn files. The FFmpeg filter reference lists them with their parameter ranges and the conditions where each one helps.
Method 2: Clean the Audio Without a Terminal
Audacity does the same job with a mouse, and it can open an MP4 directly by pulling the audio out of it. Select a stretch of recording where only noise is present, open the Effect menu, choose Noise Reduction, and click Get Noise Profile. That single step is what separates a clean result from a destroyed one.
Select the whole track and apply the effect a second time. Audacity’s defaults are deliberately conservative: 12 dB of noise reduction, sensitivity 6, frequency smoothing 3 bands is a sane starting point, and pushing past 18 dB is usually where voices start to sound processed. The Audacity manual on noise reduction explains what each slider does and why sensitivity is the one that bites.
If you would rather not leave the editor you already use, most of them have this built in. Premiere Pro hides it in the Essential Sound panel under Reduce Noise, and DaVinci Resolve keeps noise reduction on the Fairlight page.
iMovie has a Reduce background noise checkbox in the audio inspector, and CapCut offers a Reduce noise toggle in its audio settings. Each is the same idea wearing different clothes, and each carries the same risk of over-processing.
Recording applications handle the problem before it exists. OBS Studio ships RNNoise and Speex suppression filters under Audio Filters, and both run live while you capture. Zoom and Teams suppress background noise during a call, which is worth switching on if the call is going to be recorded. A browser-based speech enhancer can rescue a single voice track, but those tools are trained on speech and will mangle music.
One hardware note that no software can override: move the microphone closer. Room noise is largely a distance problem, and halving the distance to a cardioid microphone raises the voice by roughly 6 dB while leaving the room exactly where it was.
What Noise Removal Tools Can and Can’t Do
Spectral denoisers, such as FFmpeg’s afftdn and Audacity’s Noise Reduction, learn a fingerprint from a quiet moment and subtract it. Statistical denoisers such as anlmdn smooth out anything that repeats. AI speech enhancers are trained on voices and rebuild the parts they believe are missing.
To remove background noise from video, all of them need the same two conditions. The noise has to stay steady, and its frequencies have to differ from the speaker’s.
They handle fans, hiss, air conditioning, computer noise, tape hiss and electrical hum well. They handle a barking dog, traffic, a second conversation, cutlery, keyboard clicks and a television in the next room badly, or not at all. They also can’t undo clipping, distortion, a microphone muffled by a hand, or heavy reverb.
Over-processing has a signature, and it’s worth recognising before you export. A denoiser pushed too hard leaves a watery, metallic edge that audio engineers call musical noise, and it softens the consonants that make speech legible. The result passes a quick listen and fails a long one. If you can’t decide, process half the file and compare the halves back to back.
One more limit surprises people. These tools reduce noise; they don’t remove echo or reverb. A voice recorded in a tiled bathroom will still sound like a tiled bathroom afterwards, only quieter.
Rights, Consent and Responsible Use
Cleaning a recording doesn’t change who owns it. The audio in your file belongs to the person who recorded it, and if other people are speaking in it, their words and their performance are theirs. A denoised copy is still their content in a cleaner container.
Consent is separate from ownership, and it matters more. Recording rules differ by country and, in the United States, by state: some places require only one participant to agree, while others require everyone being recorded to agree. If you’re unsure which rule applies to you, say that you’re recording before you press the button.
Personal reference and redistribution are different acts. Keeping a copy for your own notes is one thing; publishing it, monetising it, or dropping it into someone else’s project is another, and the second needs permission. Music playing in the background of a recording stays licensed to whoever put it there, and removing the noise around it doesn’t license it to you.
When you do publish, the platform’s own rules apply on top of everything else. YouTube’s terms of service are a reasonable starting point for what a video host expects from an uploader.
Troubleshooting: When the Cleanup Doesn’t Work
The voice sounds underwater or metallic
You pushed the denoiser too far. Drop the reduction by 6 dB, lower the sensitivity, and compare against the untouched original. A quieter noise floor with a natural voice beats a silent floor with a phasey one.
The noise is gone but the speaker sounds muffled
Your high-pass filter is eating the voice. Move it down from 150 Hz toward 80 Hz, and check that you didn’t also apply a low-pass filter by accident. Men’s voices lose their body first, which is why 150 Hz is such a common mistake.
The hum is still there after denoising
A pure mains tone isn’t broadband noise, so a denoiser largely ignores it. Add a narrow band reject at 50 or 60 Hz, and confirm which frequency you need by listening, because the wrong one does nothing at all.
Clicks, plosives and mouth noise remain
These are transients rather than steady noise, so spectral subtraction leaves them in place. Repair them one at a time with a click remover or by hand in the waveform, and fix the cause next time by moving the microphone off-axis from the mouth.
The cleaned file drifts out of sync with the picture
Filtering can shift the audio stream slightly, and some players then show a mismatch. line the sound back up against the picture after processing instead of assuming it stayed put.
The noise comes back after uploading
The platform re-encodes your audio to a lower bitrate, which can make a barely audible hiss audible again. Leave a little more margin in the cleanup than you think you need, and keep the export audio bitrate at 192 kbps or above.
Frequently Asked Questions
Can I remove background noise from video for free?
Yes. FFmpeg and Audacity are both free and open source, and the noise controls inside iMovie, CapCut and the free tier of DaVinci Resolve cost nothing. Paid options add speed and convenience, not capabilities the free tools lack.
Why does the cleaned audio sound worse than the original?
Because too much was removed. A denoiser can’t tell a hiss from the quiet parts of a voice, so an aggressive setting deletes both. Halve the reduction strength and listen again before deciding.
Can I clean the audio without re-encoding the video?
Yes, and you should. Copy the video stream and re-encode only the audio, which keeps the picture bit-identical and avoids a second round of compression on the image.
Does Zoom or Teams noise suppression fix a bad recording?
Only for calls recorded through those apps with the setting switched on. It does nothing to a file that’s already sitting on your disk.
What if the background noise is another person talking?
Then the recording is usually beyond repair. A second voice occupies the same frequencies as the first, so any filter strong enough to remove it will remove the speaker you want to keep.
Should I export as WAV or MP3 after cleaning?
Export to WAV or FLAC if the video is going back into an editor, and let the final video export handle the compression. If all you need is the sound, pull out the audio track after cleaning rather than before, so the processed version is the one you keep.
Is a paid noise removal tool better than FFmpeg?
Not for steady noise. Paid tools are faster to learn and some handle speech better, but the physics hasn’t changed: when the noise overlaps the voice, no price fixes it.
Which Method Should You Use?
Pick by what is in front of you, not by what sounds most professional. For a single file, the FFmpeg route is the least destructive because it copies the video instead of re-encoding it. If you want a few more commands for everyday work, a broader command reference covers those cases.
If you’ve got several files, or the noise changes between them, use Audacity and take a fresh noise profile for each one. Profiles don’t transfer between recordings, and reusing an old one is the most common reason a second file comes out worse than the first.
If the file came from a call, start with the recording app’s own suppression and clean afterwards. If a music bed has to survive, or the noise is a second person, stop and re-record instead of fighting the file. Choose the method that needs the fewest decisions, then make one decision properly.
And when the noise is steady, quiet and buried under a clearly audible voice, leave it alone. A faint room tone sounds like a room; pure silence doesn’t. If you need to remove background noise from video regularly, put the high-pass command in a text file today so you’re not rebuilding it next time.