
How to Normalize Audio in a Video: Even Levels Every Time (2026)
Two buttons in your editing software say “normalize”, and they do different jobs. One pushes the loudest peak up to a ceiling. The other sets the average loudness of the whole clip. Choose the first one and the video still sounds quiet on a phone speaker.
This guide shows how to normalize audio in a video properly: measure what you have, pick a target that matches where the file will play, and apply the change without adding distortion. The same three steps work for a phone recording, a screencast and a finished edit.
What “Normalize Audio” Actually Means
Normalizing audio sets the level of a recording to a chosen target so different clips play back at a similar volume. Knowing how to normalize audio properly means knowing which target a tool is measuring against, because the two families below use different ones.
Peak normalization raises the highest sample in the file to a ceiling such as -1 dBFS. It prevents clipping and does nothing else. A clip with one door slam and quiet speech stays quiet, because the slam already used the headroom.
Loudness normalization measures perceived loudness in LUFS and moves the whole file toward a number such as -14 LUFS. It’s the one that makes a video sit evenly next to everything else in a playlist. Editors usually label it “loudness normalization” and keep it next to a meter.
If you only need the sound, extracting the audio track first makes every later step faster. Normalizing a 192 kbps AAC track is quicker than normalizing a video file, and the video stays untouched.
Check Your Current Level Before You Change Anything
You can’t aim at a target without knowing where you’re starting from. Measuring first also tells you whether the file is too quiet, already loud, or clipped past saving.
The quickest measurement is FFmpeg’s loudnorm filter running in analysis mode, with no output file. It reads the audio and writes nothing.
ffmpeg -i input.mp4 -af loudnorm=I=-14:TP=-1.5:LRA=11:print_format=json -f null -FFmpeg prints input_i, input_tp and input_lra. Keep that block; the second pass needs those numbers. The filter’s own defaults are stricter than web video: -24 LUFS integrated, -2 dBTP true peak, and a loudness range of 7. Full option list in the FFmpeg filter documentation.
If you would rather see the value in a window, most editors ship a loudness meter. DaVinci Resolve and Adobe Audition both show an integrated LUFS reading on their audio pages, and it matches what FFmpeg reports.
Method 1: How to Normalize Audio With FFmpeg
Single-pass is enough for a quick fix on consistent source material such as a screen recording or a voice-over. The result lands close to the target without any extra work.
ffmpeg -i input.mp4 -af loudnorm=I=-14:TP=-1.5:LRA=11 -c:v copy -c:a aac -b:a 192k output.mp4Three details matter. -c:v copy leaves the picture untouched, so the video isn’t re-encoded. I=-14 is the loudness target. TP=-1.5 keeps the true peak under the ceiling in case the encoder overshoots.
Two-pass is the version to use when the audio contains music. Measure first, then feed the numbers back into the filter.
ffmpeg -i input.mp4 -af loudnorm=I=-14:TP=-1.5:LRA=11:measured_I=-22.4:measured_TP=-3.1:measured_LRA=6.2:measured_thresh=-33.0:linear=true -c:v copy -c:a aac -b:a 192k output.mp4The measured values come from your own first pass, not from the example above. linear=true applies one flat gain change instead of riding the level up and down, which is what you want with music in the mix.
When the requested change would push the true peak past the target, FFmpeg falls back to dynamic mode on its own. Other everyday uses of the tool are collected in the FFmpeg command reference.
Method 2: How to Normalize Audio in a Free Editor
Take this route when the clip also needs trimming or cleanup, or when a command line isn’t an option. Both routes reach the same target.
In Audacity, select the whole track and open Effect > Volume and Compression > Loudness Normalization. The effect follows EBU R128 and defaults to -23 LUFS, so change the target to -14 for online video.
It processes whatever is selected, which means a partial selection gives you a partially normalized clip. The numbers behind the dialog are covered in the Audacity manual.
In DaVinci Resolve, the Fairlight page includes a loudness meter. Clip gain plus a limiter on the bus reaches the same target without re-encoding, and the meter confirms the result while you work.
CapCut, VN and other phone editors offer a per-clip Normalize or Volume leveling switch. It works on the clip you select and reports no LUFS value, which is fine for an impromptu upload and useless when you need a specific number.
What Target Should You Aim For?
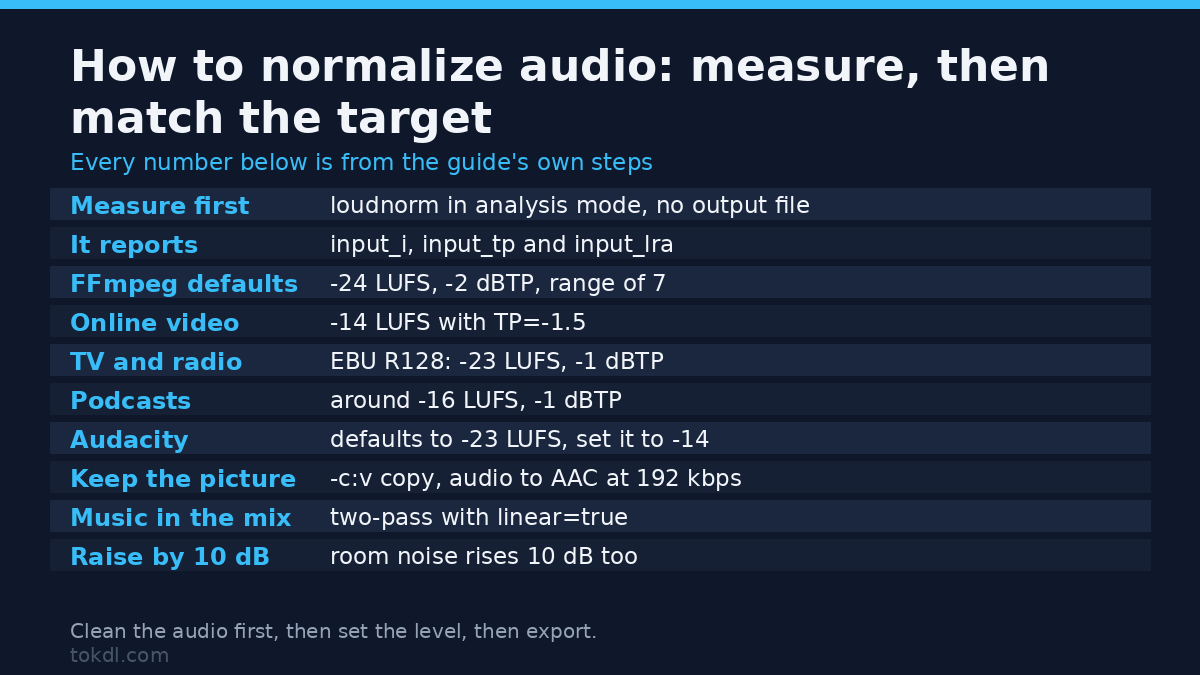
Match the target to the destination. Broadcast rules don’t apply to a phone upload, and over-loudening is the more common mistake.
| Destination | Common target | True peak |
|---|---|---|
| TV and radio (EBU R128) | -23 LUFS | -1 dBTP |
| Podcasts | around -16 LUFS | -1 dBTP |
| YouTube, Vimeo and other video platforms | around -14 LUFS | -1 to -1.5 dBTP |
| Shorts, Reels and TikTok | around -14 LUFS | -1 to -1.5 dBTP |
| Personal archive | leave the original untouched | n/a |
Video platforms don’t publish one official upload target. They apply playback normalization, so an upload far louder than everything else tends to be turned down rather than rewarded. Aim near -14 LUFS, keep the true peak at -1 dBTP or lower, and stop there.
What Normalization Tools Do, and What They Can’t Fix
Loudness normalization is a level change measured against a standard. It can’t repair clipped audio, remove a hum, or separate a voice from music sitting at the same level.
Expect side effects. A quiet recording raised by 10 dB has its room noise raised by 10 dB too, and the hiss becomes the first thing a viewer notices. If noise is the real problem, fix it before touching levels; there’s a separate walkthrough for cleaning up background noise.
Dynamic mode is where results spoil. It rides the gain across the file, which flattens a live performance and pumps the room tone between sentences. A linear two-pass avoids both.
Rights and Responsible Use
Changing the level of an audio track doesn’t change who owns it. Music, narration and someone else’s recording stay with their creators no matter how many times the file passes through a normalizer.
What you do afterwards matters more than the processing. Keeping your own recording at a sensible level for personal reference isn’t the same act as republishing a full music track inside a video you publish, and the second one needs permission or a licence. When you edit footage for a client, the paperwork comes from the client, not from the software.
For anything you upload to YouTube, the platform’s own rules on music and third-party material are the ones that count, and YouTube’s terms of service is where that starts. Read it once if you’re unsure what counts as third-party material.
Troubleshooting: When Normalizing Makes Things Worse
The whole clip got quieter. Your target was below the source’s real loudness. Lower the target by 2 dB and measure again before assuming the tool failed.
Hiss and room noise are now loud. The gain you applied lifted the noise floor along with the voice. Clean the noise first, then set the level.
It distorts after normalizing. The limiter is working too hard on peaks. Set the true peak to -1.5 or -2 dBTP, or drop the loudness target by a decibel.
Dialogue is still buried under music. Normalization treats the file as one signal, so everything rises together. This one needs level automation on the music bed, not a louder master.
The upload sounds quieter than the preview did. The platform normalizes playback against its own reference. That’s expected behaviour, not a fault in your export. If the picture drifts instead of the volume, start by fixing audio sync problems.
The two-pass result is worse than the single pass. The measured values usually came from a different file or a trimmed section. Re-run the first pass on the exact file you’re about to encode.
Frequently Asked Questions
How do I normalize audio without losing quality?
Keep the audio uncompressed while you work, then encode once. A gain change itself is lossless; damage comes from re-encoding the audio repeatedly at a low bitrate.
Is normalizing the same as amplifying?
No, they are different operations. Amplify applies a fixed number of decibels you choose, while normalizing measures the file first and calculates the change needed to reach a target.
What LUFS should I target for YouTube?
Around -14 LUFS integrated, with a true peak near -1 dBTP. That lands close to the platform’s playback reference, so your upload is neither pushed down nor left quiet.
Does normalizing ruin audio quality?
A linear gain change doesn’t damage quality by itself. Quality drops when dynamic mode pumps the level or when a limiter is asked to catch peaks it can’t handle.
Can normalization fix background noise or clipping?
Neither problem is fixable by normalizing, because only the level changes. Clipped peaks are already gone, and noise needs a repair pass before normalizing, not after.
Can I normalize audio on a phone?
Yes, but with a real caveat. Phone editors such as CapCut and VN have a per-clip normalize switch, yet they show no LUFS reading, so you can’t verify the result.
Why does my video sound quieter after uploading than on my computer?
Because the platform applies playback normalization of its own. Loud masters are turned down to the platform reference, so mixing far above it buys nothing.
Which Method Should You Use?
Use FFmpeg when the audio is already fine and you only need the level fixed, because it re-encodes nothing but the sound and takes seconds. Use Audacity or your editor when the clip still needs trimming, noise removal or music balancing in the same session. Use the phone app when the video is going straight to a social platform and nobody will measure it.
Whatever you choose, the order is the same once you know how to normalize audio: clean the audio, then set the level, then export. Fixing the level first and cleaning after wastes the gain change you just made, and there’s rarely a reason to redo it.