
How to Add a Voiceover to a Video: Record Narration That Syncs (2026 Guide)
The cut is finished. You hit record, read the script once, and stop. Playback tells a different story: every breath lands on the beat, the room rings under your voice, and by the second minute the words have drifted ahead of the picture.
Nobody fixes that with a new microphone. A voiceover is a recording problem and a timing problem, and both are solved before you open the editor. This guide shows you how to add a voiceover to a video in two ways, locked to a muted playback or recorded separately and synced, plus how to mix it under the original sound.
The direct answer
To add a voiceover, record the narration as its own audio file, then place it on a separate track beneath the video. You don’t overwrite the camera audio; you keep both and set the balance between them. That’s the whole method. What people call “adding a voiceover” is narration mixed against whatever the clip already sounded like.
If your video is silent from the start, the job is simpler: one track, recorded clean, aligned to picture. The two recording routes below cover both cases.
Before you record: room, mic and levels
Three things decide the final quality when you add a voiceover, and only one of them is equipment. In order of impact they’re the room, your delivery, and the microphone.
Pick the quietest soft-furnished space you’ve got. A bedroom with a rug, curtains and a bed beats a tiled kitchen every time. Hard parallel walls make any voice sound boxy, so the smaller and softer the room, the less reverb you’ve got to fight later.
Input level matters more than mic model. Aim for peaks near -12 dBFS and an average closer to -18 dBFS. A meter that only touches the top on your loudest word is what you want; one that sits red for the whole take means the gain needs to come down and the take needs to be redone.
Speak about 15 to 20 cm from the mic, slightly off-axis so plosives stop popping, and hold that distance constant. Turning your head to read a second screen will shift both your level and your tone. Read from one fixed point.
Method 1: Record narration over a muted playback
This is the fastest way to add a voiceover when your editing app can record your own voice while the timeline plays. The picture runs muted in front of you and you narrate against it, so the timing is right by construction.
- Set up the track. Add a new audio track before you add a voiceover, arm it for recording, and choose your microphone as the input. Mute the other tracks so the only thing you hear is yourself.
- Roll and read. Play the timeline from the start and speak to the picture. If a line lands early or late, keep going and correct it later instead of restarting the whole take.
- Monitor with headphones. Speakers feed your own voice back into the mic and smear the recording. Use closed-back headphones, one ear if you prefer, never laptop speakers.
- Record in passes, which is how to add a voiceover in one sitting. One pass per section is easier to repair than one endless take. A stumble then costs you ten seconds rather than the whole script.
Screen recorders that capture system audio and microphone on separate tracks are handy here, because they hand you the narration isolated from any music you played just to keep time. That separation makes it the simplest way to add a voiceover to a screen recording.
Method 2: How to add a voiceover to a video by recording it separately
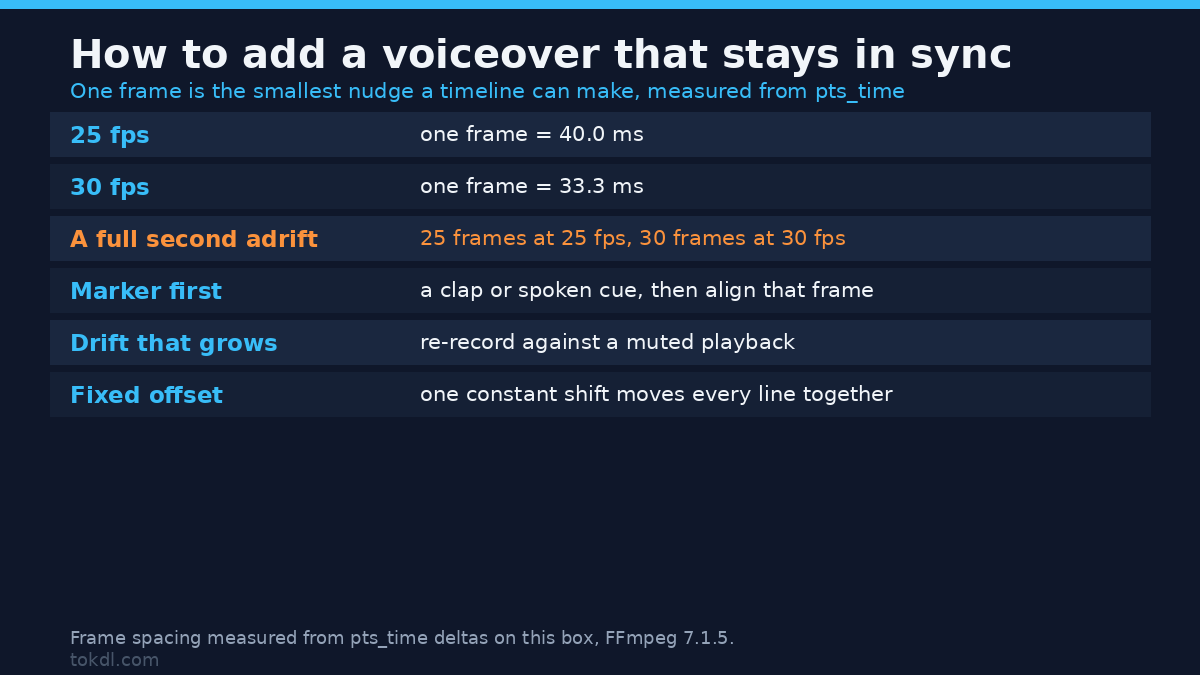
Recording separately before you add a voiceover gives you better sound and full control, at the cost of one extra syncing step. It’s the better choice when the room is noisy, when you want to retake single lines, or when one script will narrate several videos.
Use any audio recorder on the phone or computer, or a dedicated program such as the free Audacity editor. Record a hand-clap or a spoken marker at the top of the take, then read the script while you watch the picture on a second screen or on paper.
In the editor, drop the file onto its own track. Slide it until the marker sits on the frame it belongs to, then nudge in single-frame steps for the last few milliseconds: one frame is 40.0 ms at 25 fps and 33.3 ms at 30 fps, measured from the frame timestamps. Zoom in far enough that you can see the waveform against the picture before you call it aligned.
Mixing narration with the original audio
Once you add a voiceover and it sits on its own track, the mix is three moves: lower the original audio, keep the narration steady, and trim the silence between lines. Get those right and the voice sits on top of the picture instead of fighting it.
Whenever you add a voiceover, drop the camera track or music bed by 12 to 18 dB under it. Some editors offer ducking that reads the narration level and does this automatically; if yours doesn’t, draw the volume down by hand across each spoken section.
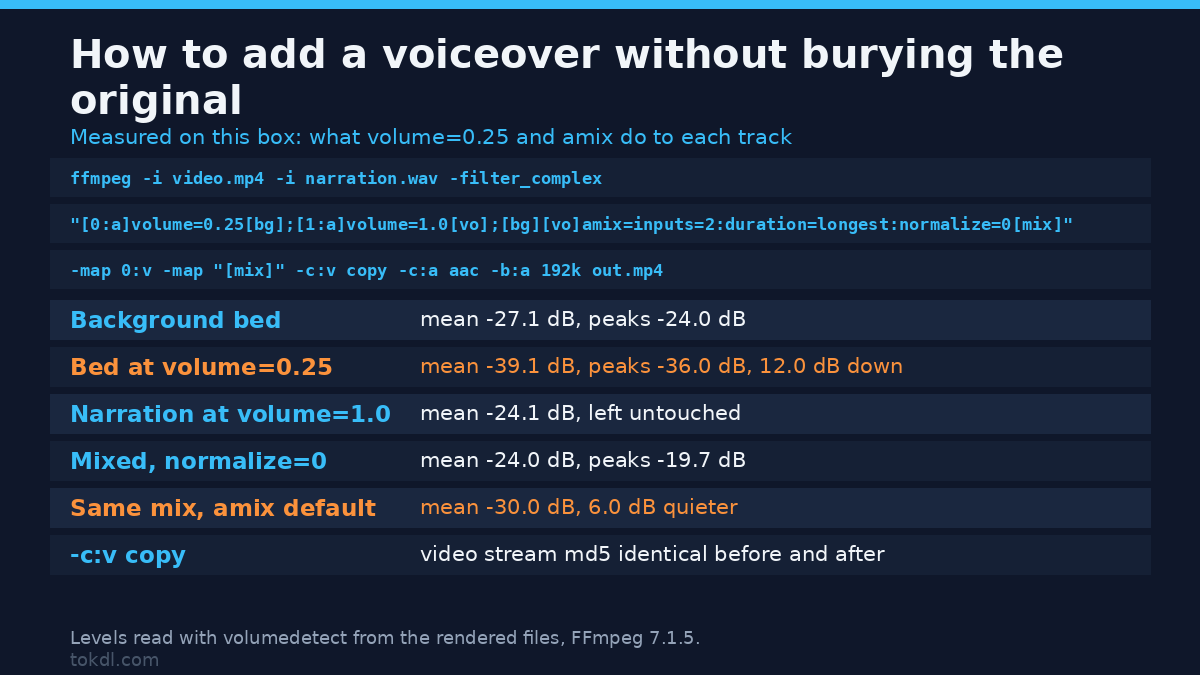
At the command line, FFmpeg can mix two files with the amix filter. Ride the original at a quarter of full gain and keep the voice untouched:
Measured on this box, the same command dropped a -27.1 dB background bed to -39.1 dB, exactly 12.0 dB, left the narration at -24.1 dB, and mixed to -24.0 dB mean; without normalize=0 amix halves both inputs and the mix came out 6.0 dB quieter, while -c:v copy left the video stream byte-identical.
ffmpeg -i video.mp4 -i narration.wav -filter_complex "[0:a]volume=0.25[bg];[1:a]volume=1.0[vo];[bg][vo]amix=inputs=2:duration=longest:normalize=0[mix]" -map 0:v -map "[mix]" -c:v copy -c:a aac -b:a 192k out.mp4Then run the finished file through a loudness pass so the whole video plays at one level, rather than a quiet intro and a shouty middle. If the narration drifts out of sync against the picture instead, the fix is a single constant offset, not a hand edit on every line.
What voiceover tools actually do, and their limits
Every tool that lets you add a voiceover does the same three jobs: capture audio, place it on a timeline, and set its level against everything else. Past that the differences are ergonomics, not magic.
Desktop editors that let you add a voiceover give you per-track gain, ducking and waveform alignment. Free audio editors add noise reduction and a de-click pass. Text-to-speech services generate narration from typed words, and they’re a real option for some formats, but the voice is synthetic, the delivery stays flat across long passages, and the result is only as good as the script behind it.
None of them repair a bad room. Noise reduction can reduce steady background noise like a hiss; it struggles with a fridge, a passing bus, or the reverb of a bare room without leaving artefacts behind. On a hosting platform the narration is re-encoded on upload, so a take that’s clean at the source stays clean and one that’s muddy gets worse.
Rights and responsible use
When you add a voiceover, the narration you record is yours. The footage you narrate over isn’t automatically yours too. Laying a voice track across a clip doesn’t transfer any rights to that clip; it creates a new work built on someone else’s footage, and that relationship is what matters, not the file sitting on your drive.
Keeping a copy for personal reference is one thing. Publishing it, monetising it, or entering it into a contest is another, and those uses need permission from whoever owns the picture and from the owner of any music underneath it. A music bed turned down low is still a licensed work.
Narrate over your own footage and you’re clear. Use a stock clip and the licence decides what you may do with it. Pull a scene from a film or a stream and talk over it, and you’re using content you don’t own. YouTube’s own Terms of Service set out what may be uploaded and what gets removed, and no amount of narration changes that.
Troubleshooting: why voiceovers come out wrong
The narration drifts ahead of the picture
Your camera and your recorder were running on two separate clocks, so the gap grows over time. After you add a voiceover, a single constant offset fixes a fixed drift; a growing gap means re-recording against the muted playback, where the timing is locked to the edit.
Every breath and mouth click is audible
You’re too close and too far on-axis. Back off a few centimetres, angle the mic across your mouth rather than straight at it, and apply a gentle gate or de-click pass if the take is otherwise good.
The take sounds distant and roomy
That’s reverb from the room, not the mic. Move to a softer space with more soft furnishings, speak closer, and if you must keep the take, accept a drier, flatter delivery rather than trying to undo the echo afterwards.
The voice is far too quiet in the final export
This is what happens when you add a voiceover and leave the original audio too loud next to it. Pull the background down where you speak and lift the narration, then check the whole mix on phone speakers as well as headphones.
A steady hum or hiss sits under the voice
Something else in the room is the source: an air-conditioner, a charger, a light on a dimmer. Record ten seconds of the room with nobody speaking, then use that sample as a noise profile to subtract the floor.
The words sound rushed against the picture
The script is longer than the runtime can hold at a natural pace. Cut words rather than speeding up your reading; speech that’s compressed to fit is the first thing a viewer notices.
Frequently asked questions
How to add a voiceover to a video for free?
Any recorder plus any editor will let you add a voiceover. Record the narration on a phone or in a free audio program, import the file into a free editor, and set the original audio lower wherever you speak.
Do I need a microphone to record a voiceover?
No, a phone headset or the built-in mic is usually enough when you add a voiceover for a personal project. A modest external mic in a quiet room will beat an expensive one in a noisy one almost every time.
Can I record narration and video at the same time?
Yes, if your tool records your microphone on a separate track from the camera sound. Recording both live is fine; what matters is that the two end up on different tracks so you can level them apart.
How do I sync a voiceover that was recorded separately?
Match a hand-clap or a spoken marker to its frame, then nudge in single-frame steps. A short marker at the top of the take is quicker to align than guessing from the waveform later.
Should I remove the original audio completely?
Usually you should not remove it. Keep the camera or music track and lower it below your voice; deleting it entirely leaves an unnaturally empty bed and loses the room atmosphere the picture was shot with.
Why does my voiceover sound better in headphones than on YouTube?
Because the platform re-encodes the audio and normalises loudness on upload. Mix to a sensible loudness target, check on a phone speaker, and leave headroom so the encoder isn’t working against you.
Can I use text-to-speech for a voiceover?
Yes, and for some formats it’s the right tool, though if you add a voiceover yourself it still sounds warmer. It’s a poor fit for anything that needs warmth or timing to the picture, and the output is only as natural as the script you feed it.
Which method should you use?
Record over a muted playback when your software supports it and you can hold a steady distance for a few minutes; the timing is correct from the start. Record separately when the room is compromised, when single lines need retakes, or when one script covers several clips.
Either way, the method for how to add a voiceover to a video stays the same: one clean take, on its own track, levelled against the original sound. Get the room and the level right first, and the editing part takes minutes instead of an evening.