
How to Reverse a Video: Play Clips Backwards (2026 Guide)
Glass falls upward. Coffee un-pours. A skateboarder snaps back onto the board and rolls away the wrong way. That payoff shot is a reversed clip, and when the footage is yours, you can reverse a video and build it yourself in a couple of minutes.
This guide shows how to reverse a video on a desktop editor, on a phone, and from the command line with ffmpeg. It also covers the two problems that catch most people: clips long enough to exhaust your computer’s memory, and audio that refuses to travel with the picture.
Reversing is a creative move, not a repair. When you reverse a video, you reorder its frames so the last one plays first. Nothing about the picture changes beyond that order.
The short answer
To reverse a video, you reorder its frames from last to first and re-encode the result. There’s no lossless shortcut, because the frame order is part of the file itself. Every editor with a Reverse control does this, and ffmpeg can reverse a video with a single filter. Expect one render pass and a small amount of generation loss.
Setup: what you need before you start
Before you reverse a video, start with a file that plays back correctly from beginning to end. If the source came from a phone at a variable frame rate, convert it to a constant frame rate first. Reverse filters assume a steady frame order, and a wobbling timeline produces duplicated or dropped frames after the flip.
Check the length and resolution next. A 30-second 1080p clip reverses comfortably on a laptop. A 20-minute 4K recording may not reverse in a single pass, and the fix for that sits in the troubleshooting section below.
Match the project frame rate to the clip’s. A mismatch is easy to miss and only shows up after the render, as stutter that looks like a dropped frame.
Keep three effects apart before you start. Reversing changes the order of frames in time. Mirroring changes left and right inside each frame, and rotating turns the whole image. If your real goal is to mirror a clip, the reverse control won’t help you.
Method 1: How to reverse a video in an editor
Desktop and mobile editors keep the control in different menus, but the idea is the same. Select the clip, open the speed or retime panel, and switch on Reverse. The table below lists where each common app hides it.
| Editor | Where to find Reverse |
|---|---|
| CapCut (desktop and mobile) | Select the clip, then the Speed or Edit panel |
| DaVinci Resolve | Right-click the clip, then Change Clip Speed |
| Premiere Pro | Right-click the clip, then Speed and Duration |
| iMovie | Select the clip, then the Speed button |
| Final Cut Pro | Retime menu, then Reverse Clip |
Work on a copy of the clip rather than the original: you can reverse a video as often as you like without touching the source. Reversing is non-destructive in most editors, but a duplicate makes it trivial to compare both directions side by side and keeps the project tidy.
If you only want the middle of a long take flipped, trim the clip first, apply Reverse to the trimmed section, and place it back between the parts you left alone.
A plain reverse and a boomerang aren’t the same thing. A reverse plays the clip once, backwards. A boomerang plays it forward and then reversed inside one file, which is why social editors sell it as a separate preset. If you want the forward pass kept, use the boomerang preset, or duplicate the clip and reverse only the copy.
Method 2: Reverse a video with ffmpeg
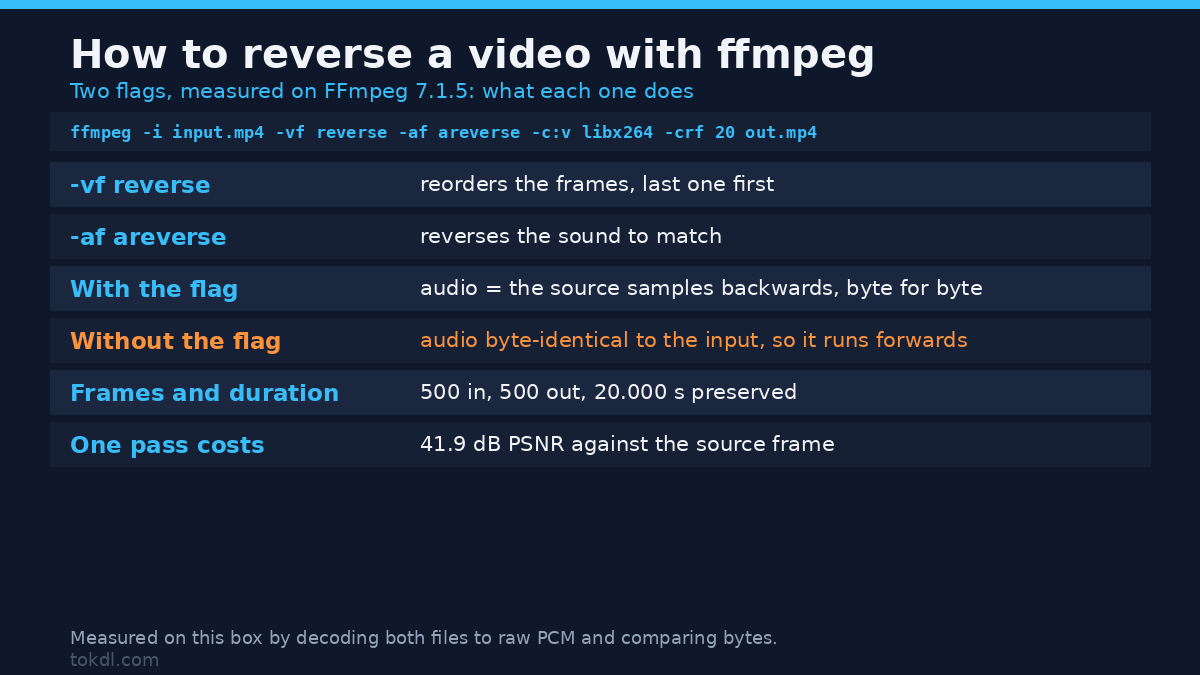
ffmpeg needs two flags, not one. The reverse filter flips the picture; areverse flips the sound. Miss the second flag and you get a backwards image with forward audio, which is a common and genuinely confusing result.
ffmpeg -i input.mp4 -vf reverse -af areverse -c:v libx264 -crf 20 output.mp4If you want the reversed picture with the original audio untouched, drop -af areverse. If you want silence instead, add -an.
The two flags do their own job, and you can prove it: with -af areverse the decoded audio came out as the source samples in reverse order, byte for byte, while dropping the flag left the audio byte-identical to the input.
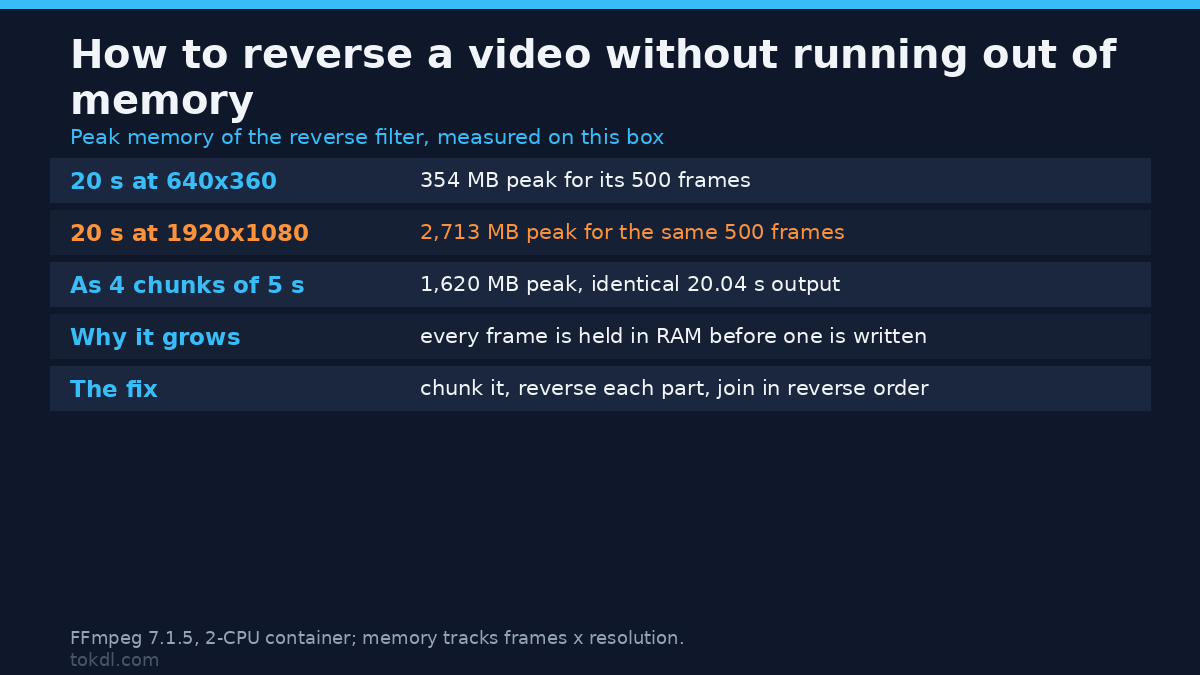
The catch is memory. The ffmpeg reverse filter buffers the entire clip in RAM before writing a single frame, so a long or high-resolution file can fail outright. The memory it needs tracks the frame count and the resolution: reversing 500 frames of 640×360 peaked at 354 MB on our test box, and the same 500 frames at 1920×1080 peaked at 2.71 GB. Cutting that 1080p clip into four 5-second chunks first dropped the peak to 1.6 GB. The workaround is to split the file into chunks, reverse each chunk on its own, list the reversed chunks in reverse order, and concatenate them.
For a clip that only needs a few seconds flipped, trimming is faster than any clever flag. Cut the segment, reverse the segment, and rejoin it with the untouched parts.
Reverse a video once and reuse the result. Re-reversing a reversed file to get back to the original is tempting and never worth it: the second pass buys another generation of quality loss for an output that only approximates what you started with.
What tools do when you reverse a video, and their limits
To reverse a video you need a re-encode, so the export sits one generation behind the source. The loss is usually invisible on a single pass at a decent bitrate, but repeated reversing and re-exporting will soften the image over time.
Most editors reverse the audio along with the picture. ffmpeg doesn’t unless you tell it to. Neither route removes a watermark or changes who owns the clip, and no reverse tool can invent frames the original never recorded.
When you reverse a video, the container matters too. Some editing apps export a reversed clip as a fresh file with no metadata or chapter markers, so a long video loses its navigation points. ffmpeg keeps whatever you map to the output, which is a fair reason to learn the command line for anything longer than a social clip.
Reversing pairs well with a change of speed. A reversed clip slowed to half speed reads as a dreamy rewind; the same clip at double speed reads as a comedic snap-back. You can change the playback speed after the reverse, but render the reverse first so the retiming works on a settled frame order.
Browser-based reverse converters upload your file to a server you don’t control, and they often cap file size or re-compress the result. For anything private, keep the work on your own machine.
Rights and responsible use
Reversing a clip doesn’t change who it belongs to. If you filmed it, it’s yours to flip. If someone else filmed it, playing it backwards is still their footage, and the reverse adds no new rights for you to publish or sell.
Personal reference and a public repost are different things. Reversing a clip to disguise where it came from, or to slip it past a platform’s matching systems, isn’t a loophole. The rights holder can still object, and platforms can still remove it.
If you post a reversed clip to a site like YouTube, its rules apply to you. YouTube’s Terms of Service and copyright policy govern what you may upload, regardless of how the frames are ordered.
Troubleshooting
ffmpeg reports it can’t allocate memory
This is the reverse filter buffering the whole clip. Reverse a shorter segment, or reverse the clip in pieces and then join the reversed pieces in reverse order.
The picture is reversed but the sound isn’t
You applied the video filter without the audio one. Add -af areverse, or strip the audio entirely with -an if you don’t need it.
The export plays forward anyway
Either the reverse control was never applied, or your player cached the old file. Re-check the clip’s properties, then open the exported file in a different player before assuming the render failed.
The reversed clip looks stuttery
A variable-frame-rate source, or a project frame rate that doesn’t match the clip, creates uneven timing after the flip. Convert the source to a constant frame rate and set the project to the same rate.
A short clip is taking an hour to export
Reversing forces a full re-encode, so the export runs at roughly your normal encode speed. If you only need a few seconds flipped, trim first and reverse that piece alone.
An online tool corrupted the file
Server-side converters re-compress and sometimes cap the resolution. If the result looks worse than the input, switch to a local editor or ffmpeg, which keep the re-encode under your control.
Frequently asked questions
Can I reverse a video on my phone?
Yes. CapCut and most mobile editors have a Reverse toggle in the clip toolbar. Tap the clip, open its Edit panel, and look near the speed controls.
Does it reduce quality when you reverse a video?
Usually a little, because a reverse re-encodes the clip. One pass at a sensible bitrate is hard to see; repeated reversals and re-exports accumulate visible softening.
How do I reverse a video when I only want part of it?
Trim the section you want, reverse the trimmed piece, and place it back between the untouched parts. Most editors let you split the clip and apply Reverse to a single segment.
Why does ffmpeg run out of memory when you reverse a video?
Its reverse filter loads every frame into memory before writing output. Long or high-resolution clips exceed what is available, so shorter chunks are the practical fix.
How do I reverse the audio too?
Add the areverse audio filter alongside the video reverse filter. In most editors this happens automatically when you flip a clip.
Can you reverse a video without re-encoding?
No. The frame order is part of the encoded stream, so changing it requires a new encode. Tools that advertise a lossless reverse are either remuxing something else or re-encoding quietly.
Can a reversed video loop smoothly?
Yes, if it plays forward and then backwards, back to back. That ping-pong loop hides the jump cut at the ends, and most editors can duplicate and reverse a clip to build it.
Which method should you use?
Use an editor if you want to watch the result and adjust timing as you go. It’s also the only route on a phone, and it handles audio automatically. Use ffmpeg when the job is batch work, when you need exact control over the encode, or when you’re already at home in a terminal.
Either way, trim before you reverse, keep a copy of the original, and remember that reversing changes the direction of a clip, not who owns it.