
Audiogram Video: Turn a Podcast Episode Into a Clip That Plays Anywhere (2026)
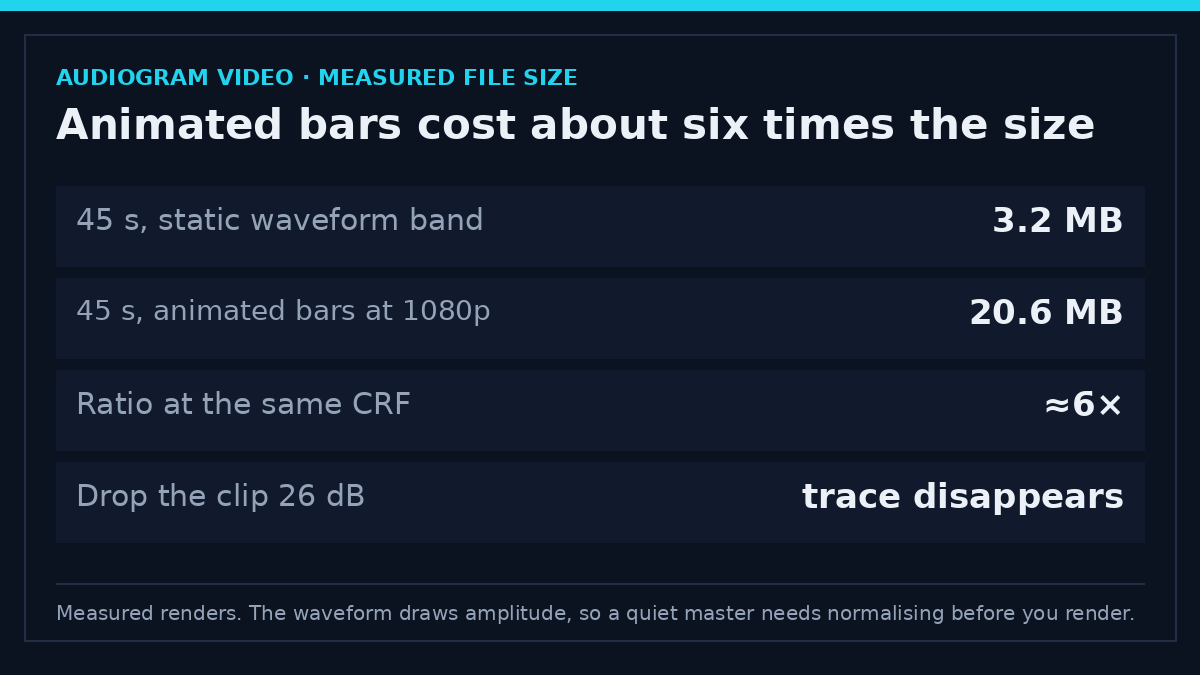
A waveform is a drawing of amplitude, nothing else. Take the same podcast clip and drop it 26 dB, and the trace disappears: the frame comes back as flat background. That one property explains most broken audiograms, and it’s also why a normalised audiogram video looks professional while a raw one looks like a screensaver left on pause.
An audiogram video is the cheapest way to give a finished episode a second life on YouTube, Shorts or a feed post. The audio already exists. What is missing is a frame, a colour, and about four minutes of work.
Sometimes the honest answer is that you don’t need an audiogram video at all. If your show already publishes a camera version, upload that. If the only goal is a YouTube upload, a still cover with the audio underneath is enough, and it renders in a single command.
What an audiogram video actually is
The output of an audiogram video is a normal MP4: an audio track you’ve already recorded, plus a picture that reacts to it. The picture is usually a waveform, a bar spectrum, or cover art with a small trace across the bottom.
Nothing about the sound changes in a well-made one. The episode is still the episode, which is why the format suits interviews and talk segments and falls flat for music.
Length is the decision that shapes everything else. Thirty seconds is a feed post. A full episode render is a YouTube upload people mostly listen to with the app in the background. Most shows cut one strong segment and leave it there.
Setup: the master file, the canvas, one check
Start every audiogram video from the episode master rather than whatever the host served. A hosted MP3 has been through one lossy encoder already, and every later encode stacks another generation on top of it. If you have the WAV, use the WAV.
Then pick the canvas. It fixes the shape of the frame, and changing it later means starting the render again.
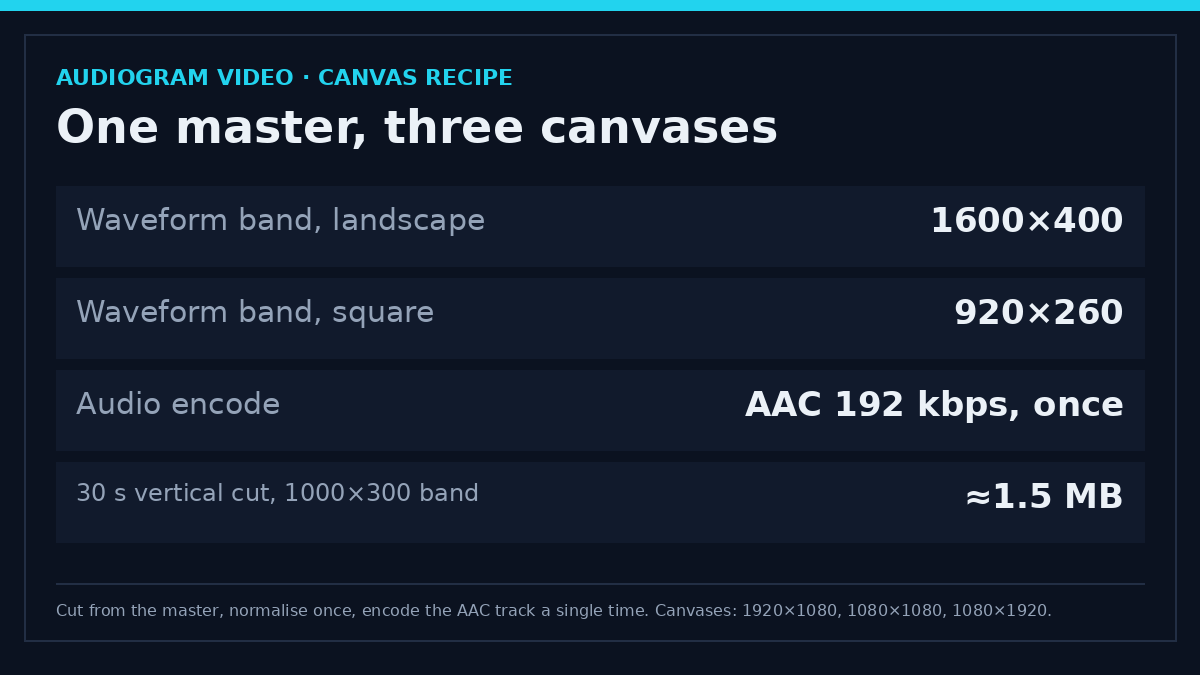
| Canvas | Where it goes | Waveform band |
|---|---|---|
| 1920×1080 | YouTube, website embeds | 1600×400, centred |
| 1080×1920 | Shorts, Reels, TikTok | 1000×300, low third |
| 1080×1080 | Square feed posts | 920×260 over cover art |
Confirm the encoder is present before you render anything, because half the audiogram video tutorials online assume it’s already there. One line is enough, and the version number it prints is the one you’ll be reading error messages against.
ffmpeg -versionOne more step matters more than the colour scheme. Normalise the clip first, since the trace height in an audiogram video is the sample amplitude and a quiet episode draws a short line no matter how good the mix is. Aim for roughly -16 LUFS integrated on stereo, or simply match the previous episode. Loudness normalization explains the measurement if those numbers are unfamiliar.
Method 1: render the clip with FFmpeg
Four commands, in order, and they produce one audiogram video. The first cuts the segment without touching the audio at all.
ffmpeg -ss 00:12:30 -t 45 -i episode.wav -c:a pcm_s16le clip.wavSecond, normalise that clip on its own so the waveform fills the band. Single-pass loudnorm is accurate enough for an audiogram video that goes straight to a social feed.
ffmpeg -i clip.wav -af loudnorm=I=-16:TP=-1.5:LRA=11 -ar 48000 clip_norm.wavThird, build the picture. showwaves draws the trace, pad centres it on the canvas, and format=yuv420p keeps the encoder inside a pixel format that every player and upload pipeline accepts.
ffmpeg -i clip_norm.wav -filter_complex
"[0:a]showwaves=s=1600x400:mode=cline:rate=25:colors=0x22d3ee[w];
[w]pad=1920:1080:(ow-iw)/2:(oh-ih)/2:color=0x0b1220,format=yuv420p[v]"
-map "[v]" -map 0:a -c:v libx264 -preset veryfast -crf 20
-c:a aac -b:a 192k -shortest audiogram.mp4
That audiogram video came back at 3.2 MB: 1920×1080, 25 fps, CRF 20, a 1600×400 band on a near-black background. Switch the band to 1000×300 and the pad to 1080×1920 and a 30 second vertical cut lands near 1.5 MB.
Which canvas you pick depends on where the clip is going, and rendering the same segment twice costs less time than debating it. The reframing guide covers the harder version of that problem, where the footage already has a picture in it.
The fourth command checks the finished audiogram video, and it’s the only way to know what was actually written rather than what you asked for. ffprobe reads the container back and prints the values that ended up inside it.
ffprobe -v error -show_entries stream=codec_name,width,height,pix_fmt -of default=nw=1 audiogram.mp4Two variants cover most other cases. Cover art with a smaller trace underneath needs a looped image and an overlay in place of the pad.
ffmpeg -loop 1 -i cover.png -i clip_norm.wav -filter_complex
"[0:v]scale=1080:1080,format=yuv420p[bg];
[1:a]showwaves=s=920x260:mode=cline:rate=25:colors=0x22d3ee[w];
[bg][w]overlay=(W-w)/2:H-320:shortest=1,format=yuv420p[v]"
-map "[v]" -map 1:a -c:v libx264 -preset veryfast -crf 20
-c:a aac -b:a 192k -shortest square.mp4
A 30 second square render of that shape came out at 1.4 MB. The command list for the filters themselves is long but well documented in the filter documentation, including the colour and drawing options not used here.
Method 2: a template tool or your editor timeline
Template tools exist because the command above contains three numbers that are easy to get wrong. They also trade control for speed, and that trade is worth taking when the same layout repeats every week.
First, open a square or vertical canvas and set the background to the show’s colour. Then drop the audio onto the timeline, so the waveform is generated from the file instead of from a preview that only looks right. Add the visualiser element last, size it to the band width, and export H.264 MP4.
Three things go wrong in that audiogram video flow. The tool may apply its own loudness pass on top of yours, so compare the exported level against the source. Its default bitrate is usually generous for a nearly static frame. And burned-in captions become part of the picture, with no way to correct a typo after export.
There is also an official route that skips the render completely. Some podcast hosts publish video episodes directly, and Spotify for Podcasters accepts a video file where an audio one used to go. Their size and format limits live on their help pages and they change, so read the current page before you export.
What these tools do, and where they stop
The trace in an audiogram video is decoration. It shows where somebody spoke loudly, not whether the dialogue is clean, and a busy waveform over a muddy recording still sounds muddy.
Full-frame animation is where file sizes explode. A 45 second audiogram video with a static band came to 3.2 MB; the same 45 seconds with animated bars filling a 1080p frame came to 20.6 MB at the same CRF, roughly six times the file for identical audio.
Template tools usually fix the duration and the aspect ratio too, which is fine until you want a 20 second story cut. None of them address the thing listeners actually judge, which is the recording. A sensible bitrate keeps the upload quick, and video bitrate cannot rescue a room with a hard floor.
Rights and responsible use
The audio in an audiogram video belongs to whoever made the episode: the host, the guest, and whoever wrote or owns the music bed. Drawing a waveform over it doesn’t create a new work you’re free to treat as your own.
Personal listening and publishing are different acts. Posting a trace over someone else’s show is redistribution, even when the picture is your own design, and a file you already have carries no licence with it.
Two of those questions come up more than any other for podcasters. A music licence bought for audio episodes often doesn’t cover a video upload, so read the terms again before you render an audiogram video. A guest who agreed to an audio interview hasn’t automatically agreed to a video post, even one where nobody appears on camera.
Platform rules sit on top of all of that, starting with YouTube’s Terms of Service, which govern what may be uploaded and how claims are handled. Those rules apply to the clip whether or not the audio belongs to you, and a claim lands on the account that posted it.
Troubleshooting: six renders that go wrong
The frame comes back empty
Cause: the audio is too quiet for the filter to draw anything. I rendered one clip at a fifth of its level and the bright pixels on an audiogram video frame fell from 5,917 to none. Fix: normalise before showwaves, or insert volume=4 ahead of it for a one-off test.
The trace is clipped top and bottom
Cause: peaks pushed past full scale before the filter drew them, so the tips flatten into two straight lines. Fix: run a limiter, or apply volume=0.9 and recheck the loudness afterwards.
It plays locally and is rejected elsewhere
Cause: the format filter was left out, so the audiogram video encoded as yuv444p with the High 4:4:4 Predictive profile instead of yuv420p. Fix: add format=yuv420p as the last filter and confirm it with ffprobe.
The file runs for hours and barely plays
Cause: a looped cover image with no -shortest flag, so the video stream never ends. Fix: pass -shortest on the output, as both commands above do.
Only one trace appears instead of two
Cause: the source is mono, and showwaves draws one line per channel. Fix: leave it if the show is mono, or convert to stereo first if the layout expects a pair.
The last half second holds on a frozen frame
Cause: stream duration and container duration disagree by a frame or two. Fix: keep -shortest, and if it persists set an explicit -t on the output matching the audio length.
Frequently asked questions
What is an audiogram video?
A moving waveform of your podcast audio, saved as a normal MP4 file. The audio is unchanged; the picture reacts to it.
Do I need special software to make one?
No. FFmpeg renders an audiogram video in a single command, and it runs on Windows, macOS and Linux without an account.
How long should an audiogram be?
Thirty to sixty seconds for social feeds, and a few minutes at most for YouTube. An audiogram video longer than that loses the loop-and-replay behaviour that makes the format work.
Does making one reduce audio quality?
Only if the audio gets encoded twice, which it doesn’t have to. Cut from the master, normalise once, and encode the AAC track a single time at 192 kbps.
Can I post the same file to TikTok and YouTube?
No. A 16:9 file posted to a vertical feed is letterboxed and shrunk, so render two canvases from the same audio instead.
Why is my waveform a straight line?
Because the clip is quiet. The trace height follows amplitude, so normalise the audio before the filter runs rather than after.
Does YouTube treat an audiogram differently?
No. It’s a standard H.264 upload, processed the same way as camera footage, so the recommended upload settings apply unchanged.
Which method should you use?
If you publish weekly and you’re comfortable in a terminal, Method 1 wins. It’s one command after the first setup, the audio is encoded once, and every number in the audiogram video belongs to you.
If you produce for several shows or for clients, use a template tool. Saving four minutes per episode matters more than the extra control you give up.
If you only want the episode on YouTube and nowhere else, do neither. Publish the video version your host already makes, or a still cover with the audio and one line of text.
The frame isn’t the interesting part. A clip travels because of what somebody said in it, and the audiogram video only has to stay out of the way. Three megabytes and a clean waveform do that.