
Horizontal to Vertical Video: Reframe 16:9 for Reels, Shorts and TikTok (2026)
Scale a 1920×1080 clip to fit the width of a 1080×1920 Reel and you keep 608 of the 1,920 rows. The other 1,312 are empty. That piece of arithmetic explains why horizontal to vertical video looks wrong before anyone touches a slider.
The quick fix is to zoom until the clip fills the screen. It works, and it often ruins the shot: a true 9:16 crop of 1080p footage keeps about 32% of the frame width, so a two-person interview becomes one chin and a lot of wall.
Three methods produce a usable vertical video, and none of them are magic. Here is what each one costs, the math that predicts softness before you export, and the cases where the honest answer is to shoot again.
Horizontal to Vertical Video: The Direct Answer
Choose by what the frame is carrying, not by which tool happens to be open. The table is the short version; the reasons behind each row follow below.
| Method | What survives | Fits | Cost |
|---|---|---|---|
| Blur pad | the whole frame | landscapes, screen recordings, wide shots | empty space, a look some viewers dislike |
| Crop or reframe | the middle third | talking heads, one subject, action | resolution and context |
| Reshoot vertical | everything | anything you still control | time |
If the subject sits inside the middle third and you still have the original file, crop. If the frame earns its width, meaning a screen, a landscape, or a group, pad it, because cropping deletes the part the clip exists to show. If the shoot hasn’t happened yet, shoot vertical and skip the argument.
The Crop Tax: What a 9:16 Cut Really Costs
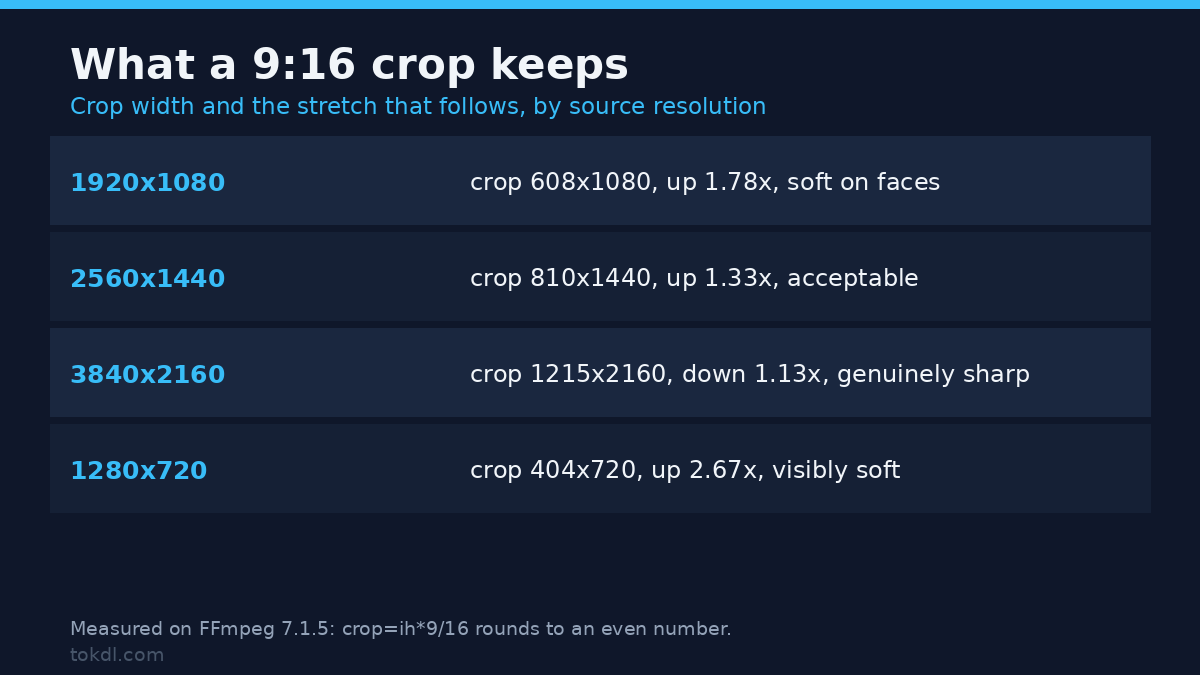
To fill a 1080×1920 frame from a 16:9 source, the image is scaled until its height reaches 1920. Width grows to 3,413 pixels. You keep 1,080 of them.
That’s why the usable crop in a vertical video comes from a much smaller region than most people expect. It also means the source resolution decides the outcome before any setting is touched.
| Source | 9:16 crop | Scale to 1080×1920 | Result |
|---|---|---|---|
| 1920×1080 | 607×1080 | up 1.78× | soft on faces and small text |
| 2560×1440 | 810×1440 | up 1.33× | acceptable |
| 3840×2160 | 1215×2160 | down 1.13× | genuinely sharp |
The rule that follows is unglamorous: crop from the highest resolution you have, and if a vertical video is even possible, shoot 4K. Downscaling a 1215×2160 crop holds detail. Upscaling a 607×1080 one invents it, and no sharpening pass brings the detail back. The filter itself writes 608 wide on a 1080p source, because crop rounds 607.5 to the nearest even number, and 404 on 720p. If you haven’t settled on a ratio yet, how aspect ratios work covers the arithmetic behind each frame shape.
Check the Source Before You Convert
Two commands answer most questions before you waste an export. The first reports what the file actually contains, which isn’t always what the filename promises.
ffprobe -v error -select_streams v:0 -show_entries stream=width,height,sample_aspect_ratio -of default=nw=1 input.mp4A sample aspect ratio other than 1:1 means the pixels aren’t square, so a 720×576 file can display as widescreen or as 4:3 depending on that single value. Force square pixels with setsar=1 on export unless you want the vertical frame to inherit the stretch.
The second command catches padding that’s already baked into the picture. A clip that was letterboxed during capture has black rows inside its height, and a 9:16 crop will slice those bars straight into the vertical frame.
ffmpeg -i input.mp4 -vf cropdetect -f null -cropdetect prints the rectangle it believes is real picture. If it reports a height smaller than the file’s, removing black bars first is the correct order of operations: strip the padding, then reframe what is left.
Method 1: Blur-Pad the Frame in FFmpeg
This keeps every pixel of the original and fills the remainder of the vertical video with a blurred, darkened copy of the same shot. One command does it:
ffmpeg -i input.mp4 -filter_complex
"[0:v]scale=1080:1920:force_original_aspect_ratio=increase,crop=1080:1920,gblur=sigma=40,eq=brightness=-0.12[bg];
 [0:v]scale=1080:-2[fg];
 [bg][fg]overlay=(W-w)/2:(H-h)/2"
-c:a copy output.mp4
Read it as three parts. The first line builds a background that covers the vertical frame completely, blurs it hard, and lowers brightness so it never competes with the subject. The second scales the real picture to full width, with -2 keeping the height divisible by two. The third pastes one over the other, centred.
Every filter in the chain is listed in the FFmpeg filter reference. It also lists the sigma range that gblur accepts, in case 40 isn’t what you want.
For a vertical video, sigma 40 is a starting point, not a law. Below about 20 the blurred copy starts reading as a second image competing for attention; above 60 the export slows down and gains nothing visible. For a flatter, more editorial result, replace the blur branch with a solid plate: color=c=0x101010:s=1080x1920:d=5 for a five-second clip. Leave the duration off and the encode doesn’t end, because a color source is infinite: the uncorrected command was still writing frames after five minutes. Add shortest=1 to the overlay instead if you’d rather not count seconds. The FFmpeg scaling guide walks through why force_original_aspect_ratio needs the crop step that follows it.
Audio passes through untouched because -c:a copy doesn’t re-encode it. If the source is variable frame rate, add -fps_mode cfr -r 30 as well, or the vertical video can drift against its own sound in some players.
Method 2: Crop With a Chosen Safe Zone
Cropping is what most people mean by horizontal to vertical video, and it gives a full-bleed vertical video with no bars and no second copy of the image. The filter derives crop width from source height, so the ratio holds at any resolution:
ffmpeg -i input.mp4 -vf "crop=ih*9/16:ih,scale=1080:1920:flags=lanczos,setsar=1" -c:a copy output.mp4That version centres the window. When the subject stands off to one side, set the offset yourself instead of letting the filter guess: crop=ih*9/16:ih:(iw-ih*9/16)*0.75:0 moves the window three quarters across, which is roughly where a presenter ends up after a wide establishing shot. This is the same operation as cropping a video by hand, only with the numbers fixed.
Editors wrap it in a tracker. Premiere Pro calls the feature Auto Reframe, DaVinci Resolve includes a smart reframe in the Studio version, and most mobile editors ship an equivalent. They usually follow a face or a moving object and write keyframes you can correct afterwards.
Method 3: Use the App’s Own Upload Crop
Instagram and TikTok both put a zoom-and-position control on the upload screen, and for a single clip that’s the shortest path to a vertical video. No export, no re-encode on your machine, no second app to install.
YouTube’s Shorts flow is stricter: in most cases it counts a file as a Short only when it arrives vertical or square, so that crop has to happen before the upload. That alone justifies learning one desktop method, even if you publish from a phone. The Instagram Reels specs are a useful reference for the target numbers.
Where all three fall short on a vertical video is padding. They crop, so a wide screen recording still loses its edges, and they compress the vertical video you hand them a second time. Their preview is also small enough that text near the edge of the vertical video survives review and then disappears under the interface.
What Auto-Reframe Tools Do, and Where They Fail
Auto-reframe is the feature that made horizontal to vertical video feel solved. It analyses frames, picks a subject rectangle, and writes keyframes so the crop window follows it. Results are good on one face in a locked-off shot and unreliable most other places.
Four failures repeat. Two people in conversation: the window ping-pongs between them and the cut looks drunk. Handheld footage: the tracker chases camera movement as if it were subject movement.
Screen recordings show the third: it locks onto the cursor and follows it around a slide. Fast cuts produce the fourth, because each shot gets fresh analysis and the window jumps at every edit point.
Correcting that is manual work, which is the part the feature page leaves out. Budget one pass on the timeline to fix keyframes, or lock a fixed crop for the whole vertical video and accept that some shots lose their subject.
Rights and Responsible Use
Reframing a clip doesn’t change who owns it. If the footage is yours, converting it for your own channels is straightforward, and the terms of the platform you publish on still apply to the result. YouTube’s terms of service set out what may be uploaded and how other people’s material may be used.
If the footage belongs to someone else, a crop isn’t a transformation that grants permission. Reposting another creator’s horizontal clip as a vertical one is republishing their work, and a credit line is a courtesy rather than a licence. Personal reference differs from redistribution: keeping a copy to study isn’t the same as posting it, cutting it into a compilation, or running it in an ad.
Commercial use needs explicit permission from whoever holds the rights, usually in writing. Saving a file never grants those rights, and neither does editing it into a new shape.
Troubleshooting: When the Vertical Export Looks Wrong
The export is softer than the original
That’s the crop working as designed. A 1080p source gives a 607×1080 crop stretched 1.78× to fill a vertical video. Only a higher-resolution original fixes it, which is why 4K capture is worth the storage when vertical video delivery is planned.
The subject is cut in half
The crop window is centred by default, which is wrong whenever the subject stands to one side. Set the x offset explicitly, and check the cropdetect rectangle first so you’re not also fighting hidden padding.
Black bars survived the conversion
The source was letterboxed before you touched it, so the bars travelled inside the image. Crop them out first, then reframe. Doing both in one filter chain usually leaves a sliver of black on one edge.
The vertical frame looks stretched
Non-square pixels are the usual cause, and the fix is setsar=1 on the output. Odd frame dimensions cause a different symptom: H.264 with 4:2:0 chroma needs an even width and height, and crop floors an odd one: ask for a 607-wide crop and you get 606, with nothing stretched.
The upload is rejected or appears zoomed
Check the final dimensions with ffprobe rather than trusting the filter graph. Crop rounds a fractional width to an even number, so a 607.5 request arrives as 608, and several apps zoom a file to fit when the aspect ratio is a fraction off 9:16.
Motion stutters on the phone
A variable frame rate source is the common culprit, since phone players assume constant timing. Convert to CFR during the vertical video export, and don’t judge 24 fps footage on a display refreshing at 60 Hz.
Frequently Asked Questions
What is the best way to make a horizontal to vertical video?
Cropping, when one subject fills the middle of the frame. It gives a full-screen vertical video with no padding, at the cost of about two thirds of the width and a real resolution hit on 1080p sources.
Does cropping to vertical reduce quality?
Yes, in resolution, though not always in a way you can see. A 9:16 crop of 1080p footage is 607×1080 and has to be enlarged to fill a 1080×1920 vertical video. From a 4K original the crop is 1215×2160, which is still larger than the target and survives the downscale.
Can I convert a horizontal video to vertical for free?
Yes. FFmpeg is free and does both the crop and the blur-pad version in one command, and the social apps include a crop control on the upload screen at no cost.
Why does my vertical video look blurry on TikTok or Reels?
Usually because the crop was upscaled before upload, then compressed again by the app. Starting from a 4K source, exporting at exactly 1080×1920, and avoiding a second conversion on the phone is the fix.
Should I shoot in 4K if I plan to crop to vertical?
Yes, if the storage and the edit machine can take it. The vertical crop of a 4K frame is 1215×2160, so it reaches 1080×1920 as a downscale rather than an enlargement, and the difference in sharpness is visible on faces.
Does rotating a horizontal video make it vertical?
No. Rotation turns the whole frame 90 degrees, so the picture lies on its side with the horizon running up the screen. Changing the crop window is what produces a vertical video, and the two operations aren’t interchangeable.
Which Method Should You Use?
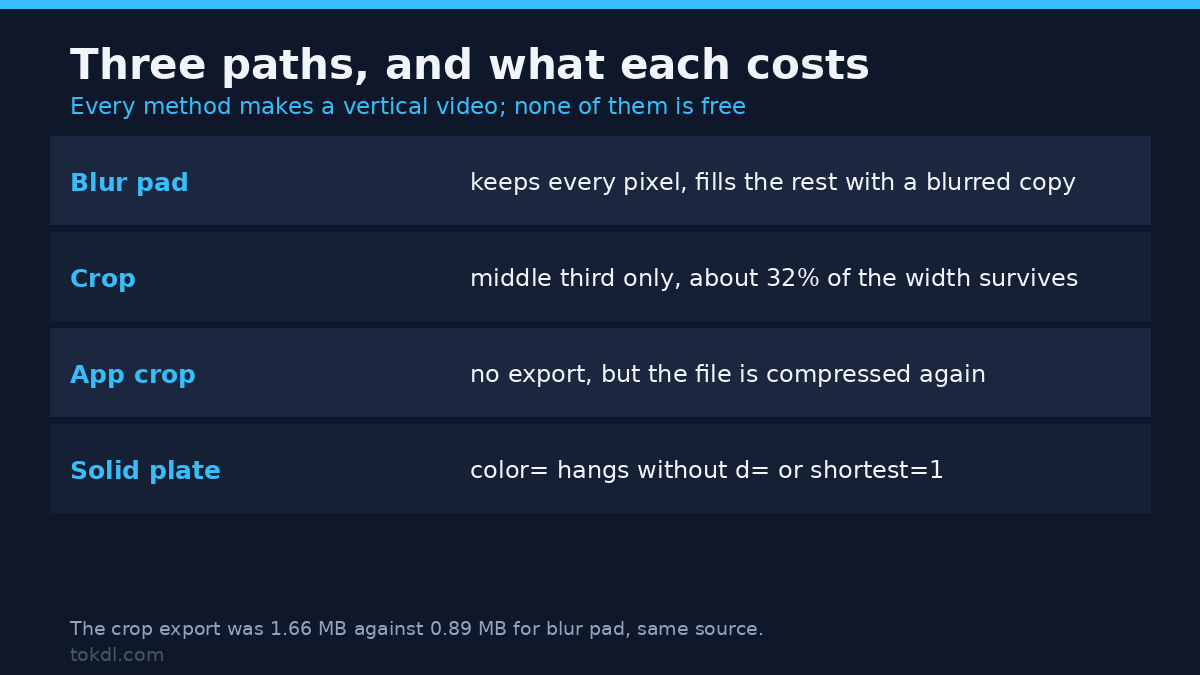
Use blur pad when the width of the frame is the point: a screen recording, a landscape, a group shot, anything where the edges carry the meaning. Use crop when a single subject holds attention and you still have a high-resolution original. Use the app’s upload control when one clip has to go out in two minutes and the framing is forgiving.
None of these beats shooting a vertical video in the first place. In most cases the cheapest vertical video is the one that was never horizontal, and a second camera angle costs less than an afternoon of fixing keyframes.