
How to Brighten a Dark Video: Fix Underexposed Footage (2026)
A dark video usually isn’t broken. It was shot with too little light, and the camera squeezed the shadows into the bottom of the range where you can barely see them. The data is still there, which is why the fix is a trade: every level you lift out of a dark video also lifts the grain and pushes the highlights toward the ceiling.
I measured that trade on this machine instead of repeating the usual advice. Brightness cost me nothing in noise but turned a black level of 16 into 45. A contrast bump crushed half the frame to 0. And a histogram equalizer turned a smooth 30 level gradient into 9 visible bands. If you have a dark video and want it to look right on a phone, those numbers pick the control.
What you’ll learn
You’ll learn how to measure a dark video before touching it, what each control does to the luma plane, where your clipping point sits, and what the lift costs in noise. The recipe at the end has before and after numbers from a real run.
Step 1: Measure how dark the file really is
Guessing is how people end up with a grey, washed out picture. One command reports the actual luma distribution, and it tells you whether your dark video is underexposed, badly ranged or being decoded wrong.
ffprobe -v error -select_streams v:0
  -show_entries stream=pix_fmt,color_range,width,height
  -of default=nw=1 input.mp4

ffmpeg -i input.mp4 -vf "signalstats,metadata=print:file=stats.txt" -f null -
The second command writes one block per frame. On my fixture, a synthetic clip with a 24 to 54 gradient, a 100 by 100 block at luma 200 and a shadow block at 20, the first block reads:
lavfi.signalstats.YMIN=19
lavfi.signalstats.YLOW=25
lavfi.signalstats.YAVG=45.341
lavfi.signalstats.YHIGH=52
lavfi.signalstats.YMAX=203
YMIN is the darkest pixel, YLOW the 10th percentile, YAVG the mean, YHIGH the 90th and YMAX the brightest. A video that fills the range has YLOW near 16 and YHIGH near 235. Here the mean is 45 and the brightest pixel only reaches 203, leaving 32 levels of headroom. That number is the difference between a clean lift on a dark video and a blowout.
Check the range before you trust the numbers
Those values only mean something if the file is limited range, which is what nearly every camera writes: black at 16, white at 235. Full range files use 0 to 255 instead, and reading one as limited makes a normal picture look crushed. A JPEG from the same fixture probed at YMIN 2 and YMAX 220, with pix_fmt=yuvj420p and color_range=pc.
That pc is the whole story. A dark video from a JPEG sequence, a screen recording or a phone’s HDR pipeline can be full range, and lifting it with camera-file numbers will overshoot. Convert with scale=out_range=tv and re-probe. The signalstats filter documentation lists the percentiles.
Step 2: Brightness, gamma and curves do different things
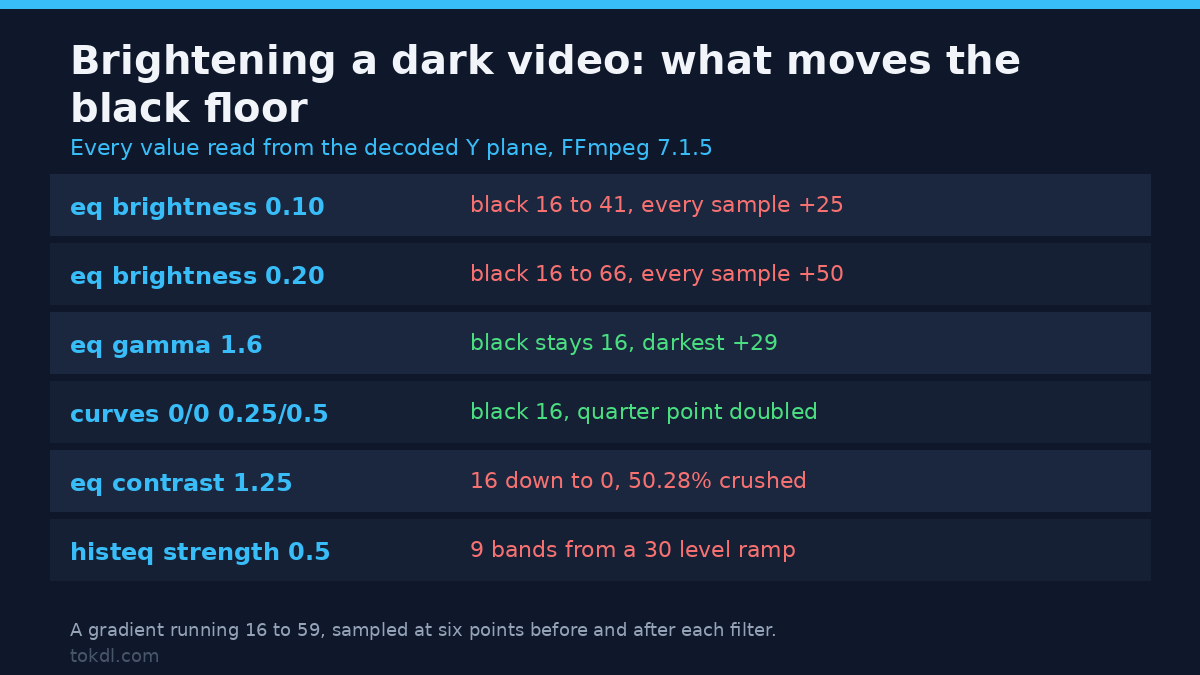
These controls for a dark video look interchangeable and aren’t. I ran each over a gradient climbing from luma 16 to 59 and read the output from the decoded Y plane, so these are delivered pixels.
| Control | Y=16 | Y=21 | Y=27 | Y=38 | Y=49 | Y=59 |
|---|---|---|---|---|---|---|
| Source | 16 | 21 | 27 | 38 | 49 | 59 |
| eq brightness=0.10 | 41 | 46 | 52 | 63 | 74 | 84 |
| eq brightness=0.20 | 66 | 71 | 77 | 88 | 99 | 109 |
| eq gamma=1.6 | 45 | 53 | 62 | 77 | 91 | 102 |
| eq gamma=2.2 | 72 | 82 | 92 | 107 | 120 | 131 |
| eq contrast=1.25 | 0 | 0 | 0 | 14 | 28 | 40 |
| curves 0/0 0.25/0.5 1/1 | 16 | 25 | 37 | 62 | 85 | 104 |
| colorlevels imax=0.65 | 16 | 22 | 31 | 49 | 66 | 81 |
| histeq strength=0.5 | 16 | 127 | 235 | 235 | 235 | 235 |
Brightness is a pedestal. brightness=0.10 added exactly 25 levels to every sample and 0.20 added exactly 50. It doesn’t know which pixels are shadow, so a black floor of 16 becomes 41 at 0.10 and 66 at 0.20. Your blacks aren’t black any more, they’re fog.
Gamma is weighted toward the shadows. gamma=1.6 added 29 levels at the darkest sample and 43 at the brightest, so it opens the shadows and leaves the black point alone. That’s the control for a genuinely dark video, as long as you accept what it does to grain.
Curves is the precise tool. curves=all='0/0 0.25/0.5 1/1' pins black at 16, doubles the value at a quarter of the range and lands the upper midtone at 104. colorlevels scales the input ceiling instead, though it moved less because it multiplies rather than remaps. Contrast is the one to avoid: contrast=1.25 pushed 16 down to 0 and left 50.28 percent of the frame crushed at black. On a dark video it doesn’t add depth, it deletes data.
histeq is a trap. It spread the gradient across 9 distinct luma values with a maximum jump of 55 and blew 73.28 percent of the frame to 235. That’s posterization, not correction. Read the FFmpeg reference for eq and curves before combining options, because the defaults are mild for a reason.
Step 3: Find a dark video’s clipping point
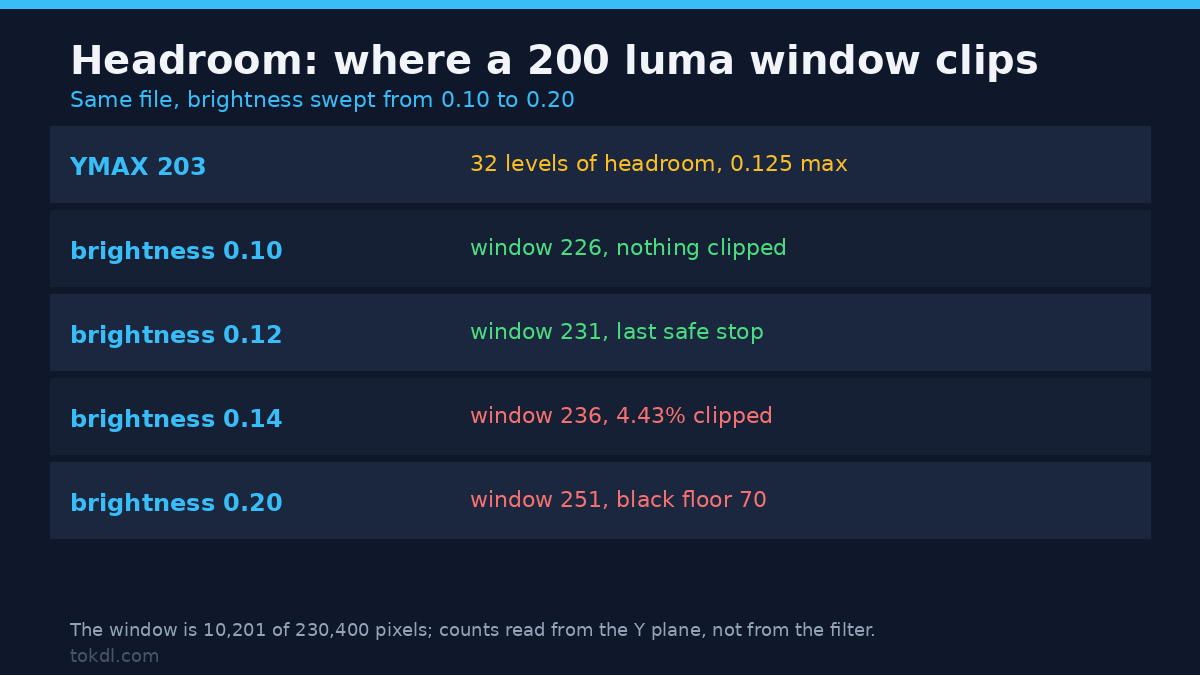
Any lift eventually hits 235 and stops. You can find where that happens by sweeping the control and counting clipped pixels. I put a 200 luma window in the fixture and swept brightness from 0.10 to 0.20. The window is 10,201 pixels out of 230,400, or 4.43 percent of the frame.
| eq brightness | Window lands at | Clipped pixels | Black floor |
|---|---|---|---|
| 0.10 | 226 | 0 | 45 |
| 0.12 | 231 | 0 | 47 |
| 0.14 | 236 | 10,201 (4.43%) | 55 |
| 0.16 | 241 | 10,201 (4.43%) | 57 |
| 0.20 | 251 | 10,201 (4.43%) | 70 |
The ceiling sits between 0.12 and 0.14, matching the arithmetic: 32 levels of headroom divided by 255 is about 0.125. So 0.12 is the last safe stop and 0.14 already costs you the window. The clipped count doesn’t grow past 4.43 percent because once those pixels hit 235 there’s nothing left to clip while the rest of the frame keeps climbing. That’s how a bright window becomes a flat white rectangle in an underlit room.
Step 4: What lifting a dark video costs in noise
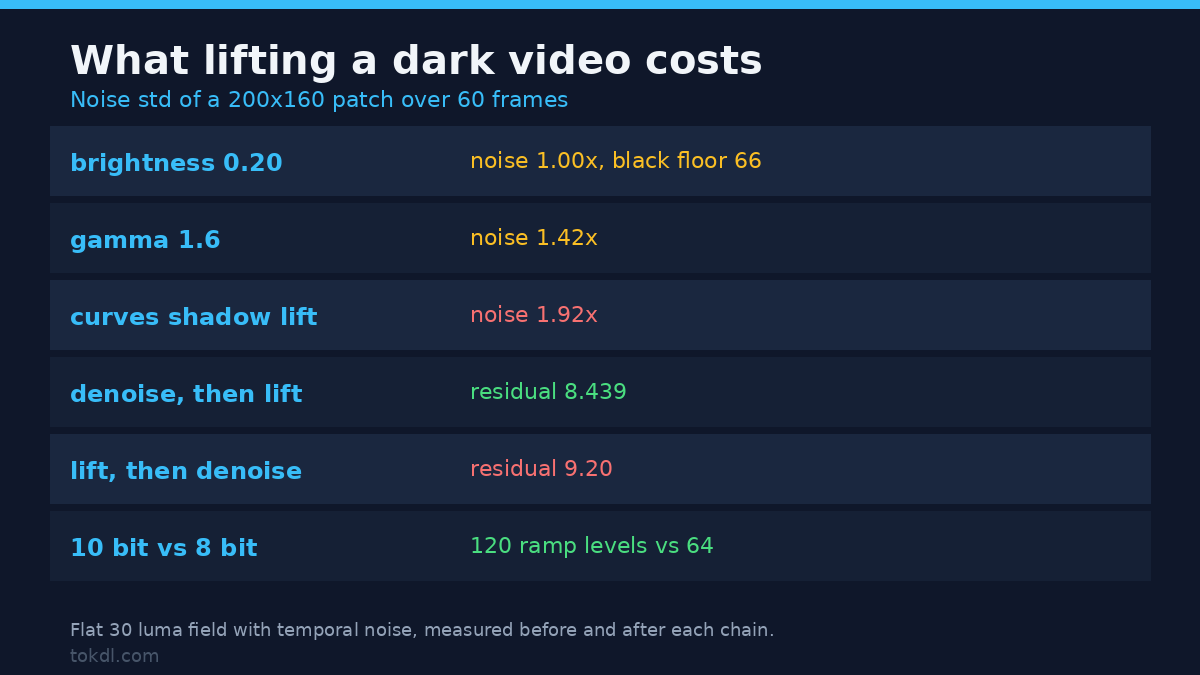
Lifting a dark video doesn’t create noise, but it changes how much of the frame the noise occupies. I built a flat 30 luma field with temporal noise, encoded 60 frames, and measured the standard deviation of a 200 by 160 pixel patch before and after each control.
| Lift | Patch mean | Noise std | Amplification |
|---|---|---|---|
| Source | 29.48 | 6.786 | 1.00x |
| eq brightness=0.20 | 79.48 | 6.786 | 1.00x |
| eq gamma=1.6 | 65.43 | 9.666 | 1.42x |
| curves 0/0 0.25/0.5 1/1 | 43.40 | 13.048 | 1.92x |
Brightness leaves the noise alone because it adds a constant, which sounds like a win until you remember it washed the black floor to 66. Gamma multiplied the noise by 1.42 and the shadow weighted curve by 1.92. On real footage that’s the difference between clean shadows and a crawling mess, and it decides whether your dark video needs a denoise pass.
Denoise before you lift, not after
Order matters, and the measurement is blunt. hqdn3d at 4:3:6:4.5 before gamma=1.6 left a noise standard deviation of 8.439. The same steps the other way left 9.20, about 8 percent more residual noise from an identical chain. With the shadow curve instead, denoising afterwards recovered almost nothing: 13.048 down to 12.784, a 2 percent improvement. Once a curve has stretched shadow noise, a denoiser can’t tell it from detail.
That’s why the order matters. A one pixel checkerboard at luma 20 and 34, lifted with the same curve, came out at a contrast standard deviation of 15.0 against 7.0 in the source. hqdn3d=4:3:6:4.5 over the lifted frame left it at 15.0, so the default strength did nothing measurable to one pixel detail. At 10:9:15:11 it did work, but pulled the source texture from 7.0 to 5.0, a 29 percent loss of contrast. Denoise first, at a strength you can justify.
Step 5: The recipe I ran end to end
Here’s the full chain on an 8 second dark fixture at 640 by 360, gradient 24 to 54, one block at luma 200, one shadow block at 20, encoded at CRF 18.
ffmpeg -i input.mp4 -vf "signalstats,metadata=print:file=before.txt" -f null -

ffmpeg -y -i input.mp4
  -vf "hqdn3d=4:3:6:4.5,curves=all='0/0 0.25/0.5 1/1'"
  -c:v libx264 -crf 18 -preset medium -pix_fmt yuv420p out.mp4

ffmpeg -i out.mp4 -vf "signalstats,metadata=print:file=after.txt" -f null -| Reading | Before | After |
|---|---|---|
| YMIN | 19 | 20 |
| YLOW | 25 | 34 |
| YAVG | 45.341 | 69.103 |
| YHIGH | 52 | 90 |
| YMAX | 203 | 231 |
The mean moved from 45 to 69, the shadows opened from 25 to 34, and the black point stayed at 19 and 20. The bright window went from 203 to 231, using 28 of the 32 levels of headroom the probe found. That’s the method: you spend the headroom deliberately instead of discovering you spent it when the window turns white.
Two notes. Keep -crf 18 or lower: on a grainy dark clip this chain scored SSIM 0.976 at CRF 18, 0.775 at CRF 26 and 0.319 at CRF 34. If the source is 10 bit, stay in 10 bit, because a 120 level ramp kept all 120 values through the lift in 10 bit and only 64 when the same curve wrote 8 bit.
Step 6: When the dark video isn’t underexposed
Some dark videos are dark for a reason a curve can’t fix. Log footage is meant to look flat and grey, and lifting it gives a washed out picture with wrong skin tones, so use the log to Rec.709 walkthrough. HDR is the second case: read as SDR it looks dark because the tone mapping never happened, and HDR to SDR conversion is the fix.
The third is a range flag mismatch. A limited range file tagged as full range, or decoded by a player that assumes full range, displays with crushed shadows. The pixels are fine and the probe will say so, so check color_range before you blame the exposure. A waveform monitor shows the same cluster on the floor, and reading a waveform and vectorscope makes it visual.
Six mistakes that make a dark video worse
1. Reaching for brightness first. It lifts the black floor with everything else, and that fog is harder to fix than the darkness was.
2. Raising contrast to add depth. The 1.25 test crushed 50.28 percent of the frame to 0, and clipped data never comes back.
3. Lifting past the reported headroom. At 0.14 the window clipped where 0.12 was the last safe stop.
4. Denoising after the curve instead of before. The same chain left 9.20 of noise one way and 8.439 the other.
5. Using histeq for a natural look. Nine luma values across a 30 level gradient and 73.28 percent at 235 isn’t a correction.
6. Re-encoding at a low bitrate. A lifted shadow needs more bits than the dark video did, because the encoder now has visible detail to preserve.
FAQ
Can I brighten a dark video without re-encoding?
No. No stream copy flag changes luma values, because the pixels are the compressed data. Any lift means a decode and a re-encode, so use CRF, not a fixed bitrate.
Why does my video get grainy when I brighten it?
Because the grain was recorded and the lift makes it occupy more of the visible range. The gamma test multiplied noise by 1.42 and the shadow curve by 1.92. Denoise before you lift and the amplification never reaches the eye.
Is brightness or gamma better for a dark video?
Gamma, almost always. Brightness added 25 levels to every sample and pushed black from 16 to 41. Gamma added 29 at the darkest end and 43 at the brightest, which opens the shadows without fogging the black point.
Conclusion
Brightening a dark video is a measurement job more than a taste job. Probe the range, read the five luma numbers, spend only the headroom you have, and denoise before you lift so the grain doesn’t come along. If the shadows still look noisy, the next step is a proper noise reduction pass on the source rather than another curve, because stacking lifts is how a recoverable dark video turns into a damaged one.