
HDR to SDR Conversion: How to Convert HDR Video Without Blown Highlights
Your phone recorded in HDR, the timeline was graded in HDR, and the moment the file lands on an older laptop the bright parts turn into flat white patches. That’s the problem HDR to SDR conversion solves, and it’s where most quick guides stop being useful. Swapping the color tags is easy. Deciding what happens to a 700 nit highlight when SDR white sits at 100 nits is the part that decides whether the picture still looks like your footage. I measured that part instead of guessing at it.
I built a real HDR10 clip, pushed it through seven different HDR to SDR conversion chains with FFmpeg 7.1.5, and measured every output frame by frame against an exact SDR render. The numbers below are what came back: which operators keep highlight detail, which ones darken midtones, and which setting turns a red jacket pink.
What you’ll learn
By the end you’ll know how to check whether a file is genuinely HDR, how to run an HDR to SDR conversion with one FFmpeg command, which tone-mapping operator to pick, and the two settings that quietly wreck an otherwise clean export. There’s a measured comparison table and a short list of mistakes I kept running into while testing.
What HDR to SDR conversion has to move
An HDR to SDR conversion isn’t a brightness change. The two formats are encoded in different worlds, and one pass has to move three things at once.
The first is the transfer curve. HDR10 stores picture with PQ, the perceptual quantizer from SMPTE ST 2084, on 10-bit code values. SDR uses the older BT.709 gamma curve on 8 bits. PQ code values aren’t nits either, and that trips people up. On my test clip, PQ code 508 is about 89 nits, code 606 is around 240 nits, and code 773 is about 1035 nits. The bright end of a PQ ramp is squeezed into a handful of codes, which is why clipping there destroys so much visible detail.
The second is the color primaries. HDR10 uses the wider BT.2020 set, SDR uses BT.709. Skip that step and saturated colors drift, usually turning muddy.
The third is headroom. SDR white sits near 100 nits. Anything above that has to be folded into the remaining space without turning into a flat patch. That folding is the tone-mapping step, and it’s the only part where you have a real choice to make.
How I measured this HDR to SDR conversion
The test clip is two seconds of 1920×1080 at 30 fps, encoded as 10-bit HEVC with PQ and BT.2020 tags, a 1000 nit mastering display header and a max-cll tag of 1000,400. The picture holds a luminance ramp running from about 1.2 nits to about 1035 nits across the top three quarters, plus four flat patches below it: a 1000 nit white, and saturated red, green and blue at 203 nits.
For a reference I generated the same scene as a display-referred SDR render, clipped at 100 nits and encoded with the BT.709 curve. Below 100 nits every pixel has exactly one correct SDR value, so those pixels can be scored as a deviation in code values. Pixels above 100 nits have no single correct answer, so I scored those on how much detail survives: the share landing on the clipping point, and how many distinct levels remain.
Each chain was encoded with libx264 at CRF 18 into 8-bit 4:2:0 with BT.709 tags, then checked twice, once with my own decoder pass and once with the signalstats filter, because a measuring tool that’s wrong looks exactly like a finding.
How to run an HDR to SDR conversion with FFmpeg
Step 1: check what you have
Run this before anything else, because pushing an SDR file through a tone-mapping chain makes it worse, not better.
ffprobe -v error -select_streams v:0 -show_entries
  stream=codec_name,pix_fmt,color_primaries,color_transfer,color_space
  -of default=nw=1 input.mp4
Look for color_transfer=smpte2084 and color_primaries=bt2020. Those two tags mean PQ and a wide gamut, which is HDR10. If you see bt709 on both lines instead, the file is already SDR and a plain re-encode is all it needs.
Step 2: run the conversion chain
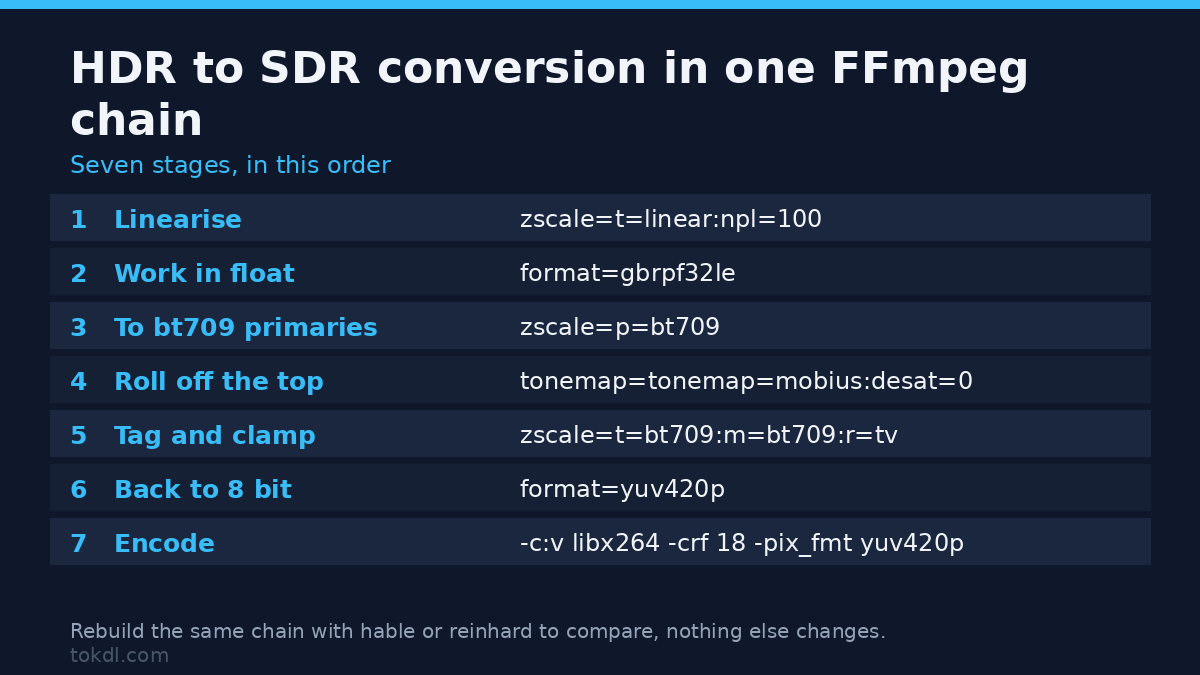
This is the HDR to SDR conversion chain I’d hand to anyone converting their own footage today:
ffmpeg -i hdr_input.mp4
  -vf "zscale=t=linear:npl=100,format=gbrpf32le,zscale=p=bt709,tonemap=tonemap=mobius:desat=0,zscale=t=bt709:m=bt709:r=tv,format=yuv420p"
  -c:v libx264 -crf 18 -pix_fmt yuv420p
  -color_primaries bt709 -color_trc bt709 -colorspace bt709
  -c:a copy hdr_to_sdr_output.mp4
The order matters, and each stage hands the next one a format it can work with:
zscale=t=linear:npl=100converts PQ code values back into linear light, treating 100 nits as the reference white the grade was built around.format=gbrpf32lemoves the frame into 32-bit float. Tone-mapping maths on 8-bit integers rounds away the detail you’re trying to protect.zscale=p=bt709converts the primaries from BT.2020 to BT.709 while the frame is still in float.tonemap=tonemap=mobius:desat=0folds the highlights down. Swap the operator name to change the look, nothing else has to move.zscale=t=bt709:m=bt709:r=tvapplies the BT.709 transfer curve and matrix, and puts the output in video range.format=yuv420preturns to 8-bit 4:2:0, which is what every player and upload target expects.-c:a copyleaves the audio alone. It’s already AAC or PCM and it needs none of this.
Step 3: compare one operator against another
Nothing above is expensive to change. Rebuild the same command with tonemap=hable or tonemap=reinhard and compare the two outputs, because the right choice depends on how bright your footage is. A clip that tops out around 300 nits behaves differently from one with a 1000 nit sun in frame, and that shows up in the next section.
Which operator should HDR to SDR conversion use?
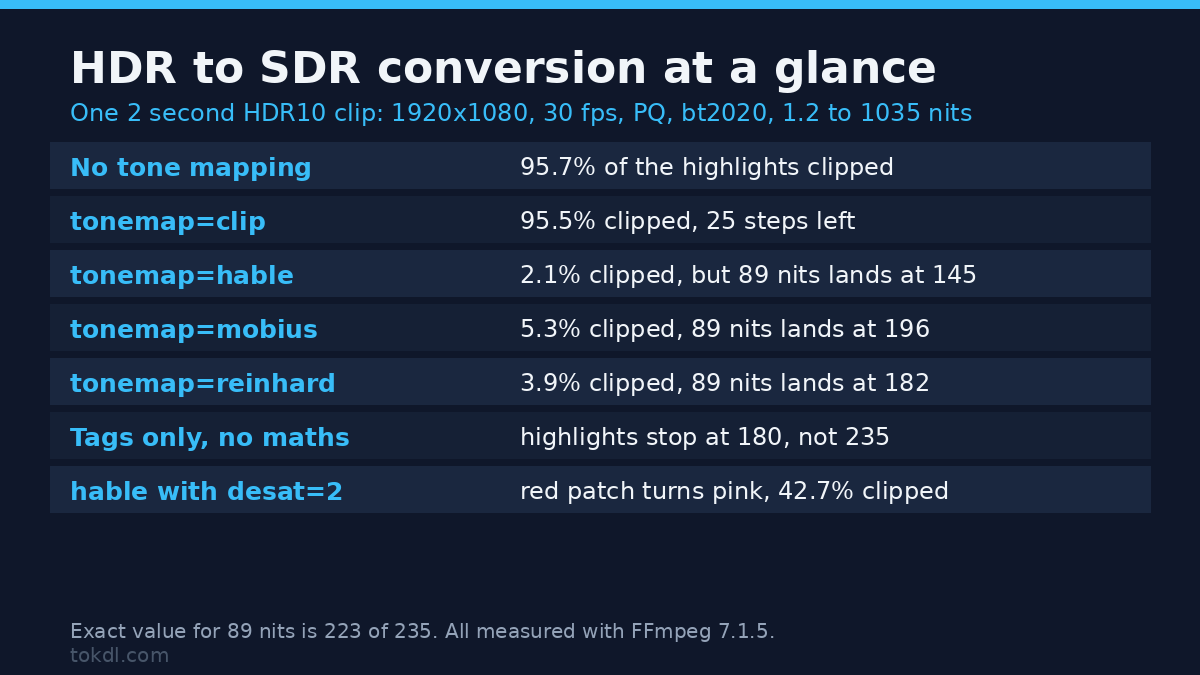
Here’s the measured table. The 89 nit column is the part of the ramp below SDR white, where a correct conversion is a known number: 223 in code values. A result far above or below that means the operator shifts your midtones, and you’ll need a brightness nudge to compensate.
| Chain | 89 nit step (exact value 223) | Highlights clipped | Highlight levels left | 1035 nit peak |
|---|---|---|---|---|
| No tone mapping (zscale only) | 224 | 95.7% | 56 | 255 |
| tonemap=clip | 224 | 95.5% | 25 | 235 |
| tonemap=hable | 145 | 2.1% | 125 | 236 |
| tonemap=mobius | 196 | 5.3% | 62 | 235 |
| tonemap=reinhard | 182 | 3.9% | 77 | 235 |
| hable with desat=2 | 163 | 42.7% | 116 | 252 |
| Tags changed, no maths | 122 | 0% | 59 | 180 |
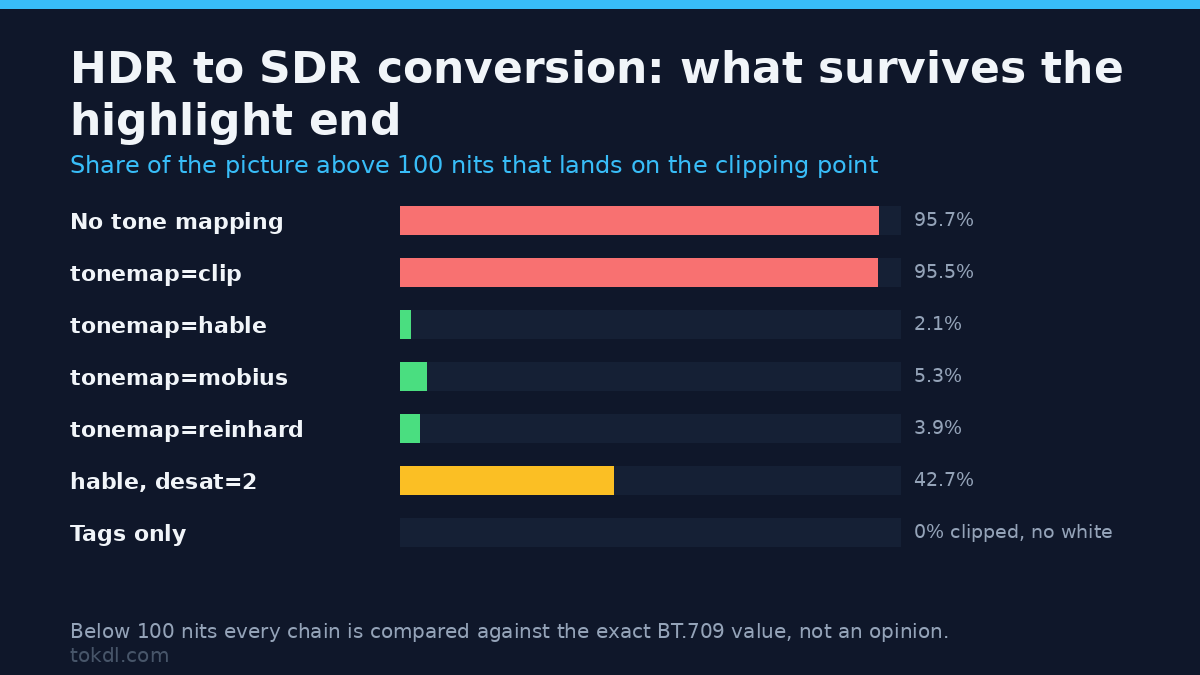
Read the clipped column first, because that’s the difference between an HDR to SDR conversion and a demolition. Without tone mapping, 95.7% of the pixels above 100 nits land on the clipping point. The picture loses that whole region and keeps 56 distinct levels as leftovers. A tone-mapped operator clips between 2.1% and 5.3%, so the sun, the window and the specular highlight on a car still have gradation in them.
Then read the midtone column. Hable protects highlights hardest and compresses everything else: an 89 nit patch that should land at 223 comes out at 145, roughly a stop and a half darker. On a bright clip that looks dramatic. On a dim interior it looks underexposed, and you’ll lift the grade afterwards to fix it. Mobius lands at 196, the closest of the three, and reinhard sits between them at 182. That’s why mobius is the chain I’d start with, and hable is the one I’d reach for when the source has real specular highlights that must survive.
One setting deserves its own warning. desat=2 on hable desaturates as it tone-maps, which sounds harmless until you measure it. My saturated red patch came out as 213,124,131, a pink, instead of 215,0,0. The same setting lifted the output enough to push 42.7% of the highlight region over the clipping point. If you want desaturation, add it afterwards with a saturation control. Don’t let the tone-mapper do it invisibly.
Why your clip looks washed out afterwards
The most common HDR to SDR conversion failure isn’t blowing out highlights, it’s the grey veil. Someone changes the color tags, re-encodes, and the result looks flat and milky, with weak blacks. The tags told the player the file is BT.709, but the code values inside are still PQ, so a display treats a dark room as a bright one.
I measured that case too, as the “tags changed” row above. Nothing clips, which makes it look safe. Highlights stop at 180 instead of 235, blacks sit at 49 instead of 27, and the whole ramp compresses into a narrow band. No tone mapper recovers it later, because the file no longer carries the information that says what those values meant. Do the whole HDR to SDR conversion in one pass, from the original source, and keep that source.
Common mistakes
Converting an already-converted file
A second pass through a tone mapper restores nothing. It applies the curve again, raising blacks and flattening contrast. Keep the master and always run the HDR to SDR conversion from it.
Leaving out the float format step
In an HDR to SDR conversion, skipping format=gbrpf32le means the tone-mapping maths runs on integers, and the highlight rolloff turns into visible banding across smooth gradients like skies.
Forgetting the output tags
If the chain converts the pixels but the output stays tagged PQ and BT.2020, players misread the result and you’re back to the washed-out look of a failed HDR to SDR conversion. Set -color_primaries bt709 -color_trc bt709 -colorspace bt709 on the output.
Choosing an operator from a preset list
The operator is a brightness decision as much as a highlight decision. Measure your source’s peak, then test two operators on ten seconds of your brightest scene. Ten seconds tells you more than any comparison chart, including this one.
Re-encoding the audio
Audio carries no dynamic range metadata that matters here. -c:a copy is almost always right, and re-encoding it spends quality for nothing.
Expecting a match with the HDR original
An HDR to SDR conversion can’t hold 1000 nits of highlight range on a 100 nit display. Something gets compressed, and the honest goal is a picture that keeps its shape and color, not one that matches the original pixel for pixel.
Frequently asked questions
Can I do HDR to SDR conversion without FFmpeg?
Yes. HandBrake exposes the same choice inside its Colorspace filter, which includes a tone-mapping stage, and most editors (Resolve, Premiere, Final Cut) handle it in export settings or on a color-management page. The maths underneath is the same class of operation. FFmpeg is the version where you can see every stage and change one at a time, which is why the measurements above come from it.
Does an HDR to SDR conversion lose quality?
It loses highlight range by definition, because the target display can’t show it. What it shouldn’t lose is color accuracy or midtone placement. On my clip, mobius kept the region below white within 27 code values of the exact BT.709 render while clipping 5.3% of the highlights. A no-tone-mapping conversion wrecks both ends.
Why does the output look darker than the HDR original on my phone?
Phones apply their own tone mapping when they play an HDR file, and each vendor tunes it differently. An SDR file has no such help, so the brightness you see is the brightness your HDR to SDR conversion baked in. With hable, expect it to look darker than the HDR playback you’re comparing against.
Should I keep the master after converting?
Keep it. HDR displays are common now, and an HDR to SDR conversion can’t be reversed. The master also costs you nothing to store if you already have it, and it’s the only source a future conversion should start from.
The short version
HDR to SDR conversion comes down to one honest decision about the bright end of the picture, and a chain that gets the pixels into the right form before that decision is made. Convert from the original master, keep the frame in float while the tone mapper works, set the output tags, and pick your operator by measuring one scene rather than trusting a preset name. For most footage, mobius keeps midtones where they belong. For footage with real specular highlights, hable protects them better and asks you to lift the midtones afterwards.
If you’re tuning the rest of the export, my breakdown of how to downscale 4K to 1080p covers the resolution side of the same pipeline, and 720p vs 1080p vs 4K covers what those targets mean. When the file is ready, choosing a bitrate decides whether it stays sharp. If you’d rather see the commands side by side, there’s a wider set in my FFmpeg commands reference, and H264 vs H265 explains which codec to feed with the result.
The FFmpeg filter documentation for tonemap lists every operator and its parameters, and the color handling wiki explains why zscale has to run before the tone mapper and not after it.