
How to Convert Log Footage to Rec.709 Without Wrecking the Highlights
You shot in S-Log3, D-Log or Apple Log because someone told you the highlights would survive. Now those clips sit on the timeline next to your normal footage looking grey, low contrast and slightly sick, and no amount of saturation brings them back. Nothing’s wrong with the camera. Log footage is meant to look like that, and the fix is one conversion per clip, not a slider you drag until it feels right.
What follows is what changes in the pixels when you convert log footage to Rec.709, measured on raw grey patches instead of copied from a spec sheet, plus the three conversion routes, the flag that quietly breaks one of them, and the mistakes I see in almost every “why does my video look washed out” thread.
What you’ll learn
- Why log footage looks flat, in code values rather than vibes
- What a Rec.709 delivery file has to contain, tags included
- Three ways to convert: the camera maker’s LUT, FFmpeg, or your editor’s colour management
- The measured pixel values before and after a correct conversion
- Six mistakes that survive the conversion, and the command that fixes the worst of them
Why log footage looks flat
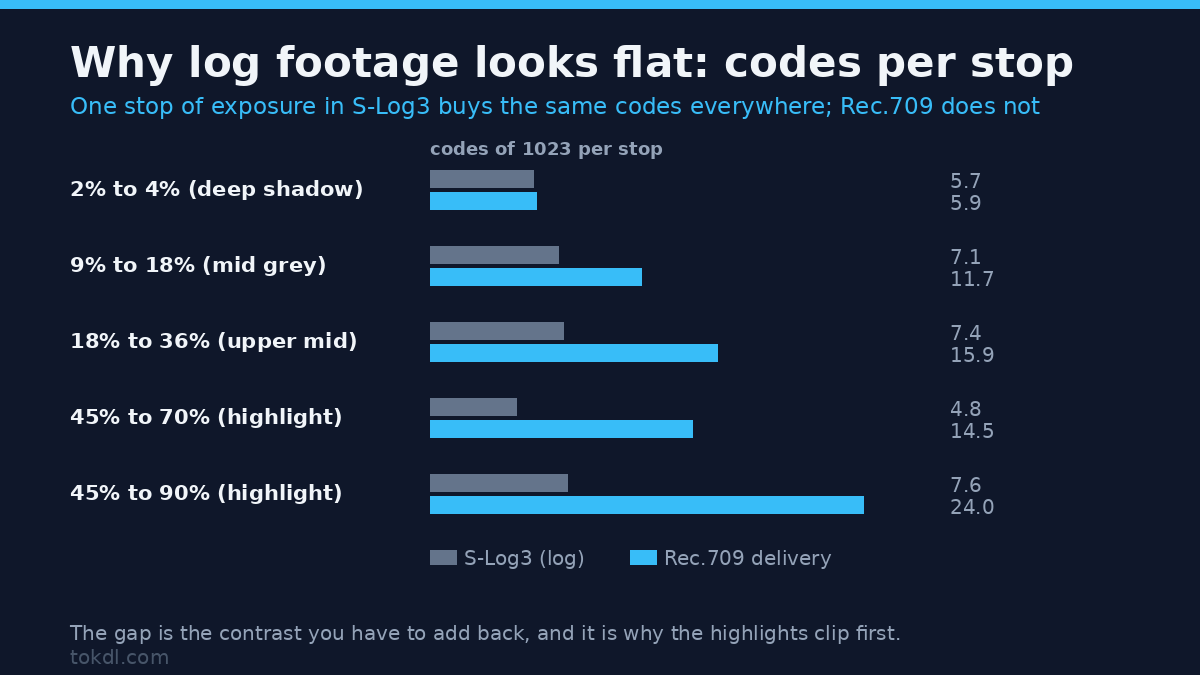
A log curve spreads the available code values evenly across the stops of exposure a sensor can hold. A display curve, which is what Rec.709 is, spends its codes differently: it packs most of them into the shadows and keeps few for the highlights, because that’s how your eye responds to light in a normal room.
That difference is the whole story, and it’s measurable. I encoded grey patches with the published S-Log3 formula, ran the conversion through FFmpeg 7.1.5, then counted how many of the 1023 codes in a 10-bit signal one stop of exposure buys at each brightness level.
| Exposure step | Codes per stop, S-Log3 | Codes per stop, Rec.709 |
|---|---|---|
| 2% to 4% (deep shadow) | 5.7 | 5.9 |
| 9% to 18% (mid grey) | 7.1 | 11.7 |
| 18% to 36% (upper mid) | 7.4 | 15.9 |
| 45% to 70% (highlight) | 4.8 | 14.5 |
| 45% to 90% (highlight) | 7.6 | 24.0 |
Read the log column first. One stop costs roughly six to eight codes almost everywhere, from the deepest shadow up to the highlights. That evenness is what makes log footage gradeable: there’s headroom everywhere, so a heavy correction late in the edit doesn’t run into a wall.
Now the Rec.709 column. The top stop needs 24 codes instead of 7.6. Nothing’s lost in the conversion itself, but the contrast you see in the finished picture isn’t in the log file. You add it, and it comes from the shape of the display curve.
Where mid grey lands
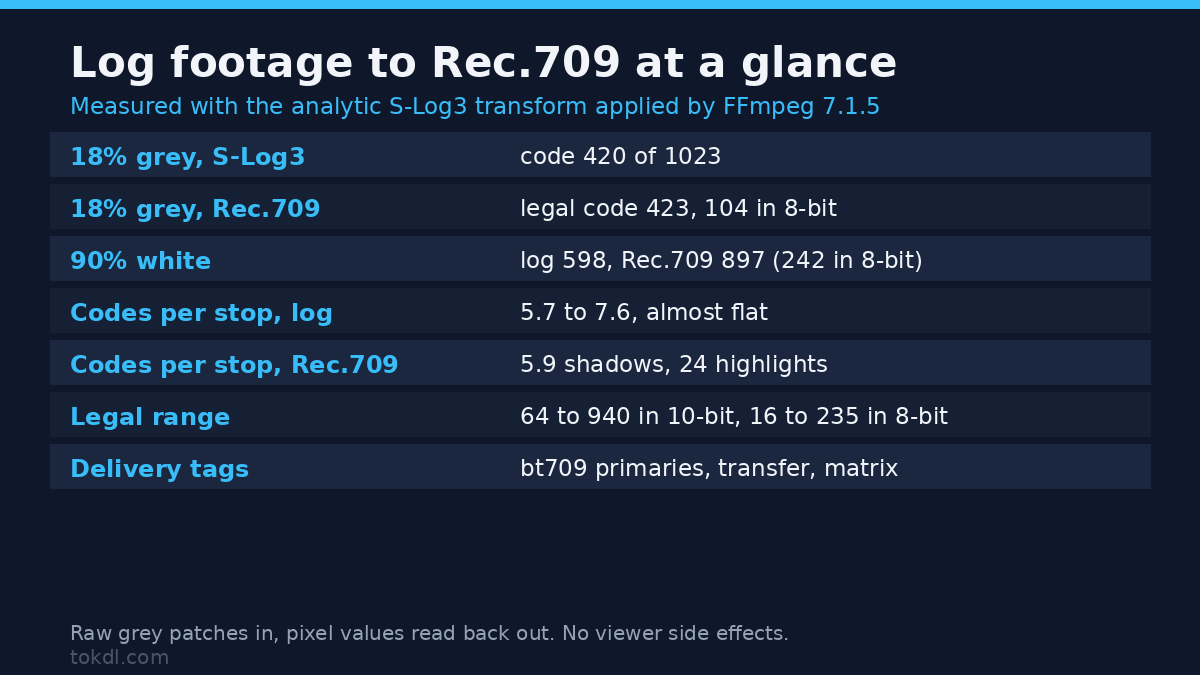
One landmark helps. In S-Log3, 18% grey, the anchor for exposure in most camera guides, sits at code 420 of 1023. After a correct conversion to legal-range Rec.709 it lands at code 423, which is 104 in 8-bit. If your converted log footage has mid grey near the middle of the video range, the conversion worked. If it’s sitting at 128 or above, you’re looking at flat, bright footage and probably at raw log that was never converted.
Bright values move much further. 90% white sits at code 598 in S-Log3 and lands at 897 in Rec.709, or 242 in 8-bit. That’s the squeeze in action: nearly two and a half stops of highlight detail live inside the last 60 codes of the log file. It’s why a converted clip clips sooner than you expect when the exposure was sloppy.
What a Rec.709 file has to carry
Rec.709 isn’t one number. A file converted from log footage needs three tags and a range, and a conversion that gets the pixels right while leaving the tags wrong still renders incorrectly in some players:
- Primaries, the triangle of red, green and blue the values refer to (BT.709)
- Transfer, the curve that turns code values into light (the Rec.709 curve, gamma 2.2 to 2.4 in practice)
- Matrix, the maths that packed RGB into luma plus two chroma channels (BT.709, not the older BT.601)
- Range, legal (16 to 235 in 8-bit, 64 to 940 in 10-bit) or full
Most conversion LUTs built for Rec.709 delivery output legal range, because that’s what broadcast and most delivery specs expect. Mix full range into a legal pipeline, or the other way round, and black and white move by roughly 7% of the range. There’s a test for it: convert one clip, then check a known black and a known white on a waveform. They should land at 16 and 235 in 8-bit, not 0 and 255.
Three ways to convert log footage to Rec.709
1. The camera maker’s own LUT
Every camera that shoots log footage ships with a matching conversion LUT, and for most people that’s the right answer. Sony publishes S-Log3 to Rec.709 LUTs, Canon ships C-Log LUTs, DJI publishes D-Log LUTs, and Apple includes an Apple Log transform with its editing apps. Grading apps load them the same way: a LUT node or an adjustment layer, then the .cube file.
Two rules with vendor LUTs. Use the one built for your camera and profile, because an S-Log3 LUT on D-Log footage gives you a colour cast no white balance control fixes. Check too whether the LUT expects the camera’s exposure offset, which the vendor states on the download page.
2. FFmpeg with lut3d (the scriptable route)
If you’re converting a folder of log footage, FFmpeg does the same job in one command per file. The lut3d filter applies a 3D LUT, and the chain needs to state the frame format so the LUT sees the full precision of the source:
| Step | Command fragment | Why it’s there |
|---|---|---|
| Read the log source | ffmpeg -i clip_slog3.mov |
No decoding flags needed, the file is the input |
| Convert | -vf "lut3d=slog3-to-rec709-legal.cube" |
Bakes the vendor transform into the pixels |
| Tag the result | -vf "...setparams=color_primaries=bt709:color_trc=bt709:colorspace=bt709" |
Without it the file can advertise only the matrix |
| Encode | -c:v libx264 -crf 18 -pix_fmt yuv420p |
A normal Rec.709 delivery encode |
That third row isn’t decoration. The familiar -color_primaries bt709 -color_trc bt709 -colorspace bt709 output flags look right and aren’t enough. I encoded the same clip four ways and probed each file with ffprobe:
| How the tags were set | Matrix | Transfer | Primaries |
|---|---|---|---|
-color_primaries/-color_trc/-colorspace output flags |
bt709 | unknown | unknown |
setparams in the filter chain |
bt709 | bt709 | bt709 |
-x264-params colorprim=bt709:transfer=bt709:colormatrix=bt709 |
bt709 | bt709 | bt709 |
Same setparams fix on a libx265 encode |
bt709 | bt709 | bt709 |
The first row is a real defect: the file carries a matrix and leaves transfer and primaries unknown, so the player guesses, and players guess differently. One extra filter fixes it, and you’d never catch it by watching the export on your own machine.
3. Colour management in your editor
If you’re grading rather than converting, tell the app what the source is and what the timeline should be. In DaVinci Resolve that’s clip attributes plus a Rec.709 output transform; in Final Cut Pro it’s a Rec.709 project colour space and letting the app read the clip’s own log metadata. This route beats a LUT when you want to grade log footage afterwards, because the conversion happens in the working space instead of being baked in before you touch a wheel.
One caveat on FFmpeg. Its zscale filter offers BT.709, linear, PQ and HLG transfers, but no S-Log3 curve, so the filter-only route that works for HDR sources doesn’t exist for camera log. A 3D LUT is the practical path, which is why the command above uses one.
What the pixels do when you get it right
Eight grey patches of log footage, S-Log3 codes in and Rec.709 codes out, read back from the raw frames after an lut3d pass. The expected column comes from the published formulas; the measured column is what the filter wrote.
| Scene value | S-Log3 code | Rec.709, expected | Rec.709, measured | 8-bit |
|---|---|---|---|---|
| 0.3% black | 115.3 | 75.8 | 75.8 | 3 |
| 1% black | 162.7 | 103.4 | 103.8 | 12 |
| 2% black | 210.4 | 142.8 | 143.1 | 23 |
| 5% black | 289.1 | 227.3 | 227.4 | 48 |
| 18% grey | 420.0 | 422.3 | 422.7 | 104 |
| 45% grey | 520.4 | 649.4 | 650.5 | 171 |
| 70% grey | 569.7 | 797.2 | 798.2 | 214 |
| 90% white | 597.9 | 895.4 | 896.9 | 242 |
Max deviation from the expected values: 1.5 codes out of 1023, which is the cost of interpolating in a 33-step cube. An identity LUT through the same pipeline returned every input code untouched, so that reading is the filter’s maths and not the harness.
Six mistakes that ruin a log conversion
Mistake 1: applying the LUT twice
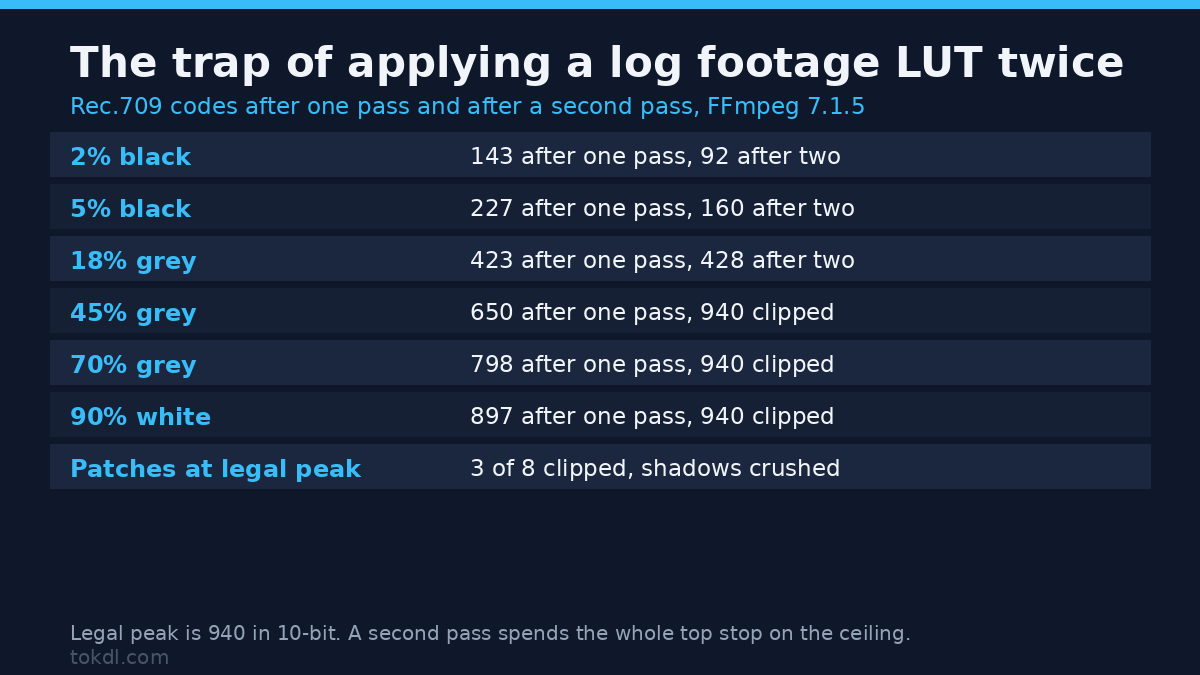
It happens when a clip already carries a conversion node and you drop the LUT on the timeline as well, or when a second pass runs over converted output. Log footage through one pass lands where it should. Through two, shadows collapse: my 5% black patch fell from code 227 to 160, and three of the eight patches hit the legal ceiling of 940, which is 255 in 8-bit. Clipped highlights and crushed blacks, from one duplicated node.
Mistake 2: using a LUT built for another camera
Log profiles aren’t interchangeable. Each allocates its codes with a different curve and a different white point, so an S-Log3 LUT on Canon C-Log footage bends the midtones and pushes skin tones off. If the result needs a fixed correction, the LUT is wrong, not the footage.
Mistake 3: grading and delivering from an 8-bit intermediate
A 10-bit log frame has 1023 codes, and the same frame stored as 8-bit has 255 before any conversion. When I quantised the log input to 8 bits and ran the same LUT, the worst patch landed 9 codes away from the 10-bit result, or 2.6 steps in the finished 8-bit picture, and the error grew as values got brighter. That’s before a grade. If you plan to push contrast afterwards, keep the intermediate at 10 bits and convert at the end, and see our 8-bit vs 10-bit colour depth guide for where those levels go.
Mistake 4: trusting the file’s tags without checking
Converted log footage with an unknown transfer curve looks plausible on your laptop and wrong on someone else’s TV. Probe the delivery file rather than assuming the flags worked.
Mistake 5: assuming a matrix mismatch is harmless
I encoded five colour patches with the BT.709 matrix, then decoded the same samples as BT.601, which is what a mistagged or untagged file invites. Pure red came back as (233, 0, 2), pure green as (20, 255, 8), and a skin tone as (217, 167, 132) against a true (222, 170, 130). The biggest single-channel error was 22 of 255, and it lands on the colours people notice: logos, brand colours and faces.
Mistake 6: shipping the conversion at the wrong size
A 4K log clip encoded at the same bitrate as a 1080p one won’t keep the detail the conversion just recovered. Pick the rate from the resolution and the motion, then check the delivered file rather than the timeline preview. Our bitrate guide has the numbers for common resolutions.
A five-minute checklist
- Identify the exact log profile before you touch anything, because every later step depends on it.
- Apply the matching vendor LUT to the log footage once, or set the source colour space in your editor.
- Check mid grey. 18% should sit near code 423 in 10-bit, or 104 in 8-bit.
- Check black and white on a waveform: 64 and 940 in 10-bit, 16 and 235 in 8-bit.
- Probe the exported file for primaries, transfer and matrix before you upload it.
- Grade after the conversion, not before, and keep the working copy at 10 bits.
FAQ
Can I convert log footage to Rec.709 without a LUT?
In most editors, yes, by setting the input colour space on the clip and letting the app do the transform. In FFmpeg, no, not with the built-in colour filters alone, because zscale has no S-Log3 transfer curve. An analytic LUT built from the published curve works fine there, as it did for every measurement above, and our FFmpeg commands guide covers the rest of the chain.
Is log footage better than shooting in Rec.709?
Only if you grade it. Log footage buys highlight headroom and grading latitude at the cost of a flat starting image. If you don’t plan to grade, the camera’s standard profile gives a more finished picture with less work.
Do I convert before or after editing?
Convert first, then edit. Cutting log footage against converted footage is guesswork, because the two look nothing alike and your exposure decisions drift. If your editor supports colour management you get both at once, because the timeline displays Rec.709 while the source stays log.
The short version
Log footage looks flat because a log curve hands every stop of exposure a similar share of the available codes, while a display curve does the opposite. Converting to Rec.709 is a single transform, applied once, with the right LUT and the right tags, and it converges on two landmarks you can check in seconds: 18% grey near code 423, and black and white at 64 and 940 in 10-bit. Get those right, grade afterwards in 10 bits, and your grey clips look like the ones you shot in standard mode, except they still have their highlights.