
How to Record Gameplay on PC: Settings That Stop Dropped Frames (2026)
The game runs at 90 fps. The recording comes back at 40, stuttering every few seconds. Nothing’s broken: the game and the encoder are drawing on the same graphics card, and the encoder is losing that fight.
That single conflict explains most bad gameplay captures. Frame drops, black frames, audio that drifts, files that end up several times larger than the session needed. That’s configuration, not hardware.
Whether you want to record gameplay on PC for a highlight reel, a bug report, or a full playthrough, the order of fixes stays the same. Pick the right capture source, hand the encoding to dedicated silicon, and leave the game enough GPU to breathe.
The settings to record gameplay on PC without stutter
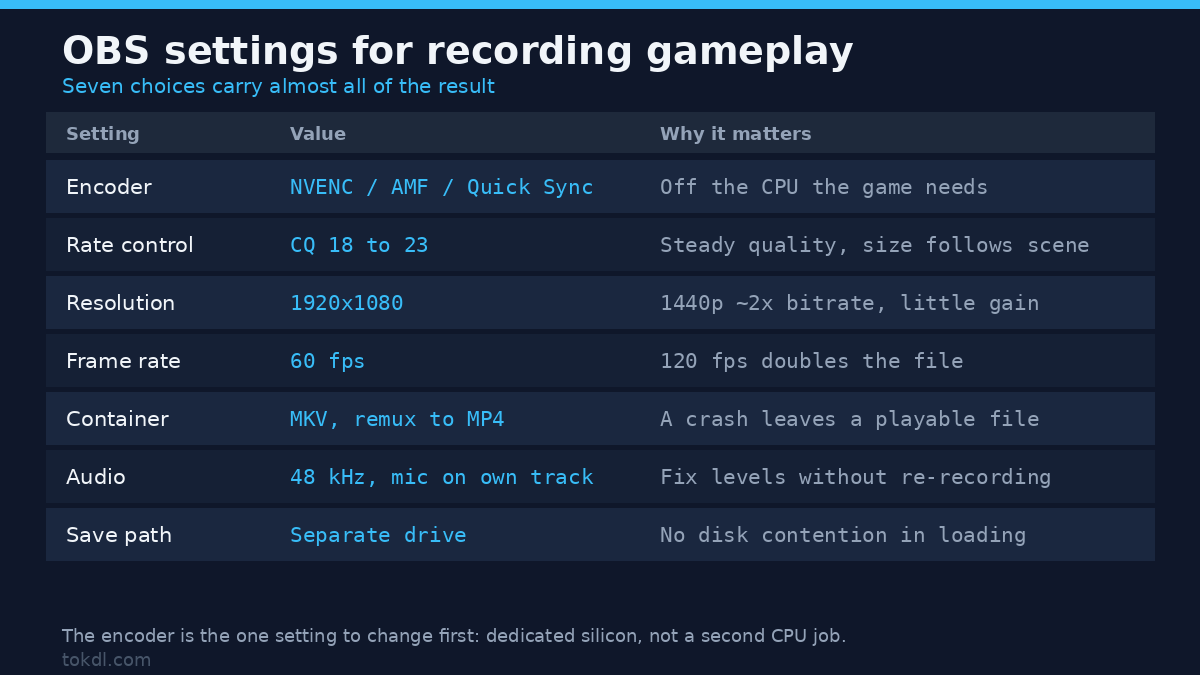
Seven choices carry almost all of the result when you record gameplay. Set these first. The rest of this guide explains why each one matters and what to change when something still goes wrong.
| Setting | Choose | Why it matters |
|---|---|---|
| Encoder | GPU encoder: NVENC, AMF, Quick Sync or AV1 | Moves encoding off the CPU the game needs |
| Rate control | CQP / CQ 18 to 23 | Quality stays steady; size follows scene complexity |
| Output resolution | 1920×1080 | 1440p capture costs roughly double the bitrate for little visible gain |
| Frame rate | 60 fps | 120 fps doubles the file for motion most players never see |
| Container | MKV, remuxed to MP4 later | A crash leaves a playable file instead of a dead one |
| Audio | 48 kHz, microphone on its own track | Lets you fix levels in editing without re-recording |
| Save path | A drive the game is not reading from | Removes disk contention during loading screens |
If you change only one thing about gameplay capture, change the encoder. A GPU encoder on the same card as the game is still the cheaper option, because the encoding block is separate silicon rather than a second job for the CPU. The trade-offs between hardware encoding and the software alternative are worth understanding before you blame the card.
Four checks before the first recording
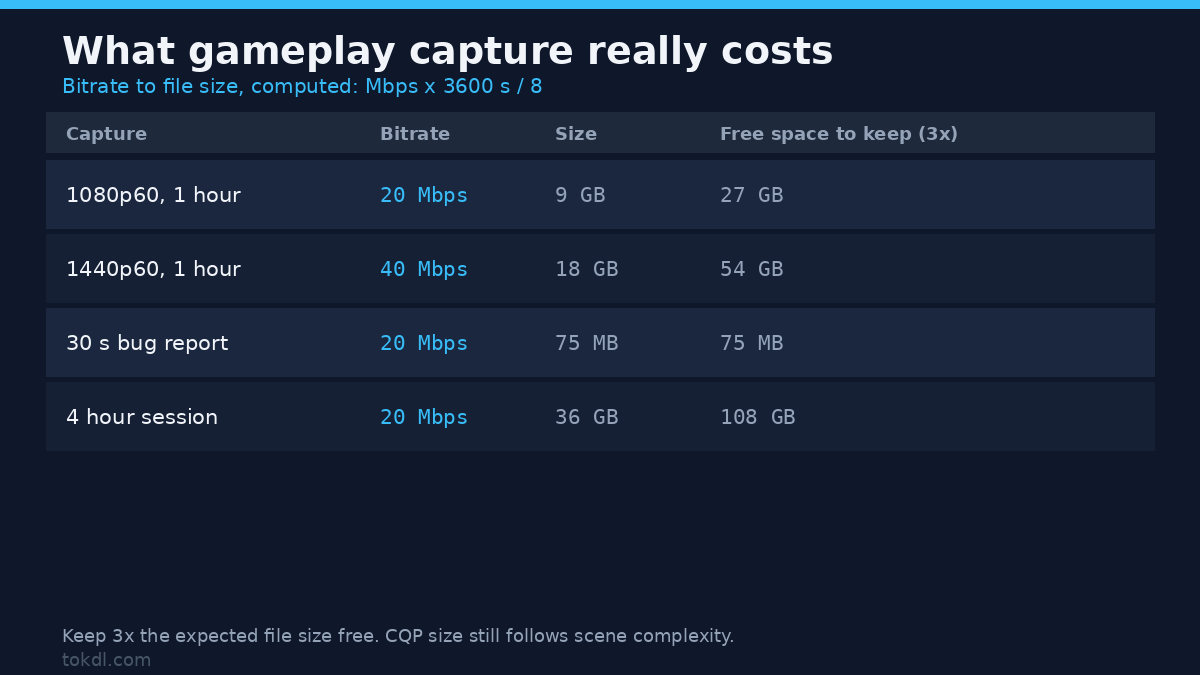
Start with the drive. At 1080p60 and 20 Mbps, an hour of gameplay footage lands near 9 GB, and Windows, the game and the recorder are all reading and writing at once. Keep about three times the expected file size free, and never record to the same slow disk the game streams from. That one number accounts for more failed sessions than any other when you record gameplay on PC.
Next, the display. If Windows is set to 30 Hz, a 60 fps recording captures a 30 Hz desktop and the game feels wrong while you play. Check the refresh rate in display settings before blaming the recorder for choppy output.
Then the capture source. A laptop with integrated and discrete graphics can present the game on one processor and the desktop on the other, which is where black recordings come from. Game capture hooks the game’s graphics context directly and avoids the problem, while a general screen recording guide covers the non-gaming cases.
Finally, HDR. If Windows HDR is on while the recorder writes SDR, colors come out flat and washed. Either record HDR with HEVC or AV1, or turn HDR off for the session and save yourself a tone-mapping step.
Method 1: OBS Studio, set up for a game
OBS is free, open source, and the tool most gameplay guides assume. Its defaults lean toward streaming, which is why a fresh install so often produces soft or stuttering files. The official quick start guide covers installation and scenes; the steps below are the ones that decide whether the recording is usable.
- Open Settings and switch Output Mode to Advanced. The Simple mode hides the rate control you need.
- In the Recording tab, pick the hardware encoder for your card: NVENC H.264, AMD HW H.264, Apple VT, or HEVC and AV1 if the card supports them. Set Rate Control to CQP and CQ to 20.
- Set the preset to P5, Tuning to High Quality, Multipass to Two Passes, Profile to high, and turn Psycho Visual Tuning on. Leave Look-ahead off; it adds latency for a small quality gain.
- In the Video tab, set the base canvas to your monitor’s native resolution and the output to 1920×1080 at 60 fps, with Lanczos scaling.
- In Audio, choose 48 kHz. Open Advanced Audio Properties, put desktop audio on track 1 and your microphone on track 2, and enable both tracks for recording.
- Add a Game Capture source, set it to capture any fullscreen application or a specific window, then record. Choose MKV as the format.
CQ 20 is the working default. Lower numbers keep more detail and produce larger files: 18 is close to transparent, worth it for footage you’ll grade or archive. Moving to 23 cuts size noticeably and softens fine grain, which is a fair trade for a highlight reel.
After the session, use File and then Remux Recordings to convert the MKV to MP4 without re-encoding. The picture is untouched and the file becomes editable in tools that refuse MKV.
Leave the GPU some room while it encodes your gameplay. If OBS reports encoding overload, drop the preset a step and raise CQ by two before you touch the resolution. If the game itself drops frames, cap it a little below your monitor’s refresh rate so the capture has headroom to work with.
Method 2: Game Bar, NVIDIA and AMD overlays
Windows already ships a recorder. Press Win+G, open the capture widget, and the last few seconds or minutes are already in a buffer if background recording is on. Settings, then Captures, controls frame rate, video quality, and whether the microphone and system audio are both included.
Its advantages are real: nothing to install, no scene to build, and a direct hook into the game. For a thirty-second clip of something that just happened, it’s the fastest route by a wide margin.
Its limits show up on longer gameplay sessions. The buffer covers a short window rather than a whole evening, bitrate control is minimal, files land with generated names, and everything shares one audio track. The overlay’s frame rate is also less consistent than a dedicated recorder’s, which matters once you start editing.
The NVIDIA overlay and AMD’s Adrenalin software sit in the same category with more knobs: configurable bitrate, instant replay length, separate microphone and desktop audio. Both encode on the GPU, so the cost is small. Both can also produce variable frame rate files, and that quirk causes audio drift later, so convert to a constant frame rate before you edit.
What gameplay capture tools can and can’t do
Every gameplay recorder here performs the same core job. It asks the graphics driver for the frames the game just presented, passes them to an encoder, and writes the result to disk. Hardware encoders do that on a dedicated block of the GPU, which is why the encoder support matrix matters more than the marketing on a product page.
The limits are the useful part. A recorder can’t capture a protected surface: storefront video players and some launchers return black by design, and no setting changes that. It can’t rescue a game that’s already stuttering, because the stutter happens before the frame reaches the capture layer.
For gameplay that must not touch the gaming machine, a capture card is the exception worth knowing. It takes HDMI from a console or a second PC and encodes independently of the gaming machine, which removes GPU contention entirely at the cost of hardware and a second device.
One caution about overlays. Some competitive games treat injected overlays as a risk, and anti-cheat teams change their rules without notice. Check the game’s own support pages before you record ranked matches with an overlay running.
Rights and responsible use
Recording gameplay doesn’t transfer any rights to the game. The footage on your screen belongs to the studio that made the game, the music inside it belongs to whoever licensed it, and your recording is a copy of both. What you may do with that copy depends on the publisher’s fan-content policy and on the rules of the platform you upload to.
Most publishers allow gameplay videos, including monetized ones, and most draw a line at cinematics, licensed soundtracks and assets reused to build a competing product. Read the policy for the specific game instead of assuming the last one you checked applies to this one.
Voice chat is a separate matter. Recording a friend’s voice needs their agreement, and publishing it needs more than that. The same holds for another player’s stream: capturing it isn’t the same as owning it.
Personal reference and redistribution are different acts. A clip you keep to study your own aim isn’t the same as a clip you upload for an audience, and commercial use sits further still. Recording something grants no rights to it, and the Steam subscriber agreement is blunt about this: a game purchase licenses personal use, not ownership of the content inside it.
Troubleshooting: six failure states and their causes
The recording stutters but the game runs smoothly
Open the stats panel in OBS while you record gameplay. Skipped frames due to encoding lag mean the encoder is saturated: raise CQ by two, drop the preset one step, or switch from HEVC to H.264. Frames missed due to rendering lag mean the GPU has nothing left for the recorder: cap the game’s frame rate or lower a graphics setting.
The capture is black or shows only the desktop
On a laptop with two graphics processors, display capture often grabs the integrated GPU while the game renders on the discrete one. Switch to game capture, or tell Windows to run the recorder on the high-performance GPU. Protected video players record black on purpose.
Audio drifts out of sync over a long session
Two causes, one fix each. A 44.1 kHz microphone feeding a 48 kHz session drifts slowly, so match the sample rates. A variable frame rate source makes the video clock disagree with the audio clock, so convert the file to a constant frame rate before editing it.
Files are far larger than expected
Scene complexity drives CQP file size during gameplay, so a bright, fast, particle-heavy game costs more than a dark corridor at the same setting. Raise CQ toward 23, drop to 30 fps for slow titles, or switch to HEVC or AV1, which need less bitrate for the same visible quality.
The recording stops, or the file won’t open after a crash
MP4 writes its index at the end of the file. If the encoder dies mid-session, the index is never written and players see an unreadable file. Record to MKV or to a hybrid MP4 format that a crash can’t orphan.
Your voice is buried under the game audio
A single mixed track can’t be repaired later. Put the microphone on its own track, add a compressor and a limiter to it, and pull desktop audio down by 6 to 10 dB in the mixer. Ducking the game under speech in the editor then takes one keyframe.
Frequently asked questions
How do I record gameplay on PC without lag?
Use a hardware encoder and cap the game’s frame rate. Encoding on the GPU moves the work to dedicated silicon, and a frame cap leaves headroom for the capture to keep up. If lag persists, record at 30 fps or lower the output resolution.
Does OBS record gameplay better than Game Bar?
Yes for anything longer than a short clip. OBS gives you encoder choice, separate audio tracks, a steady frame rate and control over the container. Game Bar stays the faster option when all you need is the last thirty seconds.
What frame rate should I record gameplay at?
60 fps suits most games, 30 fps suits slow or turn-based titles. Recording at 120 or 144 fps makes files roughly twice as large and gains nothing unless you plan slow motion.
Why is my gameplay recording black?
The wrong capture source is the usual cause. Switch from display capture to game capture on laptops with two GPUs, and expect protected video players to record black regardless of settings.
How much disk space does an hour of gameplay take?
About 9 GB at 1080p60 and 20 Mbps, and the figure scales with bitrate: 40 Mbps is roughly 18 GB per hour. Keep at least three times the expected size free on the recording drive.
Can I record gameplay on a laptop?
Yes, with two adjustments. Use game capture instead of display capture, and make sure Windows runs both the game and the recorder on the discrete GPU.
Does recording gameplay reduce in-game performance?
It can cost a few percent with a GPU encoder, and considerably more with a software encoder. The effect shows up as a slightly lower average frame rate and less consistent frame pacing under heavy load.
Which method should you use?
If you only record gameplay on PC a few times a month, and what you want is the last thirty seconds of something funny, use Game Bar or the GPU overlay. Nothing to install, nothing to configure, one keystroke.
If you plan to capture a full session, or you want footage you can actually edit, use OBS. The setup takes ten minutes and stops being interesting after that, which is the point.
And if the recording still stutters after all of it, the answer is rarely a better tool. It’s a frame cap and two points of CQ.