
How to Record Your Screen on Windows, Mac and iPhone (2026 Guide)
You close the tab, and the error message is gone. The settings screen that took twenty minutes to reach is closed. Whatever you were looking at, you cannot look at it again unless you recorded it.
Screen recording is the most underused tool on any device. Almost every modern Windows PC, Mac and iPhone can do it with software that is already installed. This guide shows how to record your screen on Windows, Mac and iPhone in 2026, what each built-in recorder can capture, and what to do when the result comes out silent or black.
The short answer
Windows: open the Snipping Tool and press the record button. Mac: press Shift+Command+5 and choose the screen option. iPhone: open Control Center and tap the record circle. Each one saves a video file you can share, edit, or convert. The steps below go through the details that usually trip people up.
What to prepare before you record
Clear the desktop of windows you do not want in the video. Close anything with personal information, and open the tabs or apps you actually need. A clean screen makes a cleaner recording and saves you an edit pass later.
Decide where the sound comes from. A microphone captures your voice, while system audio captures what the computer plays. Built-in recorders handle the microphone on every platform, but system audio support varies, especially on phones. Test both settings before the recording you actually care about.
Check free storage. Video files grow quickly, and a long recording can take hundreds of megabytes. Leave room on the device or the recording will stop on its own.
Method 1: record your screen on Windows
Windows 10 and Windows 11 ship with two recorders. The Snipping Tool handles short clips of any window. The Xbox Game Bar records games and individual apps. Neither requires an account or an install.
Record with the Snipping Tool
Press Win+Shift+S to open the Snipping Tool, or search for it in the Start menu. Select the video mode, choose the area to capture, and press the record button. A small floating toolbar appears while recording; press Stop when you finish.
The Snipping Tool keeps the recording in its window where you can trim it before saving. Export it as an MP4 file. Microsoft’s official instructions cover the buttons and the keyboard shortcuts, and the page is worth a look if anything looks different on your version. Microsoft’s Snipping Tool guide has the details.
Record with the Xbox Game Bar
Press Win+G while a game or app is open. The Game Bar overlay appears with a capture widget. Press the record button or Win+Alt+R to start and stop. By default it saves clips into the Videos folder under Captures.
The Game Bar is designed for one active window at a time. For a browser tab or a game it works well. For a walkthrough that spans several windows, the Snipping Tool or a dedicated recorder is easier.
Method 2: record your screen on Mac
macOS has a built-in screen recorder that has barely changed since it arrived, and that is a compliment. Press Shift+Command+5 to open the recording toolbar.
Choose between recording the whole screen or a selected portion. The Options menu lets you pick the microphone, show clicks, and set a timer. Press the record button, and stop from the menu bar icon when you finish. The file lands on the Desktop as a .mov by default.
Apple documents the toolbar and the shortcuts on its official help page, including the option to add a camera view. For a voiceover tutorial this is often enough on its own. Apple’s screen recording help walks through every button.
Method 3: record your screen on iPhone
iPhone screen recording lives in Control Center. Swipe down from the top-right corner on Face ID models, or up from the bottom on older ones, and tap the record circle. A three-second countdown runs, then the recording starts.
To stop, tap the red bar at the top-left and confirm, or open Control Center again and tap the record button. The video saves into the Photos app. If the record button is missing, add it in Settings under Control Center.
Hold the record button to see the microphone toggle. Without it, the recording captures the screen only. App audio capture depends on the app and the iOS version, so check a short test clip before you rely on it.
What the tools in this space actually do, and their limits
The built-in recorders cover the common cases: a short clip, a call you are part of, a walkthrough you are giving. They fail when you need multiple sources, a live camera view, or fine control over resolution and bitrate. That is where open-source OBS Studio comes in.
OBS lets you build a scene from a screen capture, a window, a camera, and audio inputs, then record or stream it. It is free and runs on Windows, Mac and Linux. The trade-off is a steeper learning curve: the scene system, the source list, the audio mixer and the output settings take an afternoon to learn, and the defaults are not tuned for a quick clip.
Every recorder shares the same hard limits. Protected video from streaming services records as a black screen, because the apps refuse to render it to a capture. Ordinary recorders cannot get around that, and none should try. Screen capture also uses CPU or GPU, so long recordings on older hardware may stutter.
Rights and responsible use
A screen recording of your own screen is your file to keep. The moment the screen shows something that belongs to someone else, the recording does not make it yours. A video call with other people, a stream you are watching, or a document you borrowed are all someone else’s content.
Keep recordings for personal reference and you are on safe ground with almost everything you capture. Sharing, republishing, or selling a recording of content you do not own is a different matter, and platforms set their own rules for what you may upload. Saving something grants no rights to it, and a recording is no exception. YouTube’s Terms of Service show how a platform frames that line.
Troubleshooting common recording problems
The recording has no sound
The microphone was probably off. On Windows, check the Snipping Tool audio settings and the Game Bar capture settings. On Mac, open the Options menu before you press record and pick the right input. On iPhone, hold the record button and enable the microphone. Re-test with a five-second clip.
The video is a black screen
Protected content blocks capture by design. Streaming apps and some players refuse to render DRM-protected video into a recording, and the result is a black frame. This is expected, not a fault. Record the parts you are allowed to, or use the app’s own download or offline feature.
The recording stops by itself
Storage ran out or the device got hot. Free up space and keep an eye on the file size as you record. On older iPhones, long recordings can end when the phone throttles; split long sessions into shorter clips.
The file is too large to send
High resolution and 60 fps inflate file size fast. Re-record at a lower resolution, or compress the finished file with free desktop tools. Our guide to compressing video without losing quality covers the settings that matter.
I cannot find the saved file
Each platform has its own default. Windows Snipping Tool saves where you choose; Game Bar uses the Videos folder. Mac saves to the Desktop. iPhone saves to Photos. If a Mac file is not on the Desktop, it was saved to the last location you picked in the Options menu.
The Snipping Tool record button is missing
The video mode arrived in a Windows 11 update, so older builds show only screenshots. Update Windows, or use the Xbox Game Bar instead, which records on both Windows 10 and 11.
Frequently asked questions
How do I record my screen with audio?
Enable the microphone before you start. Windows: Snipping Tool settings or Game Bar. Mac: the Options menu in Shift+Command+5. iPhone: hold the record button and turn on the microphone. System audio is a separate toggle and is not available everywhere, so test first.
Does iPhone screen recording capture sound?
Only the microphone, unless you enable it. Tap and hold the record button in Control Center and switch the microphone on. App audio may or may not be captured depending on the app and the iOS version, so a short test clip tells you what you get.
Can I record my Mac screen without extra software?
Yes, with the built-in recorder. Press Shift+Command+5, choose the screen option, and press record. The file saves to the Desktop as a .mov file.
Why does my recording show a black screen?
Protected video blocks capture by design. DRM-protected content in streaming apps does not render into recordings, and no setting fixes that. Record only what you are allowed to capture.
How long can a screen recording be?
As long as the device has storage and power. There is no fixed time limit on the built-in recorders; long sessions end when the disk fills or the device overheats. Short clips are safest for sharing.
Is it legal to record my screen?
Recording your own screen for personal reference is generally fine. Recording other people’s content, calls, or streams is governed by their rights and the platform’s terms. A recording does not give you permission to share or republish what is not yours.
Where are screen recordings saved on iPhone?
In the Photos app. Open Photos and look at the newest video. You can trim it there and share it from the same screen.
Which method should you use?
A quick clip of a single window on Windows: the Snipping Tool. A game or an app that fills the screen: the Xbox Game Bar. A Mac walkthrough with a voiceover: Shift+Command+5 with the microphone on. Anything on an iPhone: Control Center. A multi-window tutorial, a lecture, or anything with a camera view: OBS Studio.
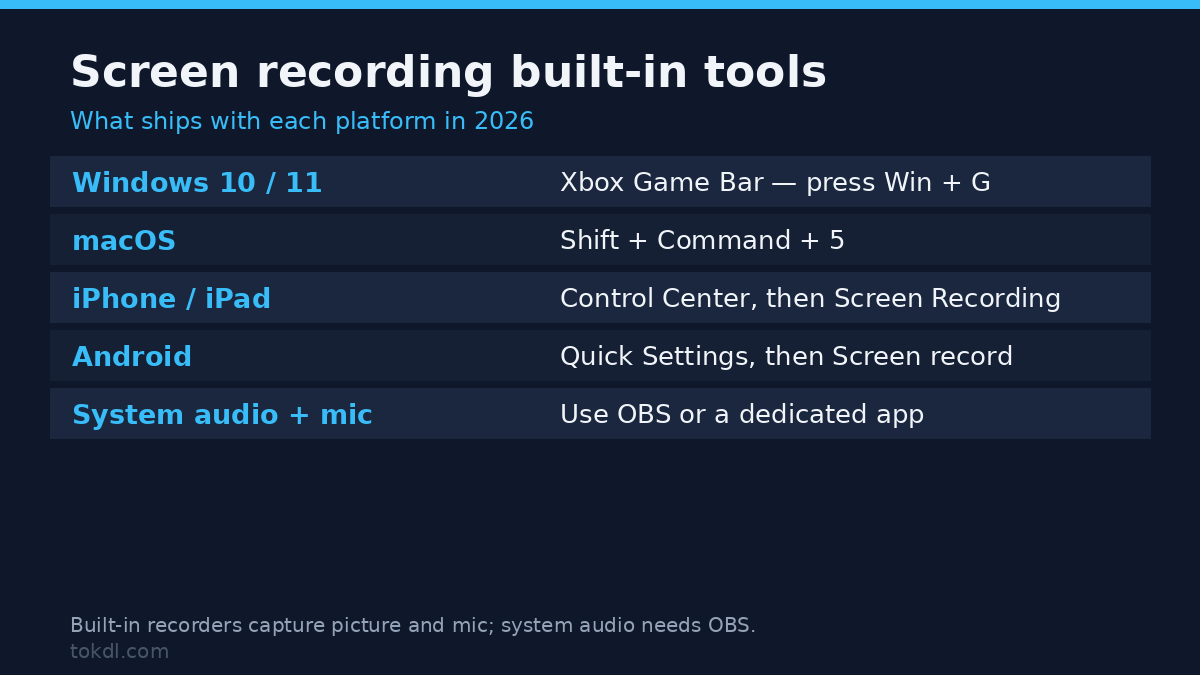
| Device | Built-in tool | Use it for |
|---|---|---|
| Windows | Snipping Tool, Game Bar | Short clips, games, single windows |
| Mac | Shift+Command+5 | Whole screen, portions, voiceover |
| iPhone | Control Center | Quick clips, anything on the phone |
| All | OBS Studio | Scenes, camera view, full control |
Pick the tool that matches the recording, not the most powerful one. The built-in recorders handle most days. OBS is there when the built-in tools run out of rope, and when you finish, our guides on converting the result to MP4, pulling the audio out, or turning a clip into a GIF cover the next step.
[…] the footage came from recording your screen, the capture step matters more than the trim. A clean recording with the right area selected trims […]
[…] when the camera app has location permission, which is the default on both iPhone and Android. A screen recording of your desktop carries almost none of this, because it never uses the camera […]
[…] a 1080p screen at 4K quality gives you an upscaled 1080p, not new detail. If you record often, our guide to recording your screen walks through the settings that decide the […]
[…] the right way. For display captures, check the recorder’s orientation controls before you record your screen. When length is the real problem after orientation, a separate trimming guide covers cutting the […]
[…] and editors assume a constant one. Normalize the file to a fixed rate before editing, and the screen recording guide covers the capture side of this […]
[…] switched off in settings, and a clean second take costs less time than guessing at a resample. The screen recording guide goes through those settings per […]
[…] Windows and macOS both ship with a recorder that needs no installation, and the same tools let you capture your screen when no meeting is involved at all. Both record your voice through your microphone, and neither can […]
[…] capture hooks the game’s graphics context directly and avoids the problem, while a general screen recording guide covers the non-gaming […]