
What Is a LUT? How to Apply Color LUTs to Video (2026 Guide)
Almost every LUT you download was built for a camera you don’t own. That single mismatch is behind most of the washed-out, milky results people blame on the filter.
A LUT, short for lookup table, is a file that remaps color values: one color goes in, another comes out, following a fixed table. It has no idea what’s in your scene, how it was exposed, or what your white balance was set to. It does arithmetic on pixels.
This guide answers what is a LUT in plain language, shows how to apply one in an editor and with FFmpeg, and is honest about the times you should skip LUTs entirely.
What Is a LUT? The Short Answer
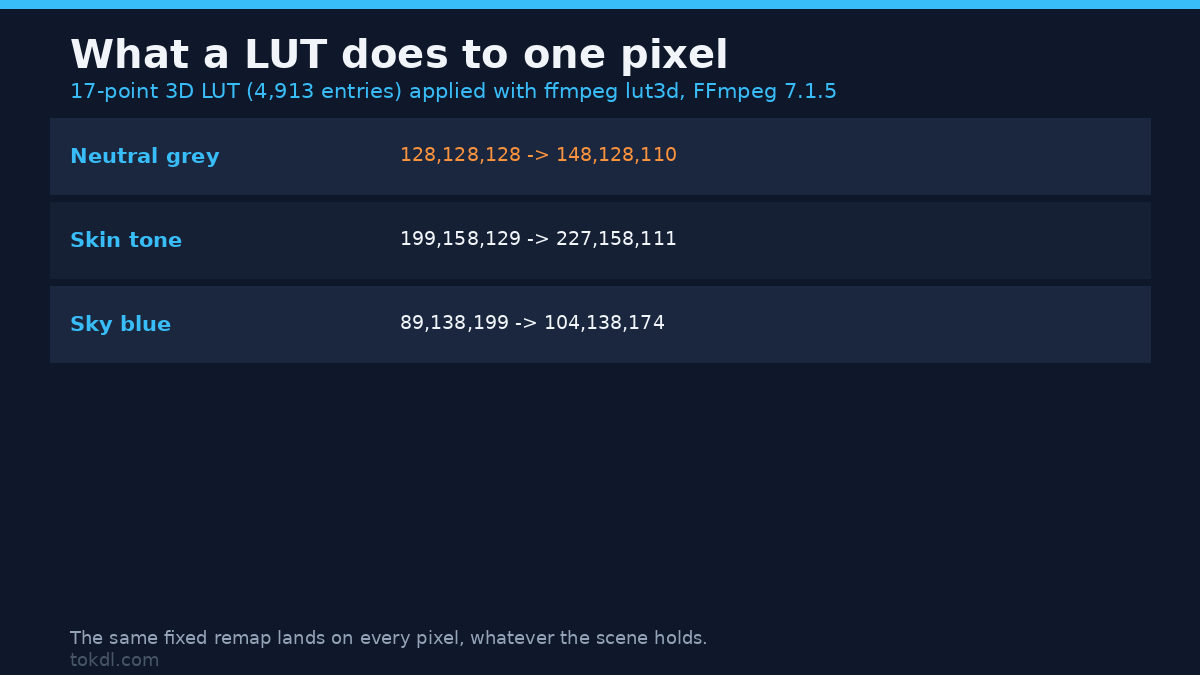
A LUT is a data file, not a filter and not a plugin. It stores a fixed mapping from input color to output color, and every pixel is pushed through that mapping. The formats you’ll meet are .cube, by far the most common, plus .3dl, .dat and .mga.
LUTs do two different jobs. A technical LUT converts footage from one defined color space to another, such as Sony S-Log3 to Rec.709, which is what a log to Rec.709 conversion actually is. A creative LUT imposes a look instead. Trouble begins when a look file is treated as a conversion.
There’s a size distinction too. A 1D LUT holds a list of values applied per channel, so it shifts tone and gamma but can’t move a color to a different hue. A 3D LUT samples a cube of RGB combinations, typically 17 or 33 points along each axis, and it can change hue. Most cinematic look files are 3D.
Before You Apply One: What Your Footage Needs
Match the file to the footage first. Read the LUT’s name and any README that shipped with it. If it says SLog3 to Rec.709 or V-Log to Rec.709, it expects log input. Apply it to footage already shot in Rec.709 and you’re stacking a second conversion on top of the first.
Check your bit depth next. A 3D LUT stretches and compresses the gaps between color samples, and 8-bit footage has fewer steps to spare, as 8-bit vs 10-bit color depth sets out. On an 8-bit source a heavy look often introduces banding in skies and gradients that no later export will remove.
Decide the order of operations and write it down. The usual chain runs a technical LUT to normalize, then a primary correction for exposure and white balance, then a creative LUT or a manual grade. Grading before the look is also valid, but most people judge an image better once it sits in a known color space.
Finally, keep the untouched originals. Applying a LUT in an editor is usually non-destructive, but every export bakes it in. Without the original clip the look stops being removable.
Method 1: Apply a LUT in an Editor
Take this route when you need to see the result and tune it. The steps are nearly the same across editors.
- Import the LUT. In DaVinci Resolve, open the Color page, right-click the LUT list and choose Open LUT Folder, drop the .cube file in, then press Update Lists. In Adobe Premiere Pro, the Lumetri Color panel has a Creative tab with a Look dropdown and a Browse option. CapCut and most mobile editors import a LUT from the filter or adjust menu.
- Set the input color space. Resolve reads the clip’s color space from Color Management or Clip Attributes, and the same LUT renders differently if that setting is wrong. Check it before you judge the look.
- Apply the LUT, then reduce its strength. Premiere exposes an amount slider in the Creative tab, and Resolve gives you node opacity or Key Output Gain. Full strength is rarely right, and somewhere between 60 and 80 percent usually is.
- Watch the scopes rather than the viewer. A waveform shows whether the blacks are crushed. Your eyes adapt to a look within seconds and stop reporting clipped highlights.
- Export and check a single frame at full size before you send anything. Judge the image, not the preview window.
Method 2: Apply a LUT With FFmpeg
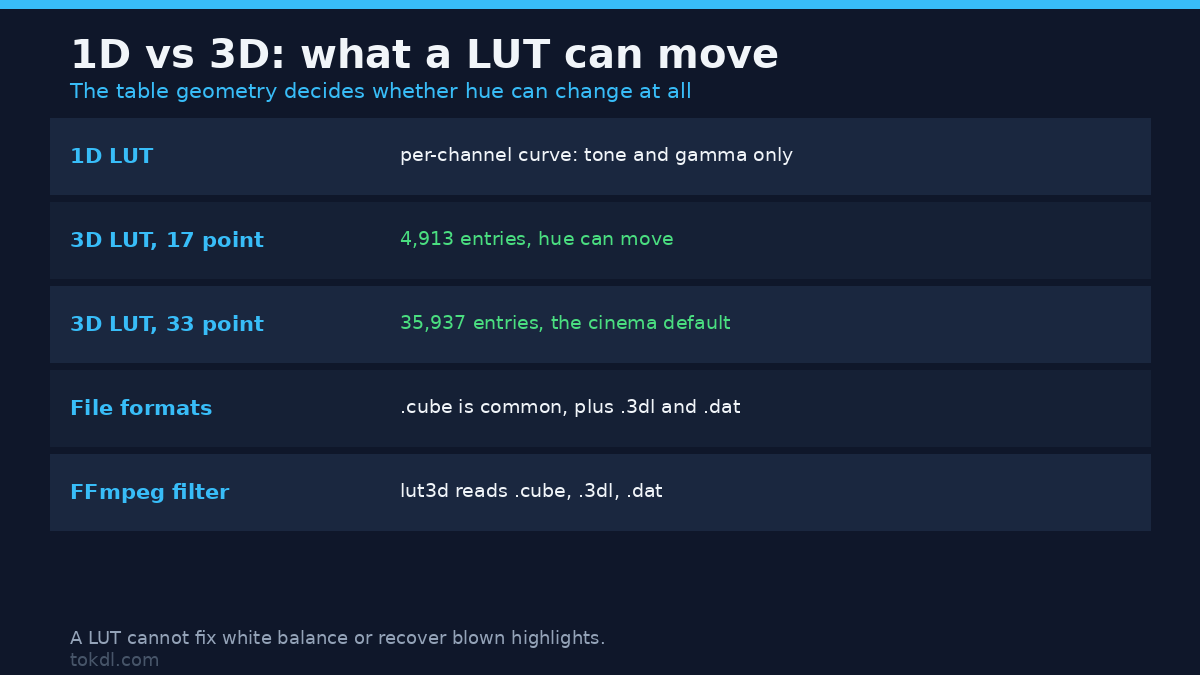
If you’ve got a batch of clips or no editor installed, FFmpeg applies a 3D LUT with a single filter. The filter is called lut3d, and it reads .cube, .3dl and .dat files.
ffmpeg -i input.mp4 -vf "lut3d=file=look.cube" -c:a copy output.mp4That command re-encodes the video, because the filter changes pixel values. Add -crf 18 for a visually lossless H.264 result, or a higher number for a smaller file. The audio is copied untouched.
Two details save time. The lut3d filter runs on the CPU and gets slow at 4K, so test on a short trim first. If your LUT only shifts brightness, the lighter lut and curves filters do the same work faster.
For a chain, keep every filter inside one -vf string and separate them with commas, because FFmpeg applies them left to right. Keep a set of everyday FFmpeg commands nearby if you work this way often. The FFmpeg filter documentation covers the interpolation modes for lut3d if the default output looks blocky.
What LUT Tools Do, and the Limits They Don’t Advertise
A LUT maps values. It can’t invent detail that was never recorded. Blown highlights stay blown, and dark noisy shadows stay dark and noisy. A strong look usually makes the noise more visible, not less.
A LUT can’t diagnose a white balance error either. Push a color cast through a look and the cast survives, wearing a different outfit. Fix white balance first and the LUT has a clean image to work on.
Look packs sold as cinematic are options, not guarantees. A look built on log footage from one camera brand can be right there and wrong on the next one along. Trial a free file before you pay for a set.
A LUT is also not an HDR converter. Display LUTs, the kind meant for monitoring on set, are built for a screen rather than for a render. Apply one to your output and you double the tone mapping. The picture goes flat and grey, and the export is wrong.
None of that’s a reason to avoid LUTs. It’s a reason to know what a LUT is before you stack three of them on one clip.
LUTs, Footage Rights and Licensing
A LUT changes how footage looks. It changes nothing about who owns it. The clip belongs to whoever shot it, and a graded version of someone else’s footage is still someone else’s footage. Saving a file, with or without a look applied, gives you no rights over it.
The LUT file itself is creative work too, with a license attached. Some packs are free for personal use only. Some ask for a paid license for commercial projects or for each editor on a team. A file that’s free to download isn’t automatically free to use in client work, so read the terms that came with the pack first.
Personal reference and redistribution are different things. Re-uploading a clip you didn’t shoot grants no permission, and neither does adding a look to it. The Creative Commons license overview is a plain-language place to check what any license actually grants.
Troubleshooting: When a LUT Looks Wrong
Most failures here are input mismatches rather than broken files. They’re the ones I hit most often too.
Washed-out, milky image
The LUT expects log input and the clip is Rec.709, or the reverse. Check the file name and your camera profile setting before you change anything else.
Crushed blacks and clipped highlights
The look carries a strong contrast curve and you applied it at full strength to an already contrasty image. Drop the intensity, or grade exposure before the look rather than after.
Skin tones shift orange or green
The LUT was built in a wider gamut than your footage, or for another camera’s color science. Insert a color space conversion before the look and the skin often settles.
Banding in skies and gradients
A heavy 3D LUT applied to 8-bit footage, then compressed hard on export. Record or convert to 10-bit where you can, and export with a gentler quality setting.
The LUT changes nothing
The editor hasn’t indexed the folder you saved into, or the file format is unsupported. Re-import it and confirm the extension is one the tool lists.
The export doesn’t match the preview
You applied a monitoring or viewer LUT, which affects only the screen. Move the file into the render path, or take it out of the chain entirely.
Frequently Asked Questions
What is a LUT in video editing?
A LUT is a lookup table that remaps the colors in an image. It stores pairs of values, one going in and one coming out, and applies them to every pixel. The file is usually a .cube.
Is a LUT the same as a filter?
No. A filter examines the image and adjusts it dynamically. A LUT applies a fixed color map, which is why the same file behaves differently on different footage.
Can I apply a LUT to 8-bit footage?
Yes, but strong looks tend to band. The gaps between color samples are wider in 8-bit, so a heavy grade can leave visible steps in skies and skin, and export compression makes them worse.
Are LUTs free?
Some are and many aren’t. Free packs often carry a personal-use license, and paid packs usually state whether the license covers commercial work and how many machines it covers.
Can a LUT fix bad white balance?
No. A LUT remaps colors; it doesn’t correct the illumination. White balance is a primary correction and belongs before the look, not inside it.
Do LUTs work on photos too?
Yes. .cube files load in Photoshop, Affinity Photo and similar editors, so the same look can carry across a photo and a video project.
Should I apply a LUT before or after color correction?
Usually after the technical conversion and before the final grade. Normalize the footage first, then correct exposure and white balance, then decide whether the look still helps.
Which Method Should You Use?
Choose by the shape of the job rather than by habit.
- One clip and no editor installed: FFmpeg with lut3d.
- A whole project with review notes: an editor, with the look dialed back to taste.
- Log footage that needs normalizing: the camera maker’s technical LUT first, then a grade. Blackmagic Design publishes a free Resolve if you want a full grading tool.
- Rec.709 footage and a vague urge to look cinematic: grade it manually first. Many clips need a small exposure tweak, not a look file.
If you take one thing from this, let it be the input side. Knowing what is a LUT is mostly knowing what it was built to receive, and that single check prevents most of the disappointing results.