
8-bit vs 10-bit Video: Which Color Depth Should You Export?
You shot a sunset, exported it, and the sky came back in stripes. Not gradients, stripes. Somewhere between the camera and the finished file, a smooth run of orange into deep blue collapsed into a handful of flat bands, and no slider in any editor puts the missing tones back. That’s the visible cost of 8-bit colour, and it’s why so many editors start asking about 10-bit video in the first place.
This guide is narrow on purpose. It isn’t about HDR, which is a different and much bigger topic (we covered the conversion side of it in our HDR to SDR conversion guide). It’s about one number: how many levels of brightness and colour each pixel can hold, and what changes when that number goes from 256 to 1024. I measured both pipelines on this machine with FFmpeg 7.1.5 instead of repeating the usual “10-bit looks better” line, and one of the numbers below is genuinely surprising.
What you’ll learn
- How many levels 8-bit and 10-bit video really store, and how wide each visible step is
- What a measured 1080p sky looks like at both depths, level by level
- The two things 10-bit video can’t fix, even though everyone assumes it can
- What the extra depth costs in size, and which encoder profile you end up with
- The exact FFmpeg command to export 10-bit video, and the flags that quietly undo it
What a 10-bit video actually stores
The number refers to bits per component, per pixel. Video keeps a luma value and two chroma values, and the depth applies to each of them separately. For banding, luma is the one that matters, because your eye is far more sensitive to brightness steps than to colour steps of the same size.
The step height is what you see
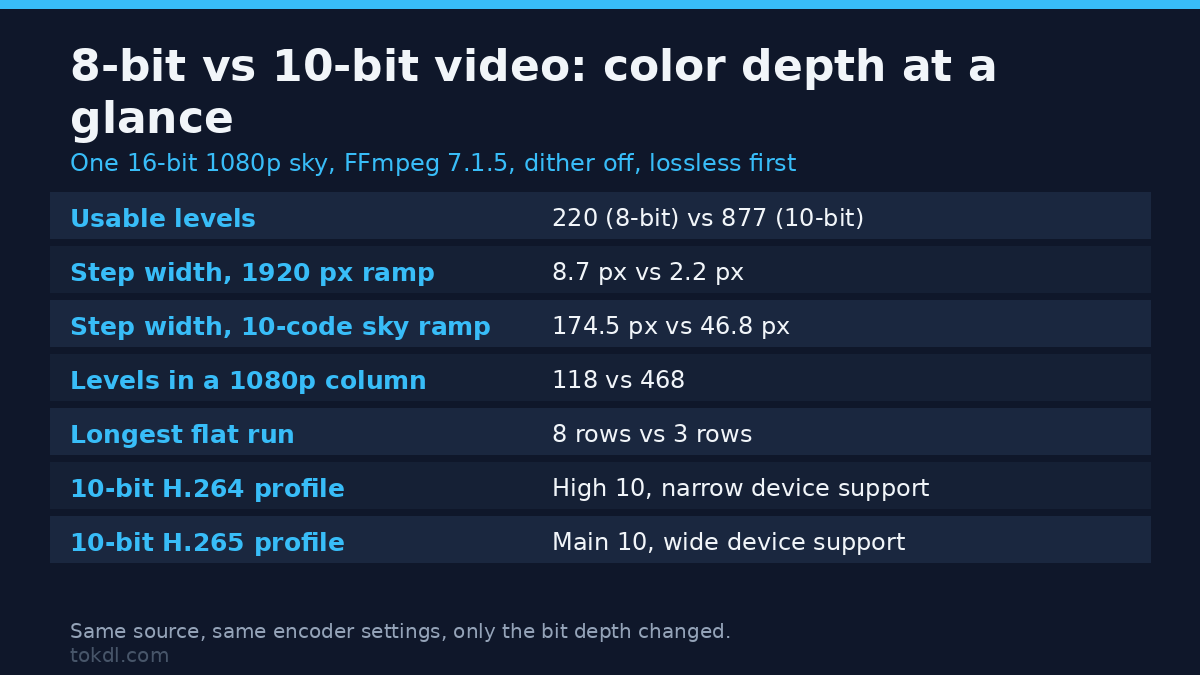
8 bits give 256 possible values per component: 0 to 255. Video doesn’t use the whole range, so a typical 8-bit export works inside roughly 16 to 235, which is about 220 usable levels. 10 bits give 1024 values, working range about 64 to 940, which is roughly 877 usable levels. That’s four times the levels, and since the range stays the same, every step is a quarter of the height.
Smaller steps mean a gradient needs more pixels before a jump becomes visible. On a ramp 1920 pixels wide the sums are simple and unforgiving. 220 levels spread across 1920 pixels gives one step every 8.7 pixels, and a subtle 10-code ramp in a dark sky gives one step every 174 pixels. Those 174 pixel wide bands are the stripes you’re seeing. Run the same two ramps at 10 bits and the steps arrive every 2.2 and every 46.8 pixels instead.
Four times the levels, not four times the file
Plenty of guides claim a 10-bit video is four times the size of the same clip at 8 bits. It isn’t, and the encodes further down show why: the extra precision replaces the hard step edges that an 8-bit encoder has to spend bits describing. What you do pay for is narrower device support, which is a real cost and gets its own section.
The test: a 1080p sky at both depths
To keep this honest I built a synthetic 1080p sky at 16-bit precision, then pushed it through both depths with FFmpeg’s scaler set to sws_dither=none. That flag matters. FFmpeg dithers by default whenever it reduces bit depth, and the dither masks exactly the banding we’re trying to count. My first run had it enabled and reported a soft, noisy gradient that hid the problem completely.
So: one source, two masters, no dither anywhere, lossless FFV1 so the encoder can’t add noise of its own. Then I counted distinct luma levels down one column of the picture.
| What was measured | 8-bit | 10-bit |
|---|---|---|
| Distinct luma levels in one column | 118 | 468 |
| Longest run of identical rows | 8 rows | 3 rows |
| Levels in a subtle 10-code ramp, 1920 px wide | 11 | 41 |
| Width of each step in that ramp | 174.5 px | 46.8 px |
| Levels in a full 16 to 235 ramp, 1920 px wide | 220 | 877 |
| Width of each step in that ramp | 8.7 px | 2.2 px |
Two things stand out. The 8-bit master holds 118 distinct levels where the 10-bit master holds 468, from identical source data. And the longest flat run is 8 rows at 8 bits against 3 rows at 10 bits. Eight identical rows on a 1080p screen is a visible stripe on any decent display, and on a big TV it’s the first thing a viewer notices in a shot of the night sky.
It’s also why the problem shows up in specific places and nowhere else. Bright, busy footage hardly ever bands, because there’s so much detail that neighbouring pixels differ anyway. Flat, low-contrast areas do it every time: clear skies, fog, underwater shots, dark interiors, and any colour depth gradient you build yourself in an editor.
Two things 10-bit video can’t fix
This is the part that costs people the most time, because both traps are easy to walk into and neither one announces itself.
Trap one: carrying an 8-bit clip into a 10-bit video timeline
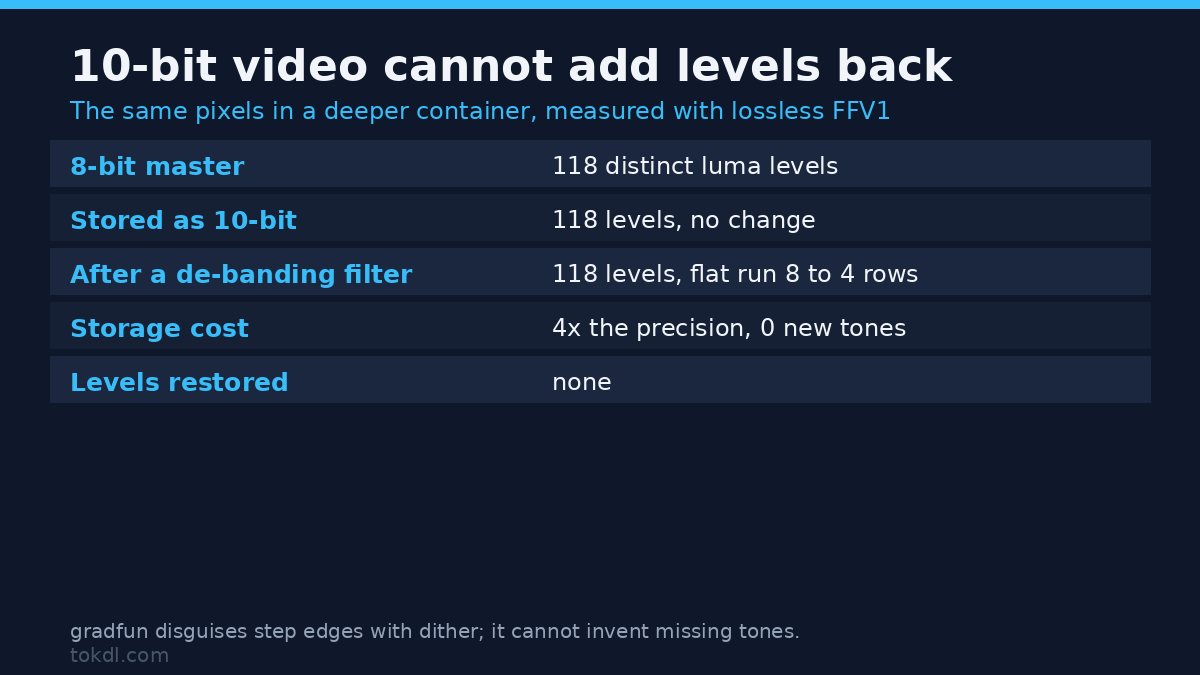
If your footage was recorded or exported at 8 bits, the steps are already baked into the pixels. Storing those pixels in a deeper container doesn’t invent levels that were thrown away. I tested it: took the banded 8-bit master, converted it to a 10-bit format with FFV1, and counted the levels again.
| Stage | Distinct levels |
|---|---|
| 8-bit master, before conversion | 118 |
| Same pixels stored as 10-bit | 118 |
118 in, 118 out. The file is four times deeper in storage terms and carries exactly the banding it started with. If your source is 8-bit, a 10-bit video export is a container change, not a quality change.
Trap two: hoping a de-banding filter adds detail
De-banding filters such as gradfun do help, but not by restoring levels. They add a fine patterned dither at the step edges, so the eye averages the two codes and reads a smoother transition. Applied to my banded 8-bit sky, the level count didn’t move at all (118 before, 118 after), while the longest flat run dropped from 8 rows to 4. Fewer obvious stripes, same underlying precision.
That’s a useful fix for a file you’ve already exported. It isn’t a substitute for capturing or exporting at 10 bits in the first place, and it’s worth knowing the difference before you spend an afternoon on filter settings.
What 10-bit video costs
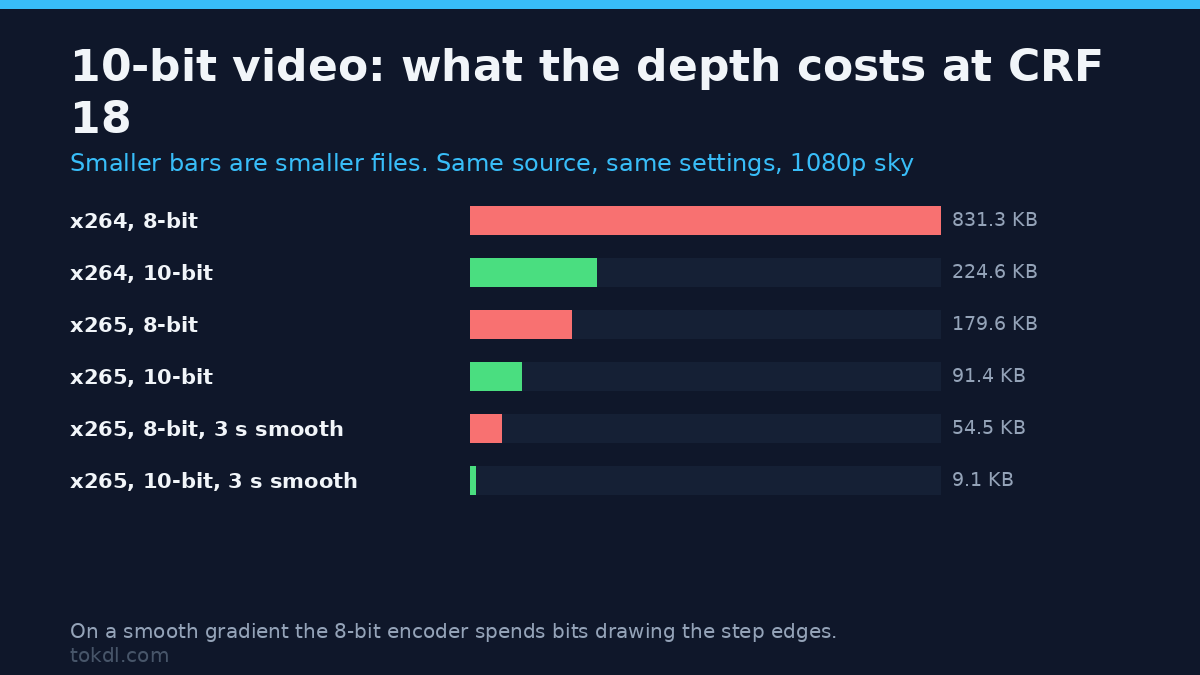
Size is where the internet’s advice goes wrong in both directions. I encoded the same smooth sky at CRF 18 at both depths, once with x264 and once with x265, holding everything else constant.
| Encoder, CRF 18 | 8-bit | 10-bit |
|---|---|---|
| x264, 1 second sky with grain | 831.3 KB | 224.6 KB |
| x265, 1 second sky with grain | 179.6 KB | 91.4 KB |
| x265, 3 second smooth sky | 54.5 KB | 9.1 KB |
| x265 at 250 kbps, SSIM against source | 0.9961 | 0.9965 |
Read that carefully, because it isn’t a general promise. On a smooth gradient, which is the best case for 10 bits and the worst for 8, the 10-bit video export came out dramatically smaller at the same CRF. The 8-bit encoder was spending bits describing step edges. On detailed, textured footage the gap narrows and can reverse, because there the bitrate goes into real detail instead of into band edges. I checked the quality side too, at a fixed 250 kbps, and got SSIM 0.9961 against 0.9965. That’s close enough that quality isn’t the reason to pick one over the other at that bitrate.
So the takeaway isn’t “10-bit saves space”. It’s that the size penalty you’ve been warned about mostly doesn’t show up on the content that needs 10 bits most.
Compatibility: the profile is the real cost
Here’s the trade that bites. Bit depth decides the profile of the file you produce, and the profile decides what can play it without help.
| Pipeline | Codec and profile | Typical support |
|---|---|---|
| 8-bit H.264 | H.264 High | Universal |
| 10-bit H.264 | H.264 High 10 | Narrow. Plenty of phones, TVs and browsers refuse it |
| 8-bit H.265 | HEVC Main | Wide on hardware from around 2015 |
| 10-bit H.265 | HEVC Main 10 | Wide on hardware from around 2016 |
I confirmed those profile names by probing the files I’d just produced, so they aren’t labels copied off a spec sheet. The important asymmetry: 10-bit H.264 is the awkward one, 10-bit HEVC isn’t. If you need 10 bits and other people have to play the file, build a 10-bit video with HEVC. If you need something that plays on anything at all, 8-bit H.264 still wins, and you deal with banding at the source.
One more thing about depth. 10 bits apply to the chroma channels as well as luma, so colour gradients in a 10-bit video get four times the precision too. That helps with saturated skies and stage lighting, where the blue or red channel bands before the brightness does.
How to export 10-bit video without undoing it
Here’s the chain that works, and the one I used for every number above. It keeps 10 bits from the moment frames enter the filter graph until the encoder writes them, and it uses the format filter rather than the scaler so nothing re-dithers behind your back:
ffmpeg -i input.mp4 -vf format=yuv420p10le -c:v libx265 -preset medium -crf 18 -tag:v hvc1 -pix_fmt yuv420p10le out-10bit.mp4Four parts of that line are doing real work. format=yuv420p10le sets the working depth inside the filter graph. -pix_fmt yuv420p10le stops the encoder from quietly dropping back to 8 bits. libx265 is the encoder that produces a widely playable 10-bit profile. And -tag:v hvc1 is the tag Apple devices want for HEVC playback. Drop the pixel format flag and you get an 8-bit file with a 10-bit label, which is the most common way people “test” 10-bit video and conclude it made no difference.
The reverse mistake matters just as much. If your source is 8-bit and you want that pipeline to look its best, leave the scaler’s dither on (it’s the default) rather than reaching for 10 bits. We used the same reasoning about scaler behaviour when we pushed a 4K source down to 1080p in our downscale 4K to 1080p guide.
Common mistakes
- Testing 10-bit by relabelling an 8-bit file. The level count doesn’t change, as measured above, so the test proves nothing. Check the encoder’s pixel format, not the filename.
- Assuming 10-bit repairs an 8-bit recording. It can’t. Those steps were lost at capture.
- Exporting 10-bit H.264 for sharing. You get the narrowest support profile in the table above for a benefit the viewer’s hardware may refuse to show.
- Chasing 10 bits while ignoring bitrate. A starved 10-bit video still looks soft, and depth won’t rescue it. Our bitrate guide covers that other half.
- Shooting deeper than your timeline. If you capture 10 bits and edit in an 8-bit timeline, the round trip puts the banding back on top of graded colour.
- Blanking on the codec. Depth and codec are separate decisions. H.264 against H.265 is about efficiency and support, while bit depth is about steps per gradient, and you’re picking both.
Frequently asked questions
Is 10-bit video always better than 8-bit?
For capture and grading, yes. For delivery, no. A 10-bit video handed to a phone that refuses the profile is worse than an 8-bit file that plays, so match the depth to where the file’s going.
Does a 10-bit video take up much more space?
On smooth gradients my encodes came out smaller at the same CRF, because the 8-bit version had to spend bits on step edges. On detailed footage the difference is small either way. Plan for a similar size, not for four times it.
Can I fix banding in an 8-bit file I’ve already exported?
You can hide it. A de-banding filter like gradfun adds dither at the edges, which cut the longest flat run from 8 rows to 4 in my test, but the level count stayed at 118. It’s a cosmetic fix, and it costs you a re-encode.
What bit depth should I shoot and export?
Shoot as deep as the camera allows, edit in at least 10 bits, and let the destination pick the export: a 10-bit video in HEVC for archive and modern delivery, 8-bit H.264 for maximum reach. If you’d rather script it than click it, our FFmpeg command reference has the building blocks.
The short version
10-bit video quadruples the levels and cuts every step to a quarter of its height, which is why a night sky stops striping. It can’t recover an 8-bit source, and no filter adds those levels back, it only disguises their edges. Measured on a real 1080p gradient, the difference is 118 levels against 468 and an 8-row flat run against 3, and at equal quality the size penalty people warn about didn’t appear on the content that needs the depth most. Build a 10-bit video in HEVC when you control both ends, stay on 8-bit H.264 when you don’t, and always check the pixel format in the encoder instead of trusting the label on the export dialog.