
FFmpeg Commands for Everyday Video Work (With Real Examples)
FFmpeg intimidated me for about three years. The documentation is enormous, the flags are terse, and every forum answer assumes you already know which of the twenty codec names you want. Then I noticed something: a handful of FFmpeg commands covers almost everything I do with video, and I’ve typed those same commands hundreds of times.
These FFmpeg commands are a working list rather than a complete reference. Every one has been run on real files, and I’ve included the failures that cost me the most time, because those are the parts nobody writes down.
Three things to know before your first FFmpeg commands
Check your install first. If ffmpeg -version returns anything other than an error, you’re ready to go. Skip this and half the FFmpeg commands below will look broken. On macOS, brew install ffmpeg covers it. On Windows, download a build, unpack it, and add the bin folder to your PATH. On Linux the package manager has probably handled it already.
I am not going to walk through every flag. Nobody needs that, including me.
The syntax never changes: input first, output last, options sitting in between.
ffmpeg [options] -i input.mp4 [output options] output.mp4Option order matters more than it should. Options placed before -i apply to the input, options after it apply to the output. Put them on the wrong side and you get results that look broken while being perfectly obedient.
When a command produces something odd, ffprobe tells you what the output contains. I check it after anything involving copy or trim, because both produce files that look correct right up until they aren’t.
What FFmpeg commands do to a file
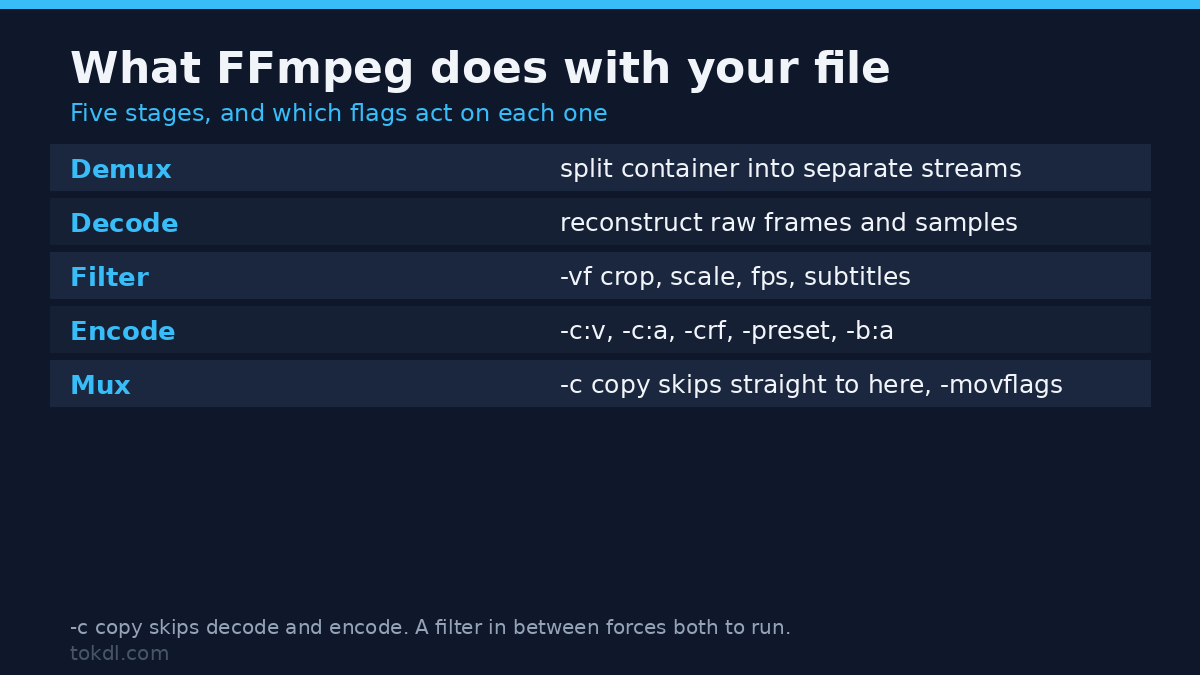
Every FFmpeg command runs the same pipeline. The container is split apart into separate streams (that part is the demuxer), each stream is decoded into raw frames or samples, any filters you asked for are applied, the result is handed to an encoder, and the encoded streams are packed into the container you named as the output. Most of the confusion in this tool comes from not knowing which stage your flags act on.
That pipeline explains two things that otherwise look arbitrary. -c copy skips the decode and encode stages entirely, which is why a remux takes one second on a two hour film. Filters, by contrast, sit in the middle of the pipeline and need raw frames to work on, so the moment you add -vf the decoder and encoder both have to run whether you want them or not. Nothing about that is a bug. It’s the cost of the feature.
The FFmpeg commands worth memorising
1. Change the container without touching the video
ffmpeg -i input.mkv -c copy output.mp4This is a remux, and it’s nearly free. The video and audio streams move into a new container without ever being decoded, so it takes seconds and loses nothing. It only works when the codecs inside are acceptable to the target container. H.264 with AAC always works. VP9 with Opus inside MP4 plays in modern browsers and fails on an older television. It’s the most useful of all the FFmpeg commands here, and the fast route for most MKV to MP4 conversions.
The rule I go by: if the output won’t open, you didn’t need a remux, you needed an encode. Every FFmpeg command below assumes you made that check first.
2. Convert when the codecs don’t match
ffmpeg -i input.mov -c:v libx264 -crf 20 -preset medium -c:a aac -b:a 128k output.mp4This is where most FFmpeg commands get their reputation for being cryptic. The -crf value is the quality dial, and it runs backwards from intuition: lower means better. Eighteen is close to visually lossless, twenty-three is the default, and anything above twenty-eight starts showing blocking on gradients and skies. -preset trades time for compression efficiency, and medium is the sensible resting place. Moving to slow buys roughly five percent of file size for twice the encoding time, which is rarely a good trade on a laptop.
Add -pix_fmt yuv420p when the result has to play on hardware you don’t control. QuickTime, some televisions, and older phones refuse 4:2:2 and 4:4:4 files that every desktop player handles without complaint.
3. Compress something that is too large
ffmpeg -i input.mp4 -c:v libx264 -crf 26 -preset slow -vf scale=1280:-2 -c:a aac -b:a 96k output.mp4Two changes do the work in this FFmpeg command: a higher CRF and a smaller frame. scale=1280:-2 sets the width to 1280 and lets FFmpeg work out the height, with the minus sign forcing an even number because H.264 demands one. Writing -1 instead of -2 is behind most of the “width not divisible by 2” errors I’ve seen in the wild. If the file still has to be smaller, the CRF and scaling trade-offs are worth understanding before you lower the number blindly.
4. Pull the audio out of a video
ffmpeg -i input.mp4 -vn -c:a libmp3lame -q:a 2 output.mp3-vn means no video stream. It’s easy to forget, and forgetting it produces a surprisingly large MP3. -q:a 2 asks for variable bitrate around 190 kbps, which uses space far better than a fixed 320. Swap in -c:a copy when the source audio is already AAC and you want it untouched. It’s the shortest FFmpeg command in this list.
5. Trim without re-encoding
ffmpeg -ss 00:01:30 -i input.mp4 -t 45 -c copy output.mp4That cuts 45 seconds starting at the ninety second mark, and it finishes almost instantly. The catch is that copy mode can only cut on keyframes, so your cut may land a second early. Drop -c copy when you need frame accuracy and accept the re-encode.
Keep -ss before -i whenever you can. It seeks the input first instead of decoding everything up to your timestamp, which on a long recording is the difference between two seconds and two minutes. Those two FFmpeg commands run on almost every file I touch.
6. Crop, scale, or both
ffmpeg -i input.mp4 -vf "crop=1080:1080:420:0" output.mp4
ffmpeg -i input.mp4 -vf "scale=1920:1080" output.mp4
ffmpeg -i input.mp4 -vf "crop=1080:1920:420:0,scale=1080:1920" output.mp4
The crop filter takes width, height, then the x and y offsets of the top left corner. Chaining filters with a comma applies them in order, and the quotation marks around the whole expression stop your shell from eating the colons. In Windows PowerShell those quotes matter even more than elsewhere.
Crop and scale aren’t the same operation, and mixing them up wastes quality. Cropping discards pixels, and scaling resamples them. Turning landscape footage into vertical means discarding the sides, which is why a 1080p clip cropped to 9:16 comes out closer to 608 pixels wide and people wonder why their vertical video looks soft.
7. Fix a variable frame rate recording
ffmpeg -i input.mp4 -vf fps=30 -c:v libx264 -crf 20 -c:a copy output.mp4This is the FFmpeg command I reach for most often after the first two. Phone and screen recordings often claim 60 fps while delivering frames unevenly, which makes editors drift out of sync with audio. Forcing a constant rate fixes the drift at the cost of one generation of quality, since it’s a re-encode. I run it before importing anything into a timeline.
8. Handle subtitles
ffmpeg -i input.mkv -sn -c copy output.mp4
ffmpeg -i input.mp4 -vf "subtitles=subs.srt" -c:a copy burned.mp4
The first command drops subtitle streams while copying everything else. The second draws them permanently onto the picture, which is a heavier FFmpeg command that requires libass support and a full re-encode of the video because the frames themselves are changing. Soft subtitles stay editable and burned ones don’t, so choose deliberately. The wider trade-off between sidecar tracks and permanent captions is covered in the guide to adding subtitles.
9. Strip the metadata
ffmpeg -i input.mp4 -map_metadata -1 -c copy output.mp4This drops GPS coordinates, device model, original timestamp, and the software that wrote the file, without touching a single frame of picture. Run it before sending footage to anyone outside your own machine, because the fields inside a video file are longer than most people expect. It’s a one line FFmpeg command, and it never re-encodes.
10. Batch a whole folder
for f in *.mov; do ffmpeg -i "$f" -c:v libx264 -crf 21 -c:a aac "converted/${f%.mov}.mp4"; doneOne FFmpeg command, a whole folder of files. Create the output folder first, or the loop dies on the first file. The ${f%.mov} part strips the extension, and the quotes around the filenames handle spaces, which otherwise break the loop in a way that looks random.
Flags that trip people up
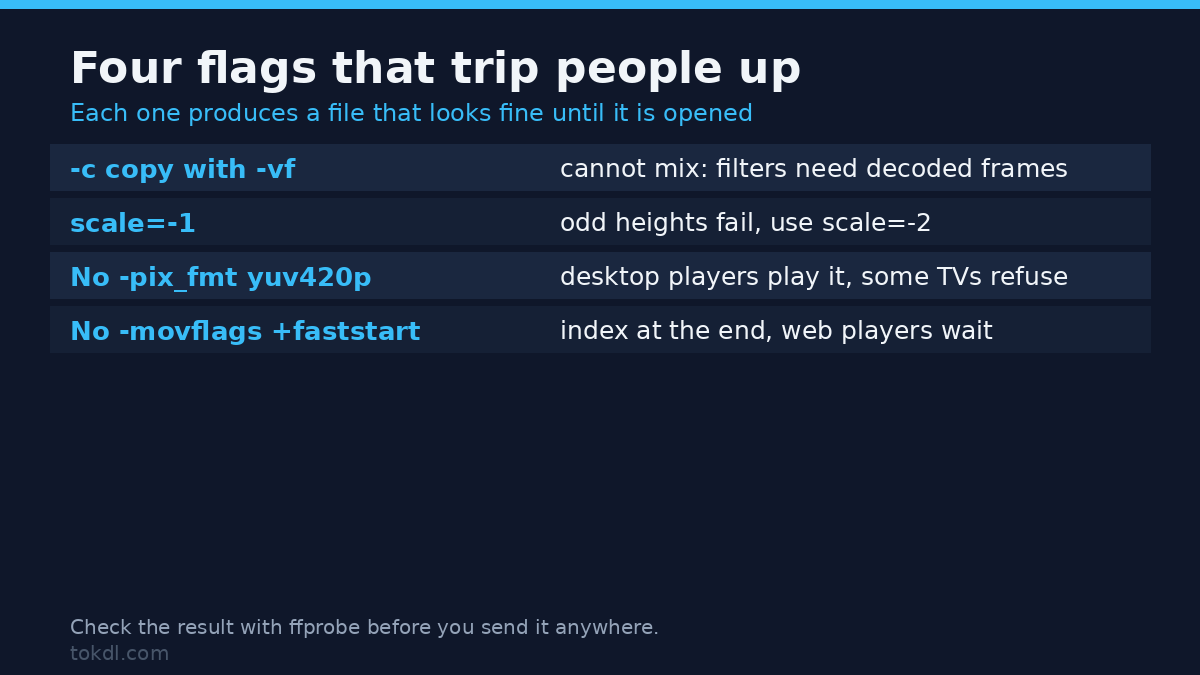
Some FFmpeg commands misbehave when you combine them. I lost an afternoon to the first one, which is why it leads this list.
Filters and -c copy can’t coexist. The moment you reach for -vf, something has to decode and re-encode the picture, so asking for copy at the same time produces either an error or a quietly ignored filter.
Fast start matters for anything headed to a web page. Adding -movflags +faststart moves the index to the front of the file, which lets a player begin before the download finishes. It costs nothing.
Two-pass encoding still has a place. When a platform imposes a hard size limit, -b:v across two passes spreads a fixed budget more evenly than a single CRF pass manages. It doubles the encoding time, so I only reach for it when the limit is non-negotiable. Working out what bitrate that budget allows is arithmetic, and video bitrate calculation covers it without opening FFmpeg at all.
FFmpeg commands: a quick reference
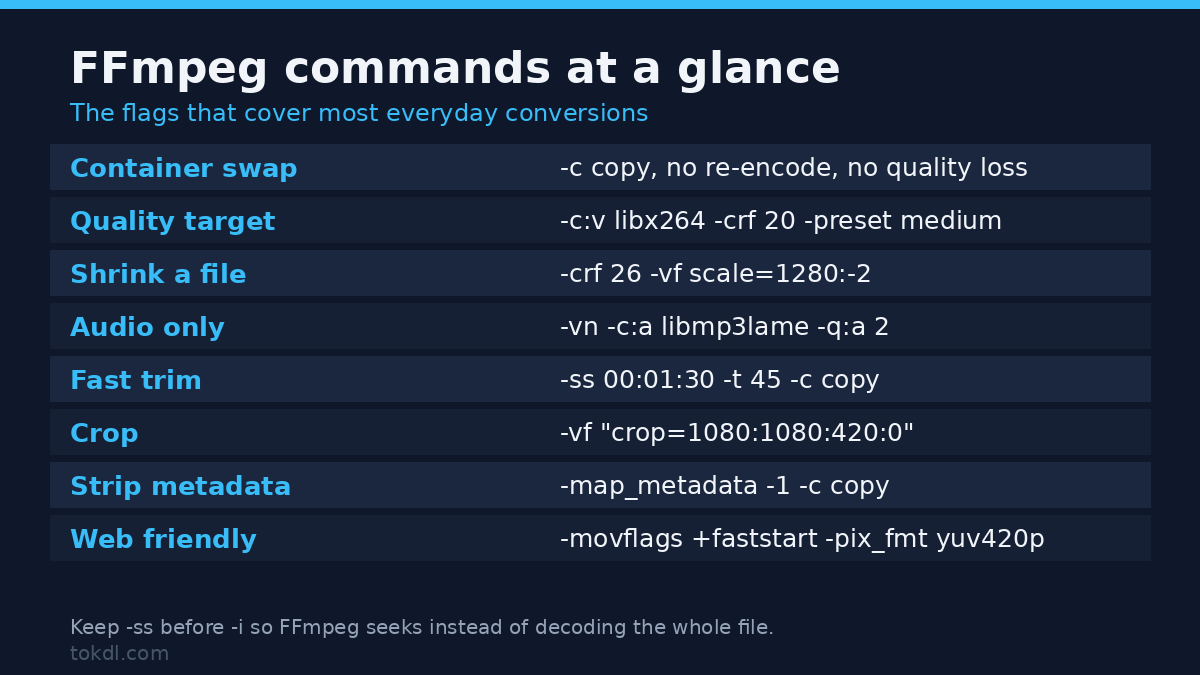
| Task | Command core |
|---|---|
| Container swap, no quality loss | -c copy |
| Encode with a quality target | -c:v libx264 -crf 20 -preset medium |
| Shrink a file | -crf 26 -vf scale=1280:-2 |
| Audio only | -vn -c:a libmp3lame -q:a 2 |
| Fast trim | -ss 00:01:30 -t 45 -c copy |
| Crop | -vf "crop=1080:1080:420:0" |
| Constant frame rate | -vf fps=30 |
| Strip metadata | -map_metadata -1 -c copy |
| Web friendly MP4 | -movflags +faststart -pix_fmt yuv420p |
The full option list lives in the FFmpeg documentation, and the H.264 encoding guide on the project wiki explains CRF and preset behaviour in more depth than you’ll need.
Quick answers about these FFmpeg commands
What does “moov atom not found” mean?
The file is truncated, or the recording ended before the container was finalised. No FFmpeg command fixes that on its own. Interrupted phone recordings and lost power do it. FFmpeg can’t repair data that was never written, though tools like untrunc can sometimes rebuild the index from the video that survived.
Is there a faster FFmpeg command than libx264?
Hardware encoders are, and they’re worse per bit. On a modern Mac, -c:v h264_videotoolbox finishes a long file in a fraction of the time. On Windows and Linux, run ffmpeg -encoders to see what your GPU exposes. When file size isn’t the constraint, take the speed.
Why is my output larger than the input?
The CRF was too low, the preset was too fast, or you moved to a less efficient codec. Converting H.265 to H.264 at matched quality always grows the file, because H.265 spends fewer bits to reach the same picture.
Do I need the command line at all?
No. Handbrake and Shutter Encoder hide the same FFmpeg commands behind a window, and for a single file they’re faster to use than looking up flags. The command line wins on repetition: one loop converts a folder while you do something else, and that’s the case where learning ten commands pays for itself.
Which FFmpeg commands to learn first
Start with three: the remux, the CRF encode, and the scale filter. Those FFmpeg commands alone handle the majority of real work, and the rest of the list is here for the day a specific file refuses to behave. Keep the reference table somewhere visible. After a month you’ll stop looking at it, which is the point.
[…] of the join. The official FFmpeg filter documentation covers both approaches in detail, and our FFmpeg command examples collect the variations that come up most […]