
Selective Color Video: Keep One Color and Desaturate the Rest
You shoot a red coat walking through a grey street, and the frame already looks like the shot you wanted: one colour, everything else quiet. That’s selective color, and it’s the effect editors reach for when a normal grade feels like too much. It’s also the effect most tutorials get half right, because FFmpeg ships two filters that claim to do the same job and they don’t behave the same way.
I tested both on a card of known colour patches and read the pixels back. Selective color turns out to have one defect nobody mentions: the parts you desaturate change brightness, and by a lot. A pure blue goes from a luma value of 29 to 85, which is the difference between a dark sky and a pale grey one.
If you want the whole frame in black and white, the black and white guide covers the four desaturation paths. This article is the narrower job: keep one hue, grey the rest, and keep the greys honest.
What you’ll learn
- Which FFmpeg filter to use for selective color, and when the second one is better
- The similarity values that keep a colour, measured across six settings
- Why the desaturated area shifts brightness, with the numbers per hue
- A mask recipe that keeps proper luma and handles two colours
- What
blenddoes to edges, measured in pixels
What selective color means in a video file
Selective color keeps a range of hues at full saturation and turns everything outside that range grey. Photo editors call it color splash, and it’s the same idea: a mask built from colour distance, applied to a desaturated copy of the frame.
Two details decide whether the result looks deliberate or cheap. How wide the surviving range is, because a narrow one greys the subject’s own edges while a wide one brings the orange scarf and half the skin tones along. And what happens to the greys, since an unweighted average instead of luma turns dark blues pale and yellows muddy.
The two FFmpeg filters, and why they differ
FFmpeg has colorhold and chromahold. Both take color, similarity and blend, and both turn a colour range grey. The names hide the important part: they measure distance in different spaces.
colorhold: distance in RGB
colorhold converts the frame to RGB and compares each pixel against the key colour there. An exact red patch sits at distance zero, so the default similarity=0.01 is enough to keep it. The filter’s documentation is one line long, which is why the behaviour has to be measured: see the FFmpeg filter reference.
chromahold: distance in YUV
chromahold compares in YUV and adds a yuv flag for passing the key as YUV. That sounds like a technicality. It changes which colours survive at a given number, and it hides a trap: at the default similarity=0.01 it greyed out even a patch of pure sRGB red, while colorhold kept it perfectly.
Method 1: selective color with colorhold
The single-filter command is the shortest path. This keeps red and greys the rest:
ffmpeg -i input.mp4 -vf "colorhold=color=red:similarity=0.2:blend=0" -c:v libx264 -crf 18 -pix_fmt yuv420p -c:a copy output.mp4Start at similarity=0.2 rather than the default, then raise it if you’ll see your subject’s edges losing colour. These numbers come from a 1280×720 card of flat patches, read back pixel by pixel after the filter ran.
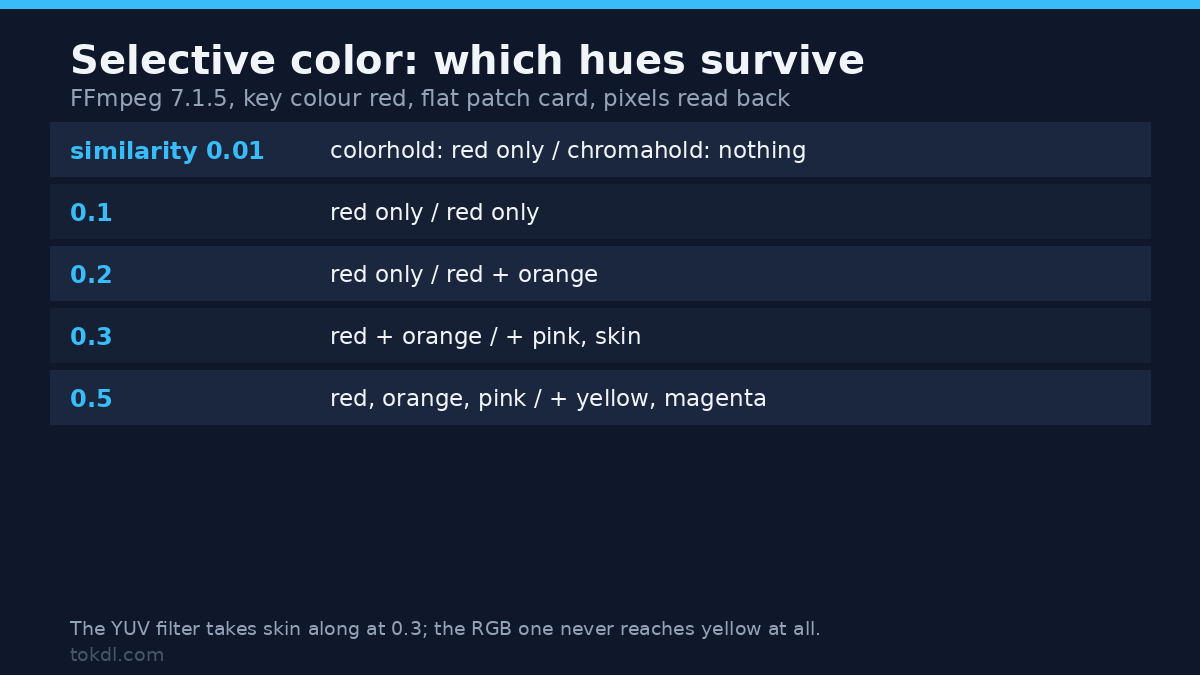
| similarity | colorhold keeps | chromahold keeps |
|---|---|---|
| 0.01 (default) | red only | nothing at all, red included |
| 0.05 | red only | red only |
| 0.1 | red only | red only |
| 0.2 | red only | red and orange |
| 0.3 | red and orange | red, orange, pink and skin |
| 0.5 | red, orange and pink | red, orange, pink, skin, yellow and magenta |
Two things jump out of this selective color table. The YUV filter drags skin tones and pink into the mask earlier, which is either what you want for a face or a leak that ruins the selective color effect. And yellow never entered the RGB mask even at 0.5, because it sits far from red in RGB distance while the YUV distance treats it as a near neighbour.
For a red bouquet, the safest selective color start is colorhold at 0.2: it holds the red and leaves skin grey. For a portrait where lips should keep colour, chromahold at 0.3 pulls the skin in without touching a blue jacket.
The defect: the greys are averaged, not measured
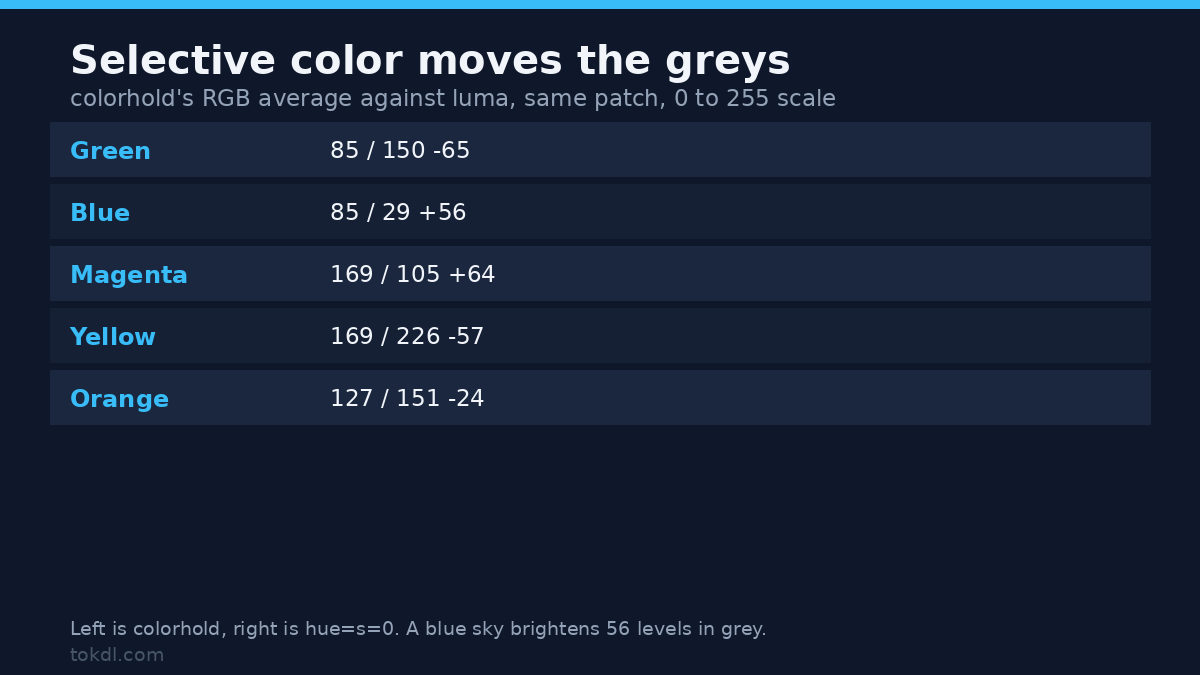
Here’s the part that decides whether your selective color looks like a grade or a filter. colorhold desaturates by averaging the three RGB channels. Luma is a weighted sum, because eyes are far more sensitive to green than to blue. The two aren’t close.
| Patch | Source RGB | colorhold grey | hue=s=0 (luma) | Shift |
|---|---|---|---|---|
| Green | 0, 255, 0 | 85 | 150 | -65 |
| Yellow | 255, 255, 0 | 169 | 226 | -57 |
| Blue | 0, 0, 255 | 85 | 29 | +56 |
| Magenta | 255, 0, 255 | 169 | 105 | +64 |
| Orange | 255, 128, 0 | 127 | 151 | -24 |
| Cyan | 0, 255, 255 | 169 | 179 | -10 |
| Pink | 255, 150, 150 | 184 | 182 | +2 |
A blue sky behind your subject goes from 29 to 85, roughly three stops brighter in grey, and a green hedge drops 65 levels until it reads as dark sludge. Neutral colours barely move, which is why selective color looks fine on a grey wall and wrong outdoors.
That’s the price of the one-line selective color command, and it’s invisible unless you measure it. If you can’t live with moved greys, use the mask recipe below: hue=s=0 gives proper luma, and the same card read 150 for green and 29 for blue through that path.
Method 2: an alpha mask, for correct greys and two colours
The selective color mask build is longer, but it fixes the grey problem and it holds two colours at once. Make a grey base with hue=s=0, build a matte where your key colour sits at full alpha, and stack the untouched colour frame back through it. colorkey zeroes alpha on the pixels it matches, so alphaextract plus negate flips it into the mask.
ffmpeg -i input.mp4 -filter_complex "[0:v]split=3[base][col][mk];[base]hue=s=0[gray];[col]format=rgba[cr];[mk]format=rgb24,colorkey=color=red:similarity=0.2:blend=0.1,format=rgba,alphaextract,negate[m1];[cr][m1]alphamerge[fg];[gray][fg]overlay=shortest=1[out]" -map "[out]" -c:v libx264 -crf 18 -pix_fmt yuv420p output.mp4On the test card this kept red at 99 percent saturation and turned every other patch into proper luma grey. It isn’t free. Orange leaked in at 11 percent, because the per-pixel distance between orange and red sits inside the 0.2 radius even though the flat patches look far apart. Catching a second colour makes that worse: green needed 0.3 through the same mask, and at 0.3 a teal patch came through fully.
So the mask route buys clean selective color greys and a second colour at the cost of a leak you’ll tune per shot. It’s the right call for a brand clip with two fixed colours and a lot of sky. For a five-second social edit, nobody will spot the one-liner’s moved greys.
What blend does to a selective color edge
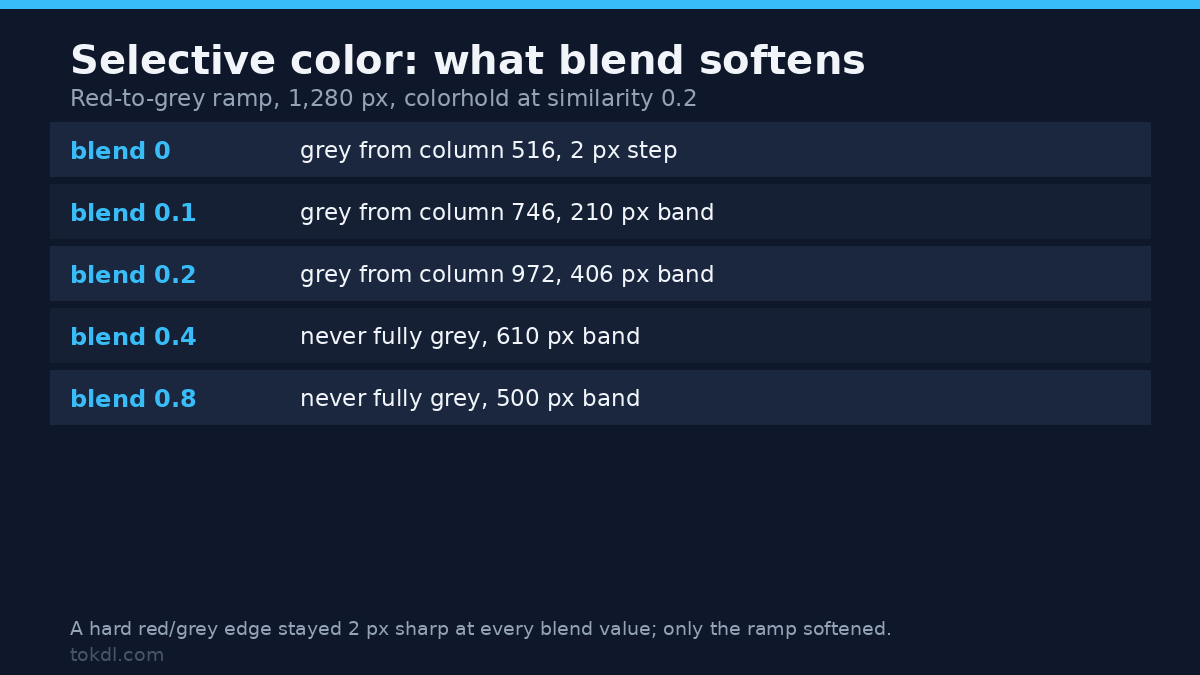
blend is the softness control, and it’s widely misunderstood. On a hard edge between an exact red and a mid grey it didn’t change anything in my test: zero soft columns at 0, 0.2, 0.4 and 0.8. It only does work where pixels sit partway between the key and the grey, which is why it matters on gradients and skin, not on logos.
To measure it I used a 1280-pixel ramp from pure red to mid grey, so distance from the key sweeps continuously, then counted columns that kept partial chroma:
| blend | Fully grey from column | Soft band width | Result |
|---|---|---|---|
| 0 | 516 | 2 px | hard step, visible outline |
| 0.1 | 746 | 210 px | smooth, greys still arrive |
| 0.2 | 972 | 406 px | soft, grey only at the far end |
| 0.4 | never | 610 px | everything keeps a tint |
| 0.8 | never | 500 px | most of the frame stays coloured |
At 0.1 you’ll get a usable soft edge: the transition spans 210 pixels and the grey reaches full neutral by column 746. Past 0.2 the far end of the ramp never goes properly grey, which reads as a wash rather than a selective color effect. If your subject’s edges look cut out, fix the mask first and use 0.1, not 0.6.
Three approaches that don’t work
Chaining two colorhold filters to keep red and green fails, and it fails silently. The second pass treats the red the first one preserved as just another colour to grey out, so red came back at zero saturation. My card went from one kept colour to none, with no error at any point.
Expecting the container’s chroma format to change the selective color mask doesn’t hold up either. I encoded a 1-pixel red line at CRF 18 in both 4:2:0 and 4:4:4 and ran both filters: the line survived each time, and the only difference was the one 4:2:0 already causes, where a 1-pixel colour edge reads 2 pixels wide after chroma upsampling. The mask runs on the decoded frame, so subsampling adds no second penalty. The background is in the 4:2:0 vs 4:2:2 guide.
And the default similarity=0.01 on chromahold isn’t safe. It greyed out pure red, which looks exactly like a broken filter. Set the value explicitly and check the first frame.
Export settings that keep selective color clean
Selective color is a saturation effect, so it suffers what any grade suffers from. Encode at -crf 18 for a master and 20 to 23 for the web, and keep -pix_fmt yuv420p since players and platforms expect 4:2:0. Watch the shadows: a frame where the only colour left is a dark red will band across the grey gradient, and 8-bit output makes that worse. The fix is a slightly higher bitrate, not a stronger filter, and the luma shift above is what pushed the gradient into a visible band. The mechanics are in the 8-bit vs 10-bit comparison.
Correct white balance before the selective color pass, never after. The mask compares raw colour distances, so a warm cast moves your subject out of the radius and the coat flickers between colour and grey as the camera moves. Don’t mask a shot you haven’t graded. The colour correction guide covers that step, and ffmpeg.org lists the CLI flags used above.
Common selective color mistakes
- Leaving similarity at the default. On
chromaholdthat keeps nothing, and the render looks like a plain black and white export. - Forgetting the greys shift brightness. Blue goes 29 to 85 with
colorhold, so a preview that looked fine reads washed out in the grey areas. - Pushing blend instead of fixing the mask. Above 0.2 nothing reaches neutral grey, and the effect reads as a tint over the whole frame.
- Masking a warm-cast shot. The coat drops in and out of the radius as the camera moves; grade first.
- Keeping skin in the mask by accident. At
chromahold0.3 skin comes through, which turns a portrait into a colour splash of the whole face.
If you’re keying a subject out entirely rather than keeping a colour, that’s a different mask with different thresholds, covered in the green screen guide.
FAQ
Can I keep two colours at once?
Not with one filter. Chain two colorhold calls and the second greys out what the first kept. Use the mask recipe and stack two overlays, or build one mask covering both hues. Expect to tune each key separately: red held at 0.2 in my test while green needed 0.3.
Why did my whole video turn black and white?
Either chromahold is at its default similarity=0.01, which kept nothing on a pure red patch, or your key colour never appears in the frame. Pull a still from that frame and check the pixels before changing values blindly.
Does selective color work on a phone clip with a lot of motion?
Yes, with a caveat. The mask is per pixel, so it follows motion without tracking. A subject moving through changing light shifts its hue, though, and edges can flicker at low bitrates. A slightly wider similarity plus blend=0.1 smooths that out.
Is colorhold or chromahold the better selective color default?
colorhold for objects with a strong, flat colour. chromahold when you want skin or a warm tone included without pushing tolerance too far. Both need an explicit similarity value, and both need the grey shift checked on a frame that carries sky or foliage.
Conclusion
Selective color in FFmpeg comes down to one line and one decision. The line is colorhold=color=red:similarity=0.2:blend=0, and it gets a usable result on a subject with a clean hue. The decision is what the rest of the frame should become, because the default path averages RGB and that moves blue and green further than anyone expects: 29 to 85 on blue, 150 to 85 on green.
When the greys matter, the alpha mask earns the extra graph: proper luma, room for a second colour, and a leak you can see and correct. Read the first frame before rendering the whole clip, and remember the mask compares colour, so grade first and mask second.