
How to Make a Side by Side Video: Two Clips, One Frame (2026 Guide)
You want a before and after in one frame, so you drop two clips onto the timeline and hit play. One side is letterboxed. Both soundtracks play at once. The comparison you pictured a minute ago now looks like a mistake.
The layout is the easy part. A side by side video is just two sources scaled into one canvas, left and right or top and bottom. What breaks is everything around it: mismatched aspect ratios, different frame rates, and audio that refuses to stay quiet.
This guide covers both routes to a clean side by side video: a standard editor for one-off comparisons, and FFmpeg for repeatable ones. It also names the failure points that swallow the most time.
Side by Side Video: The Short Answer
A split screen places two clips in a single frame, either left and right or one above the other. You build it by scaling both sources to a shared frame size, positioning them inside a canvas, and exporting the result as one file.
Most video editors can do this, and so can FFmpeg on the command line. The layout itself takes a minute. Getting the two sources to agree on size, frame rate, and sample aspect ratio is what takes the rest.
Setup for a Side by Side Video
Both clips already exist. What they need is a shared target: one output resolution, one frame rate, one aspect ratio. Decide all three before you touch either file, because every later step in a side by side video inherits them.
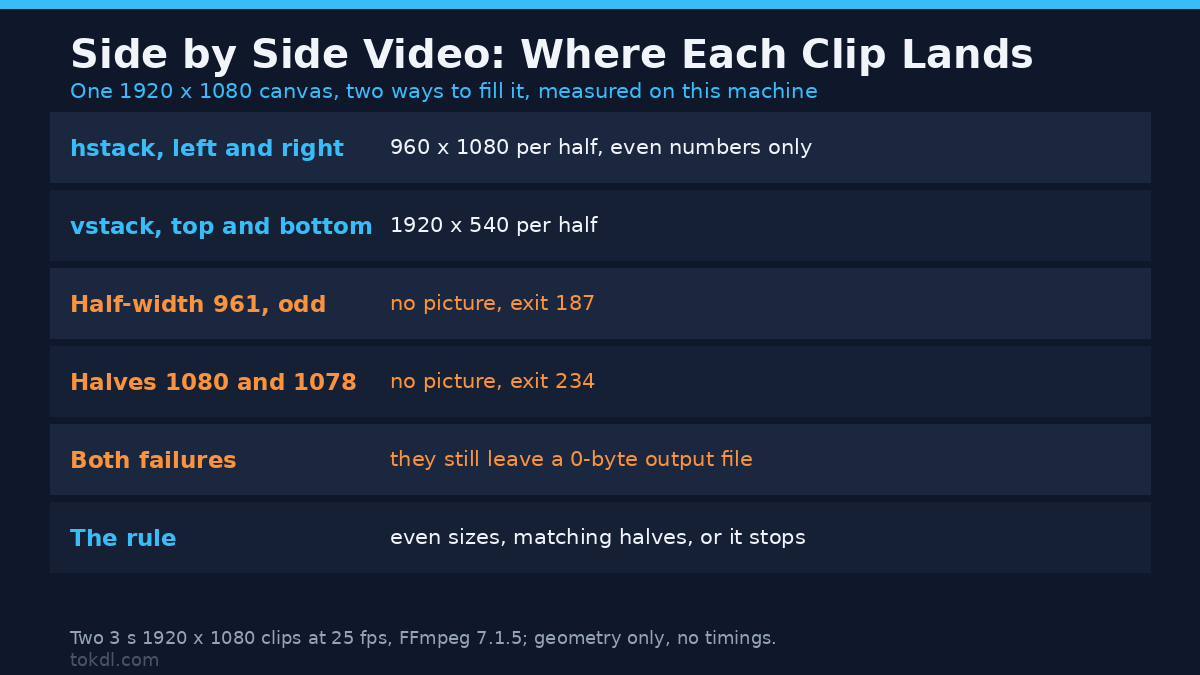
For a side by side video on a 1920×1080 canvas, a left and right split leaves each clip 960×1080. A top and bottom stack leaves each 1920×540. Pick the arrangement that suits the footage, because a landscape clip and a portrait clip rarely sit well beside each other without padding or cropping.
If the sources disagree, fix that first. Matching aspect ratios explains the arithmetic, and you can crop to match when one clip is a different shape. Convert variable frame rate footage to a constant rate before combining anything.
Method 1: Build a Side by Side Video in an Editor
The editor route is the one to take when you’re watching the side by side result take shape as you work. The steps are almost identical across tools.
- Create a project at your target resolution, for example 1920×1080.
- Import both clips and place one on each video track, stacked on the timeline.
- Scale the first clip to half the canvas width and move it to the left, or half the height and move it up.
- Repeat for the second clip on the opposite side, keeping the scale linked so nothing stretches.
- Align the start times, then trim to the shorter clip if the comparison should end together.
- Decide the audio: keep one clip’s track, mute both, or mix them. Two voices at once usually reads as an error.
- Export at the project resolution.
CapCut, DaVinci Resolve, iMovie, and Premiere Pro all follow this logic. Apple’s iMovie guide is a useful reference for the macOS path, which leans on split-screen and picture-in-picture presets rather than manual scaling.
Method 2: Build a Side by Side Video with FFmpeg
The command line is worth learning because the same side by side layout repeats. Give both inputs an identical frame size, then join them with hstack or vstack.
ffmpeg -i left.mp4 -i right.mp4 -filter_complex
"[0:v]scale=960:1080,setsar=1[l];[1:v]scale=960:1080,setsar=1[r];[l][r]hstack=inputs=2[v]"
-map "[v]" -map 0:a side-by-side.mp4
For a top and bottom stack, change the scale targets and swap hstack for vstack. The stream mapping stays the same:
ffmpeg -i top.mp4 -i bottom.mp4 -filter_complex
"[0:v]scale=1920:540,setsar=1[t];[1:v]scale=1920:540,setsar=1[b];[t][b]vstack=inputs=2[v]"
-map "[v]" -map 0:a stacked.mp4
That keeps only the first file’s audio. To hear both, add a mix to the same filter graph:
-filter_complex "...;[0:a][1:a]amix=inputs=2:duration=longest[a]" -map "[v]" -map "[a]"Those side by side scale values assume both sources share an aspect ratio. If they don’t, add a crop or pad step before the scale so the geometry lines up. The FFmpeg filter documentation lists the options for hstack, vstack, and amix if you need to go further.
One thing to plan for: hstack and vstack re-encode the video. There’s no stream-copy shortcut, so budget the encode time and choose a quality setting you’re happy to live with.
What We Measured: the Same Side by Side Command, Run Twice
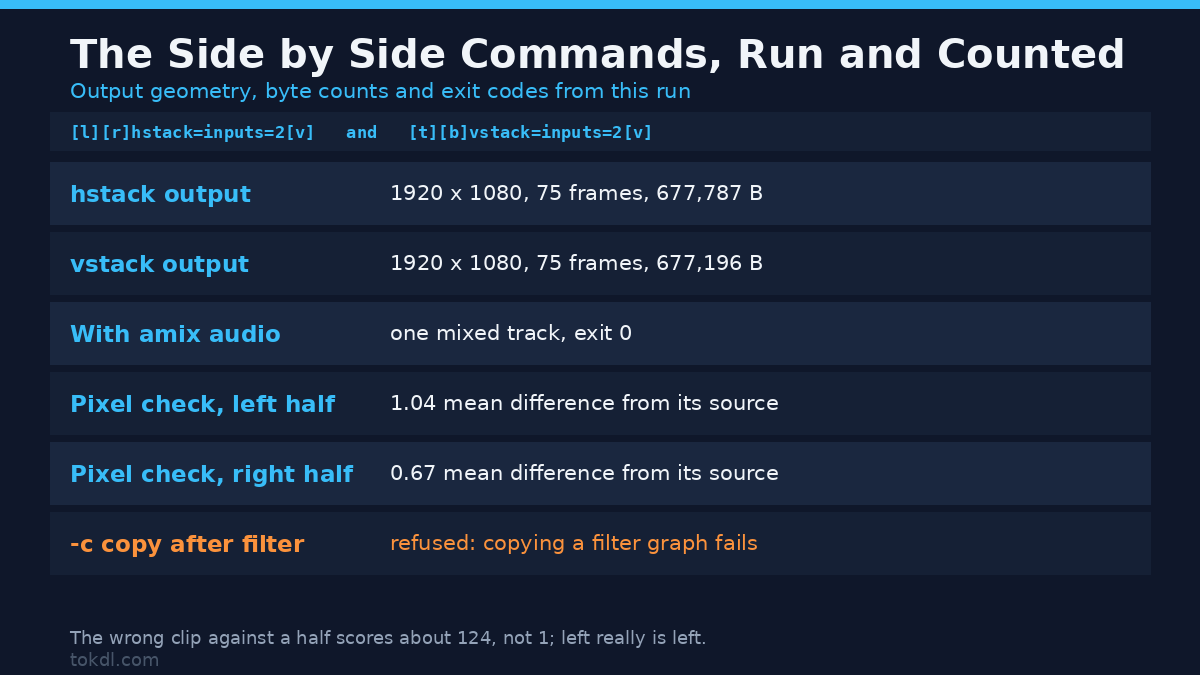
A filter graph is easy to write and hard to predict, so I ran both commands instead of trusting the documentation. Two clips, 1920×1080, three seconds each, 25 fps, on FFmpeg 7.1.5. The layout is the part that decides where each clip lands, and the exit code is the part that decides whether you get a file at all.
| What I ran | What came back |
|---|---|
| hstack, two 960×1080 halves | 1920×1080 output, 75 frames, 677,787 bytes, exit 0 |
| vstack, two 1920×540 halves | 1920×1080 output, 75 frames, 677,196 bytes, exit 0 |
| amix across both audio streams | one mixed track in the output, exit 0 |
| Half-width 961, an odd number | no video written, exit 187 |
| Halves of 1080 and 1078 | no video written, exit 234 |
| -c copy after the filter graph | refused, exit 234 |
Reading frame 40 of the hstack output and comparing each half against its own source gives a mean absolute difference of 1.04 on the left and 0.67 on the right. Compare a half against the wrong clip and the same measure jumps to about 124. So the left clip is on the left, and nothing drifted.
Two rows in that table deserve a second look. An odd half-width and a mismatched pair of halves both stop the encode, and both still leave a zero-byte file behind. Check the size, because a folder of empty files looks a lot like success. The last row is where the shortcut dies: a filter graph builds a new video stream, and a copy can’t stand in for that decode.
One disclosure. This machine advertises 64 CPUs while its container is limited to two, and the load average sat above 70 during these runs. Geometry and exit codes don’t move under that; encode times do, so none are quoted.
What Split-Screen Tools Do, and Where They Stop
A side by side video app or filter does four things: scale each input, position it, pad the edges, and mux the result. That’s the whole trick. The software doesn’t know which clip is the before shot, or that the two timings ought to match.
It’s worth knowing the limits before you install anything. Most of them come from the tool rather than your settings:
- Different aspect ratios produce bars or distortion unless you crop or pad on purpose.
- Different frame rates force the encoder to duplicate or drop frames, which shows up as stutter.
- Many one-tap apps cap output resolution and watermark the free tier.
- None of them fix a comparison whose two clips aren’t aligned in time.
If you’re only moving between two clips, you may not need the layout at all. A short cross-cut often reads better than a 50/50 side by side split once the viewer is on a phone screen. The technique for one small panel over a full frame is covered in this walkthrough of the picture-in-picture overlay, which is a different result built from the same scaling idea.
Rights and Responsible Use
A comparison video rarely contains only your own footage. The moment you drop in a clip you didn’t shoot, the rules change. That footage belongs to whoever created it, and placing it next to your own doesn’t make it yours.
Watching something for personal reference is one thing. Republishing it, building a channel around it, or folding it into paid or sponsored work is another. That’s the line that matters in a side by side comparison. A credit line in the description isn’t a licence, and it doesn’t transfer any right to the material.
Pairing your own recordings with licensed, public-domain, or openly licensed material keeps an edit clean. If you’re planning to publish, read YouTube’s Terms of Service, and the rules of whichever platform you upload to, before you export rather than after.
Troubleshooting
One half is letterboxed or black
The two clips have different aspect ratios, so the smaller one floats inside its half of the side by side frame. Scale the wider clip to fill, then crop the overflow, or accept the bars. Letterboxing is the app default because it never cuts anything away.
One clip looks stretched or squashed
A forced scale ignored the source ratio. Set the sample aspect ratio to 1 and scale by the ratio itself, not by width and height chosen independently. In FFmpeg, placing setsar=1 after every scale prevents the classic smear, and it’s the single most common reason a side by side frame comes out looking wrong.
Both audio tracks play at once
You mapped both streams, so the mixer summed them in the side by side output. Keep one file’s audio, or lower one track before mixing. Two voice-overs in a comparison tend to fight; a music bed plus one voice is easier to follow.
Playback stutters after the join
That’s usually a frame-rate mismatch. Convert both sources to the same constant rate first, because a 24 fps clip next to a 30 fps clip will judder no matter how the layout is built.
FFmpeg errors on an odd width or height
hstack and vstack need even dimensions, and both scaled halves must match exactly. Round your half-width to the nearest even number and confirm the two halves compute to the same value.
The export takes far longer than expected
Both inputs are re-encoded in a single pass, so you’re paying roughly the cost of encoding twice. Preview with a short trim before committing to the full length.
Frequently Asked Questions
Do I need an editor to make a side by side video?
No. FFmpeg does it with a single command, and many phones include a split-screen template. An editor is only necessary when you want frame-accurate placement or on-screen labels.
Can I build a split screen on a phone?
Yes. Apps such as CapCut and iMovie for iOS offer split-screen layouts. Expect a lower export resolution and, on free tiers, a watermark.
What resolution should a split screen be?
Start from a 1920×1080 canvas. A left and right split leaves 960×1080 per clip, while a stacked layout leaves 1920×540 per clip. Exporting below that makes each side look soft on a large screen.
Why does one side of my split screen have black bars?
The two clips have different shapes. Matching the aspect ratio first, or padding the narrower clip, removes the bars. A crop removes them too, at the cost of part of the frame.
How do I hear both clips at the same time?
Mix the two audio streams instead of mapping one. In an editor, bring both tracks up in level; in FFmpeg, use amix. In a side by side video the two voices sit in the same speakers, so level is the only thing separating them. Keep one fader low so the two voices stay intelligible.
Can I put three or more videos side by side?
Yes. Editors place a third track with the same scaling, and FFmpeg’s xstack filter arranges a grid. The more inputs you add, the smaller each panel becomes.
Which Method Should You Use?
Use an editor when it’s a one-off, when you need labels or timing nudges, or when you want to watch the result take shape. Use FFmpeg when the same layout has to repeat across many pairs of clips, or when you want identical settings every time.
For a single side by side on a deadline, neither is mandatory. Several editors already ship a split-screen preset, and that preset is the fastest route to a clean side by side frame. Reach for the command line once the manual steps start to repeat.
[…] a swapped input before you publish a grid with the host in the wrong corner. For two angles, the side by side video guide covers the layout […]