
Video Collage: The Complete, Easy Grid Guide (2026)
You’ve got four clips and one frame to put them in. You open a collage app, pick a template, and it hands back a grid where the vertical phone clip is squeezed into a letterbox and a watermark lands over the bottom right. So you try FFmpeg instead, and the output has a quadrant that isn’t black, a file that weighs zero bytes, or clips that freeze two thirds of the way through.
Both failures share one cause. A video collage is arithmetic before it’s art: a canvas, a grid, and a tile size every clip has to be forced into. Get the arithmetic right and the rest is one command.
Every grid here was built on FFmpeg 7.1.5 and read back from the pixels, so the sizes and exit codes are what this machine returned.
What you’ll learn
- The tile arithmetic that decides whether a video collage looks sharp or muddy
- One FFmpeg command for a 2×2 grid with correct order, borders and mixed audio
- Six failure modes, including the empty cell that fills itself with the wrong colour
What a video collage is
A video collage plays several clips at once inside one frame, arranged on a grid. Two clips is a split screen, covered separately in side by side video. A grid of four, six or nine is a collage. A grid of stills pulled from one clip is a contact sheet, a different job covered in contact sheet.
The distinction matters because a collage has one timeline. Every tile starts at the same instant and the file ends when the longest tile ends. That rule causes the freeze defect in mistake four.
Three shapes dominate: the 2×2 quad for reaction and before/after sets, the 1×4 strip for four short loops, the 3×3 wall for dashboards and recaps.
The tile arithmetic behind every video collage
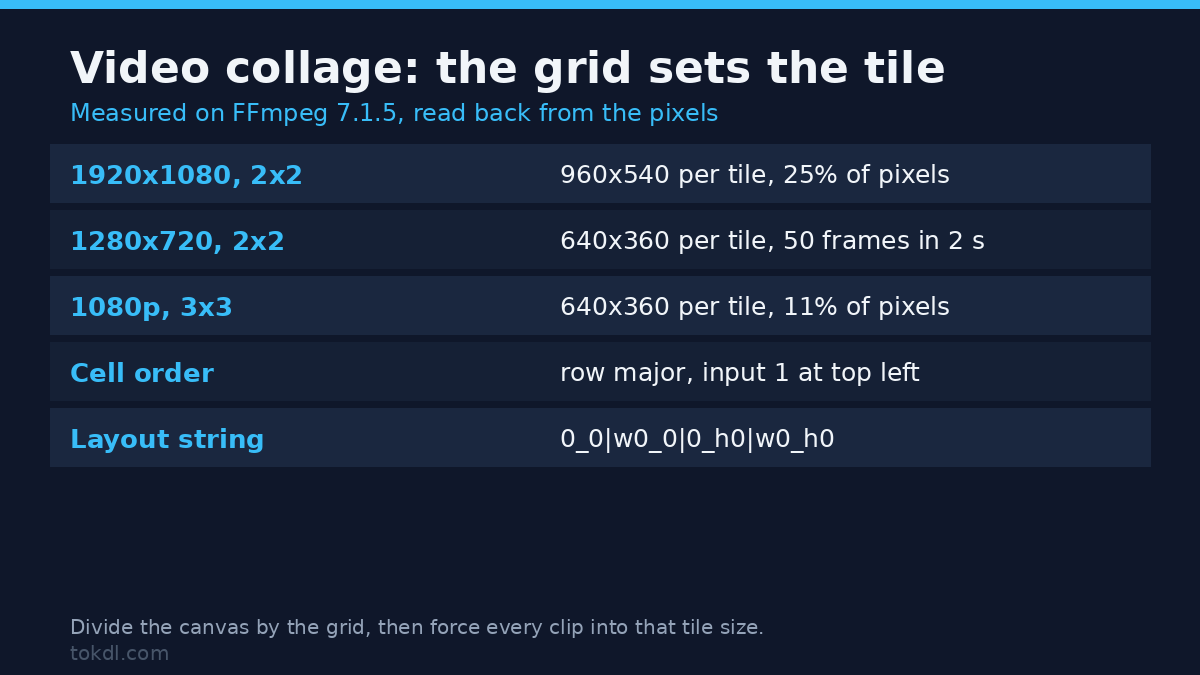
A video collage is a canvas divided by a grid. Divide 1920 by 2 and you get 960. Divide 1080 by 2 and you get 540. That’s your tile, and every clip has to arrive at exactly that size or the grid breaks.
| Canvas | 2×2 tile | 3×3 tile | 1×4 strip tile |
|---|---|---|---|
| 1280×720 | 640×360 | 426×240 | 1280×180 |
| 1920×1080 | 960×540 | 640×360 | 1920×270 |
| 1080×1920 (vertical) | 540×960 | 360×640 | 1080×480 |
| 1080×1080 (square) | 540×540 | 360×360 | 1080×270 |
The part people skip: a 1920×1080 collage gives each of four tiles 518,400 pixels out of 2,073,600, which is 25% of the canvas. If your sources are 1080p, each is downscaled to a quarter of its detail before the encoder sees it. On a 3×3 wall the tile is 640×360, and any on-screen text smaller than about 24 pixels in the original becomes unreadable.
The read-back below used four 640×360 solid clips on a 1280×720 canvas, so nothing was scaled.
| Cell | Input index | Sampled RGB | Source colour |
|---|---|---|---|
| Top left | 0 (first input) | 253, 0, 0 | red |
| Top right | 1 (second input) | 0, 127, 0 | green |
| Bottom left | 2 (third input) | 0, 0, 254 | blue |
| Bottom right | 3 (fourth input) | 253, 253, 0 | yellow |
That’s row-major order: across the top row first, then the bottom. The canvas came back at exactly 1280×720 with 50 frames for two seconds at 25 fps. If you’ve built a grid and found two clips swapped, this table is why, and the fix is to reorder the input arguments rather than the layout string.
Method 1: one command for a 2×2 video collage
The filter that builds a video collage is xstack, documented in the FFmpeg filter reference. It places N inputs at coordinates you supply and sizes the canvas to fit. It does not scale anything for you, which is why step one exists.
Step 1: force every tile to the same size
Each input gets the same chain. scale with force_original_aspect_ratio=increase blows the clip up until it covers the tile, crop cuts the overflow, and setsar=1 resets the pixel aspect so a phone clip doesn’t inherit a stretched flag. That fills each cell of the video collage edge to edge.
If you’d rather keep the whole frame and accept bars, swap increase for decrease and replace the crop with a pad. On a 480×640 vertical clip in a 640×360 tile, fill covered 0% in black, while letterbox left 57.81% of the pixels as bars with the picture 270 pixels wide.
Step 2: place the tiles
The layout string for a four-clip video collage lists positions separated by pipes. 0_0 is the top left corner. w0_0 means x equals the width of input zero, which puts the second clip beside the first. 0_h0 drops to a second row, and w0_h0 is the bottom right cell.
ffmpeg -i clip1.mp4 -i clip2.mp4 -i clip3.mp4 -i clipv.mp4 -filter_complex "[0:v]scale=640:360:force_original_aspect_ratio=increase,crop=640:360,setsar=1[a];[1:v]scale=640:360:force_original_aspect_ratio=increase,crop=640:360,setsar=1[b];[2:v]scale=640:360:force_original_aspect_ratio=increase,crop=640:360,setsar=1[c];[3:v]scale=640:360:force_original_aspect_ratio=increase,crop=640:360,setsar=1[d];[a][b][c][d]xstack=inputs=4:layout=0_0|w0_0|0_h0|w0_h0[grid]" -map "[grid]" -c:v libx264 -crf 20 -preset medium -pix_fmt yuv420p collage.mp4On this machine that exits 0 and writes a 1280×720 file, 6.000 seconds long, 2,333,121 bytes from four six-second sources. The semicolons separate filter chains, the brackets name each intermediate stream, and -map "[grid]" tells the muxer which one to keep. Miss the map and you get the inputs back instead of the grid.
Step 3: verify the order from the pixels
Don’t trust a thumbnail to tell you the order inside a video collage. Pull one frame with ffmpeg -ss 1 -i collage.mp4 -frames:v 1 collage.png and sample the pixel at a quarter width and quarter height for the top left cell, three quarters for the top right. That’s how the colour table above was produced, and it’s how you catch a swapped input before a client’s faces land in the wrong corners.
Step 4: mix the audio
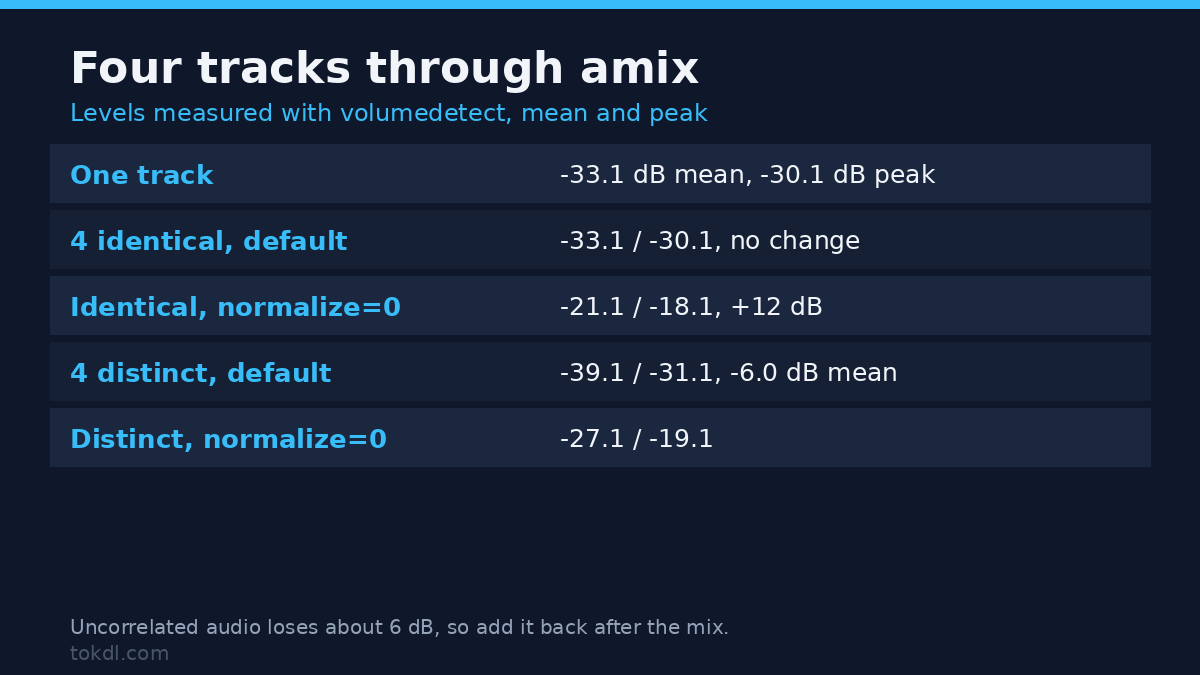
Four clips means four audio streams, and amix combines them. Its default normalisation divides the sum by the number of inputs, which isn’t the same as preserving your level.
Four identical 440 Hz tones at -33.1 dB mean each came back at -33.1 dB mean and -30.1 dB peak with the default, identical to a single track, because coherent copies sum and then divide by four. With normalize=0 the same tones landed at -21.1 dB mean and -18.1 dB peak, exactly 12 dB up.
Real clips aren’t coherent. Four different tones at the same starting level came out at -39.1 dB mean against -33.1 dB for one, a loss of 6.0 dB. That’s why a four-up collage sounds quiet next to its sources. Add this fragment to the same graph, before the map:
[0:a][1:a][2:a][3:a]amix=inputs=4:duration=longest,volume=6dB[mix]Then map "[mix]" alongside "[grid]" with -c:a aac -b:a 192k. Adding a 6-pixel white border to every tile (pad=652:372:6:6:color=white after setsar=1) returns 1304×744 with audio at -19.3 dB mean and -10.4 dB peak.
Method 2: collage makers on a phone
CapCut, InShot and Canva all ship collage templates, and for a quick four-up story post they’re faster than a terminal. What you give up is control: the template fixes the canvas and tile size, so a vertical clip gets bars or gets cropped by whichever rule the app chose.
That’s fine when the video collage goes straight to a story and the app’s canvas matches the platform. It’s not fine when the grid has to match a brand template or carry sources whose resolutions differ by a factor of three.
Which route fits your job
| Route | Best for | What it costs you |
|---|---|---|
| FFmpeg command | Exact tile sizes, mixed aspect ratios, repeatable batches | You check the output yourself |
| CapCut or InShot | Fast four-up posts on a phone | Template fixes the canvas, watermark on some exports |
| Canva | Collages with text, logos and brand colours | Export resolution capped by plan |
Six video collage mistakes that survive publication
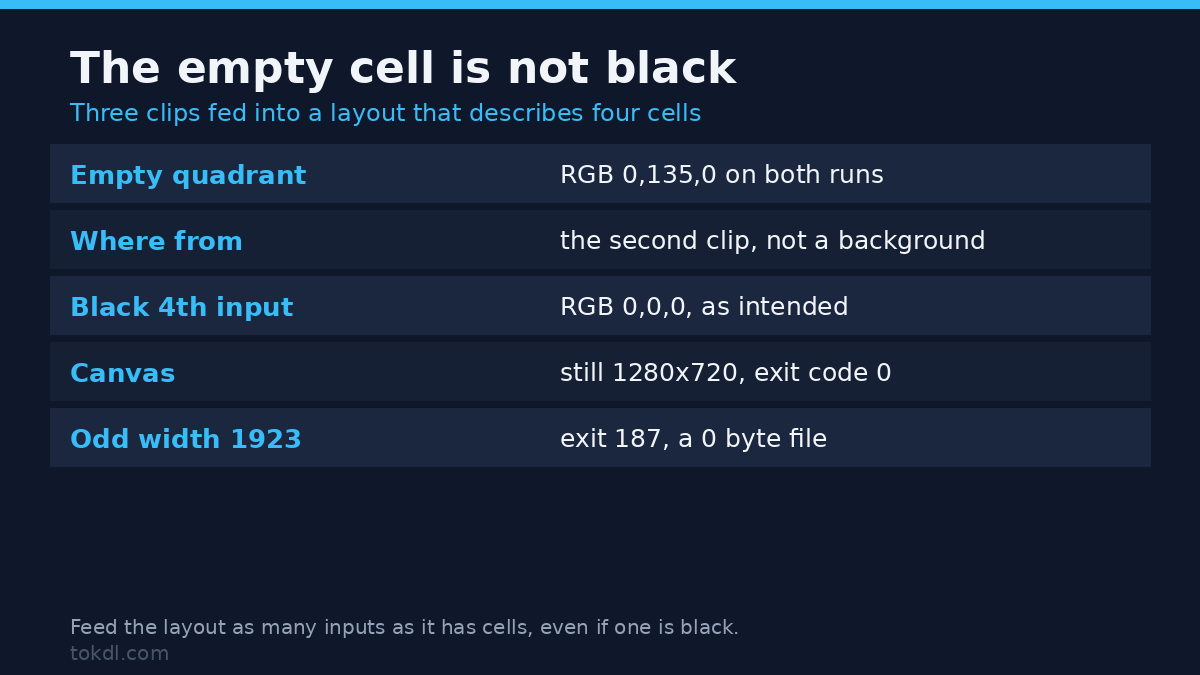
Every one was reproduced here, and four of them exit with code 0, which is why they survive into published files.
1. The empty cell isn’t black. Feed three clips into a layout describing four cells and the fourth cell isn’t painted. Two runs of the same command both returned that quadrant at RGB 0, 135, 0, the second clip’s colour, spread evenly across the whole cell. For a three-up video collage on a quad grid, feed a black colour source as the fourth input. The same test with an explicit color=c=black input returned RGB 0, 0, 0.
2. Mismatched tiles blow up the canvas. Skip the scaling and xstack sizes the canvas to the largest clip’s native resolution. Inputs of 640×360, 640×360, 480×640 and 1280×720 produced a 1920×1080 output, because the layout put the 1280-wide clip at x=640 and the 720-tall clip at y=360. The grid stops being a grid, with holes where the small clips don’t reach.
3. An odd total width writes a zero-byte file. H.264 needs even dimensions, and the check lands on the canvas, not the tile. A video collage with three tiles of 641 pixels gives 1923 across, which is odd. FFmpeg exited 187 and libx264 reported Invalid argument, but it still created the output, and that file was 0 bytes.
4. Short clips freeze, silently. A video collage ends when the longest clip ends. Four clips of 3, 5, 4 and 6 seconds produced a 6.000 second output with 150 frames, and the three-second clip held its final frame for the last three. On the top-left tile, between 4.2 s and 5.5 s the mean pixel difference was 0.02 out of 255 with 37 pixels changing, which is compression noise around a still. The five-second tile was still moving in that window, mean difference 25.3.
5. Mixed frame rates double the frame count. Stacking 25 fps and 30 fps inputs in one video collage doesn’t pick a winner, it interleaves. A two-second grid came back with 100 frames at an average 50.68 fps instead of 50 at 25. Normalising every tile with fps=25 before the stack returned exactly 50 frames in 2.000 seconds, 729,480 bytes against 739,070.
6. A vertical clip gets bars or loses its top. There’s no third option in a 16:9 tile. With fill, the phone clip is scaled until it covers 640×360 and the top and bottom are cropped, which is where heads and captions go. With letterbox, 57.81% of the tile is black. If the subject matters, reframe it first, the problem horizontal to vertical video solves in the other direction.
Borders that make the grid look deliberate
A video collage with no border reads as one busy image, because two tiles of similar colour merge across the seam. Pad every tile in the video collage before the stack: 6 pixels on a 640×360 tile gives 652×372, so the canvas grows to 1304×744 and the seam between two tiles is 12 pixels wide.
The pixel read-back confirms it: white columns appeared at 0 to 5, 646 to 657 and 1298 to 1303, which is the left border, the doubled seam and the right border. If the seam looks uneven, one tile is a different size and xstack is honouring the wrong width.
Frequently asked
How many clips can a video collage hold?
Cells get smaller as the grid grows, and the aspect ratio of each one is fixed by the canvas (see video aspect ratio). Nine is a practical ceiling at 1080p. A 3×3 grid gives each tile 640×360, still legible for faces and large text. Past that the tiles drop below 480 pixels wide and the encoder spends its bitrate on noise.
Does a video collage lose quality?
Yes, measurably. A four-second 1280×720 grid from real test footage weighed 1,811,211 bytes at CRF 18, 1,163,113 at CRF 23 and 687,207 at CRF 28, against 449,303 for one source clip at the same settings.
Why is my collage’s audio so quiet?
Because amix divided by four. The default normalisation assumes coherent inputs, and real dialogue isn’t, so you lose about 6 dB of mean level. Add roughly 6 dB after the mix, or set normalize=0 and limit the peaks.
The short version
Decide the canvas for the video collage, divide by the grid, and force every clip into that tile size before stacking. Give the layout as many inputs as it has cells, even if one is a black colour source. Check the first frame with a pixel sample rather than by eye. Then trim the clips to a common length and frame rate, because those two mismatches leave a file that looks fine in a preview and breaks on playback.
Once the arithmetic is right, a video collage is one command, whether it holds four clips or forty.