
How to Add a Watermark to a Video: Brand Your Own Clips (2026 Guide)
A re-upload takes the video and leaves your name behind. When the clip resurfaces on another account six months later, the logo sitting in the corner is often the only thing still pointing back at you.
This guide covers how to add a watermark to a video on a phone and on a desktop, using free tools and one FFmpeg command. It also covers the part most tutorials skip: placement. A mark that hides under the player’s own buttons, or gets cut off when your clip is reframed, protects nothing.
One thing worth saying first, because it can save you ten minutes. If all you want is a clickable badge that follows viewers around your channel, YouTube already has that feature and you don’t need anything below. A channel badge and a burned-in watermark are different tools, and only one of them travels with the file.
How to Add a Watermark to a Video: The Short Answer
Overlay a logo or a line of text on your own footage, then re-export the file. A phone editor, a desktop editor, or a single FFmpeg command will all do it in a couple of minutes.
Three settings decide whether the result looks professional or amateur. Use a PNG with transparency rather than a JPEG, size the mark to roughly 5 to 10 percent of the frame width, and keep it inside the safe area instead of hard against the edge.
What You Need Before You Start
Start from your original footage, not from a copy you pulled back down off a platform. Re-downloading your own upload adds a second round of compression before you’ve even begun.
Your logo file should be a PNG with an alpha channel, exported at two to four times the size it’ll occupy on screen. A 60-pixel logo stretched up from a 60-pixel file looks soft; the same artwork exported at 240 pixels and scaled down stays sharp.
You also need to settle two things in advance: which corner, and how strong the mark should be. Both are easy to change before an export and annoying to change after one.
Method 1: Add a Watermark on Your Phone
Phone editors are the fastest route, and the free tiers are genuinely usable. CapCut, InShot and iMovie all handle a still-image overlay, and the workflow is nearly identical in each.
- Import your clip and move the playhead to the start so the overlay spans the whole timeline.
- Add your logo as an overlay or sticker, not as a text element, so the transparency survives.
- Scale it down. Pinch until the logo is roughly one-twelfth of the frame width.
- Drop the opacity to somewhere between 60 and 80 percent. A fully opaque mark competes with your own footage.
- Drag it into a corner, leaving a margin about as wide as the logo itself.
- Export at the highest quality the editor offers, then watch the first ten seconds back at full screen before uploading.
One honest caveat about free tiers: some editors append their own end card to every export. Check the last few seconds of the finished file, and if a card appears, turn it off in the settings or use a different editor. Exporting at maximum quality also keeps the file large, so if size becomes a problem, compress the export afterwards rather than lowering the watermark opacity.
Method 2: Add a Watermark on Desktop With FFmpeg
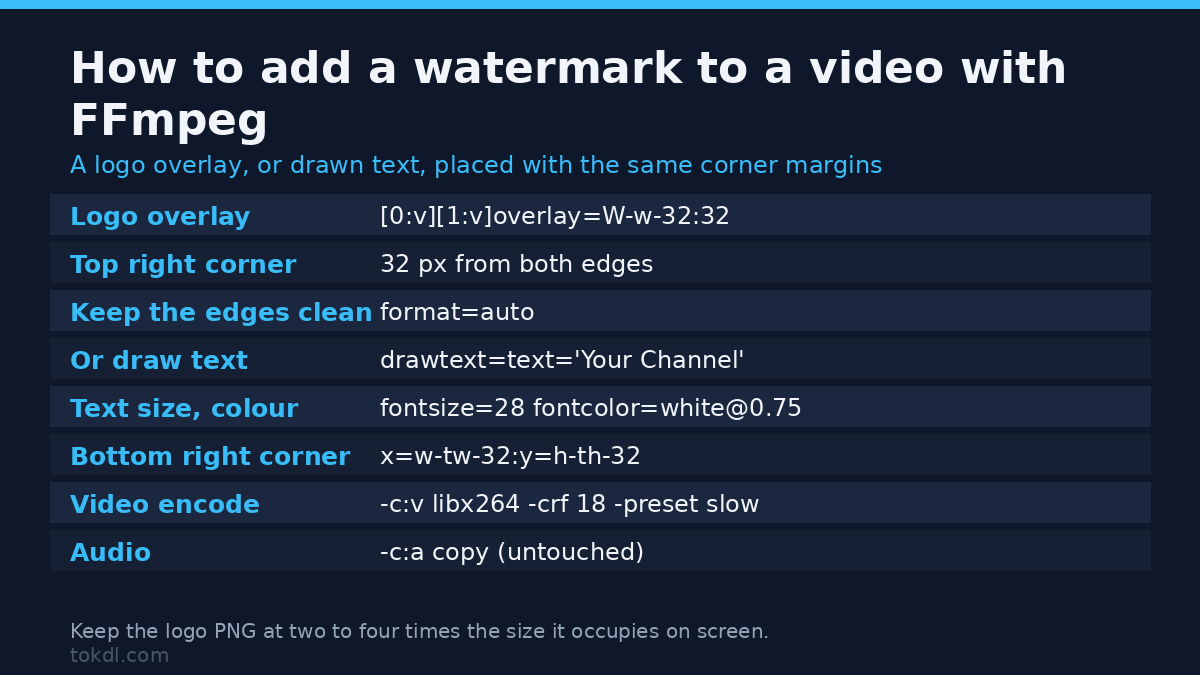
FFmpeg gives you exact control over position and opacity, and it chews through a long file without any interface overhead. The overlay filter places a second image on top of your video:
ffmpeg -i input.mp4 -i logo.png -filter_complex "[0:v][1:v]overlay=W-w-32:32:format=auto" -c:v libx264 -crf 18 -preset slow -c:a copy output.mp4The two values after overlay are the horizontal and vertical offsets. W-w-32 means the full frame width, minus the logo width, minus a 32-pixel margin, which parks the logo in the top-right corner. Swap it for 32:32 for top-left, or W-w-32:H-h-32 for bottom-right.
If you would rather burn in a text credit, drawtext does the same job with a font file instead of an image. The positioning arguments behave in the same way.
ffmpeg -i input.mp4 -vf "drawtext=text='Your Channel':fontfile=/path/to/font.ttf:fontsize=28:fontcolor=white@0.75:x=w-tw-32:y=h-th-32" -c:v libx264 -crf 18 -preset slow -c:a copy output.mp4Note the -c:a copy flag in both commands. It leaves your audio alone instead of re-encoding it, so a re-export doesn’t degrade sound you already have. The video stream must re-encode, because an overlay changes the pixels, and -crf 18 -preset slow keeps that pass visually clean.
One more detail if your source has letterboxing or a stray edge. Cropping the frame first makes the overlay coordinates predictable, because W and H then refer to the picture you care about.
drawtext depends on the libfreetype library. If your build of FFmpeg was compiled without it, the filter won’t exist and the command fails with a clear message. The full filter list is in FFmpeg’s filter documentation, and for a wider set of everyday recipes there’s our FFmpeg command reference.
The Official Route: YouTube’s Branding Watermark
YouTube Studio has a built-in watermark. Open Customisation, then Branding, then Video watermark, upload a square PNG, choose when it should appear, and save. It then shows in the corner of every video on your channel.
Its behaviour differs from a burned-in mark in three ways that matter. It’s clickable, so a viewer can subscribe straight from it. It sits over the player rather than inside the file. And it disappears the moment the video plays anywhere other than YouTube.
That last point is the whole argument. If your goal is channel growth, the official watermark beats anything you can bake in. If your goal is credit that survives a re-upload, it does nothing at all. Plenty of creators run both.
What Watermark Tools Get Right and Wrong
A whole category of online services exists to stamp a logo onto a video without installing anything. They’re fine for your own footage, and some handle batch work across a back catalogue, which is where manual editing gets tedious.
The trade you make is privacy. You upload your original file to someone else’s server, and retention policies vary wildly. Read the page before handing over an unreleased edit, and prefer a tool that deletes the upload over one that keeps a copy.
What none of them can do is protect the file. A watermark is a credit line, not a lock. Somebody determined enough can crop it out, paint over it, or repost the clip with the mark intact and claim the work anyway. Treat the mark as a signal rather than a defence, and put your actual protection in the platform’s reporting tools.
Be wary of anything whose pitch is branding a video you found rather than a video you made. Stamping your logo on someone else’s footage isn’t a workflow. It’s passing off another creator’s work as your own, and platforms treat it accordingly.
Rights, Credit and Responsible Use
A watermark doesn’t create a right to anything. The footage belongs to whoever made it, and the platform’s rules decide how it may be used, not the logo in the corner.
Adding your own mark is a claim that you produced the material, so apply it only to clips you own or hold a licence for. If you’re editing for a client, agree in writing whose name goes on the export before you start the edit.
Saving a clip for personal reference is also not the same as publishing it. Downloading a video grants you no rights over it, and re-uploading somebody else’s work, with or without credit, can infringe their copyright.
The reverse holds just as firmly. Stripping another creator’s mark and reposting the result is passing off, and it’s one of the fastest ways to lose a channel. When you’re unsure, read YouTube’s Terms of Service and ask the creator for permission instead.
Troubleshooting: When a Watermark Goes Wrong
Nearly every watermark problem traces back to one of four things: contrast, position, the resolution of the logo file, or the format you exported. Here are the failures that come up most often and what causes each one.
The mark vanishes on light footage. A white logo over a bright sky or a white wall disappears. Give the artwork a thin dark outline or a soft drop shadow instead of raising the opacity, because cranking opacity to 100 percent makes the logo fight the footage rather than sit on it.
The mark sits under the player’s own controls. Bottom-centre placement is the culprit most of the time. The progress bar, the caption block and the vertical player’s side buttons all live there, and they cover your logo at exactly the moment a viewer looks at it.
The mark looks soft or blurry. That’s almost always the logo file, not the video. Scaling a small PNG upward interpolates pixels and smears the edges, so export the artwork at two to four times its final on-screen size and let the editor scale it down.
The mark disappears when the clip is reframed. Because the safe area shifts with aspect ratio, a corner placement that reads well on a 16:9 upload can land outside the visible frame once the same clip is cut for vertical. Keep the mark inside the central square and it survives both crops.
FFmpeg reports “No such filter: drawtext”. Your build was compiled without libfreetype support. Check the build configuration, or install a full FFmpeg package from your distribution rather than a minimal one.
A transparent PNG exports with a black box behind it. The alpha channel was lost, usually because the intermediate file was saved as a JPEG, which has no transparency. Keep every step of the chain in PNG and the box disappears.
Frequently Asked Questions
How to add a watermark to a video for free?
Use a free phone editor or FFmpeg, both of which cost nothing. CapCut, InShot and iMovie include image overlays in their free tiers, and FFmpeg is open source on desktop. Check the final seconds of any free export, because some editors append a promotional card of their own.
Can I add a watermark without installing anything?
Yes, with a browser-based watermark service. You upload the file, position the overlay, and download the result. The trade-off is that your original footage sits on somebody else’s server for the duration, so read the retention policy before you start.
Where should I place a watermark on a video?
Top-right or bottom-right, with a visible margin, is the usual choice. Those corners stay clear of most players’ controls and read as a credit rather than an interruption. Save the centre of the frame for preview and review copies.
Does a watermark stop people from re-uploading my video?
No. A watermark is a credit line, not a technical protection. It makes deliberate theft obvious and gives you something to point at when you report it, but anyone can crop it out or repost the clip with the mark still on it.
Will adding a watermark reduce my video quality?
Not measurably, if you export with sensible settings. The overlay forces one re-encode of the video stream, and a high-quality CRF value keeps that loss invisible. Your audio doesn’t need re-encoding at all.
How big should a watermark be?
Roughly 5 to 10 percent of the frame width. On a 1920-pixel-wide video that lands between 96 and 192 pixels. Anything larger competes with the footage, and anything much smaller becomes unreadable on a phone screen.
Should every video get a watermark?
No. Preview and review copies benefit most, because those are the files most likely to circulate before release. On a finished public upload, the platform’s own badge usually does more for you than a burned-in mark.
Which Method Should You Use?
If you publish on YouTube and care about subscribers, switch on the Studio badge and stop there. It is clickable, it costs nothing, and it does a better job than a baked-in logo at exactly that task.
If your clips travel beyond one platform, burn the mark into the file. Reach for a phone editor when you’re working on the device you shot with, and FFmpeg when you have a batch of files or need an exact pixel position.
Once you know how to add a watermark to a video, the harder questions are the boring ones. Is the logo big enough to read on a phone? Is it inside the safe area for every aspect ratio you publish? Is your file a real PNG with working transparency? Get those three right and the mark will survive most of what a re-upload can throw at it.