
Frame Interpolation: How to Make Slow Motion Video Smooth
Your clip runs at 30 fps. You drop it to half speed for the best five seconds of the match, and the motion turns into a slideshow. You can see every step the ball takes, because at 15 fps you’re looking at 15 pictures a second rather than a moving object. Frame interpolation is the fix editors reach for here. It estimates where every block of pixels moved and draws new frames in between the ones you shot, so the ball travels instead of jumping. It works, but only under conditions you can measure, and the wrong mode costs you either sharpness or a long night of rendering. I ran all of it on one machine with FFmpeg 7.1.5, compared each mode against a clip that already had the missing frames, and read the results back pixel by pixel. Here’s what frame interpolation puts on screen, when smooth slow motion is worth the render time, and the two situations where it makes a clip worse.
What frame interpolation does, and what it can’t do
Every frame rate conversion answers one question: what do I show at a moment when I never recorded anything? FFmpeg’s minterpolate filter offers three answers, and only one of them is frame interpolation in the sense editors mean.
- Duplicate (
mi_mode=dup): show the previous frame again. Free, and it’s what a plainfps=50conversion does. - Blend (
mi_mode=blend): mix the two neighbours into one frame. Cheap, and everything that moved turns semi-transparent. - Motion compensated interpolation (
mi_mode=mci, the default): split the frame into blocks, find where each block went, and move it along its own path to the midpoint.
Only the third option invents motion. The other two are fallbacks, and the filter’s own documentation says so. What matters is that mci guesses, and a guess can be wrong in ways you see on screen. The rest of this article measures frame interpolation instead of trusting it.
Frame interpolation also can’t recover detail that was never recorded. If your shutter was long, the motion blur sits in every source frame, and blending two blurred frames gives you more blurred frames. It won’t repair a source that stutters from an uneven frame rate either.
Frame interpolation modes, measured
I built a clip where I knew the right answer. A white 40 by 40 square crosses a black 640×360 frame at 200 pixels per second, rendered at 50 fps. Then I threw away every other frame to make a 25 fps source, so the missing frames existed as ground truth and I could compare against them. A second test used testsrc2, which has rotating and scrolling detail like real footage.
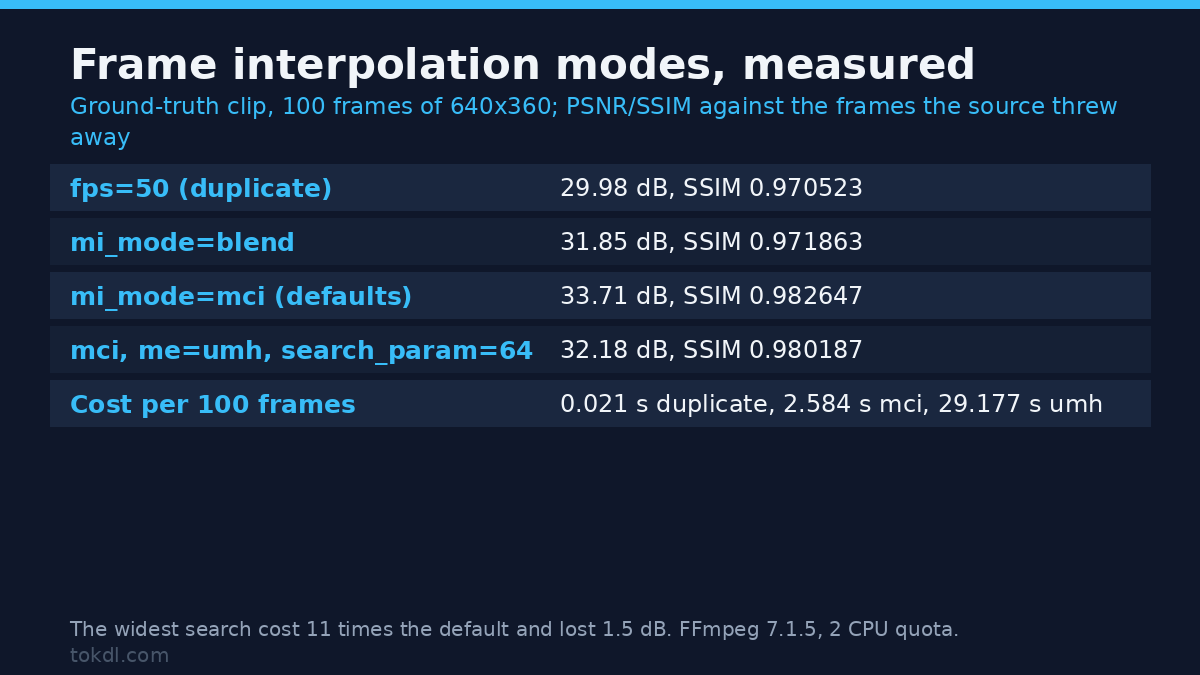
Here’s how the modes compare on the realistic clip. PSNR and SSIM are measured against the ground truth frames, and the times are the median of three runs.
| Conversion | PSNR vs ground truth | SSIM | 100 frames at 640×360 |
|---|---|---|---|
fps=50 (duplicate) |
29.98 dB | 0.970523 | 0.021 s |
minterpolate mi_mode=dup |
29.65 dB | 0.969479 | 0.023 s |
mi_mode=blend |
31.85 dB | 0.971863 | 0.070 s |
mi_mode=mci (defaults) |
33.71 dB | 0.982647 | 2.584 s |
mci, mc_mode=aobmc, vsbmc=1 |
33.64 dB | 0.982469 | 2.6 s |
mci, me_mode=bidir |
33.82 dB | 0.982655 | 2.9 s |
mci, me_mode=bidir, me=umh, search_param=64 |
32.18 dB | 0.980187 | 29.177 s |
Read the last row twice. The heaviest search on the list costs 11 times what the default does and loses 1.5 dB on this clip. A wider search region finds more candidate matches, including wrong ones, and on detailed content it doesn’t always pick the right one. The defaults are a sane starting point, and turning the search up is not an upgrade you get for free.
The gap between duplication and motion compensation is the headline: 3.7 dB on real detail, at roughly 120 times the cost. Whether that trade is worth it depends on what you’re delivering.
Reading the pixels instead of the score
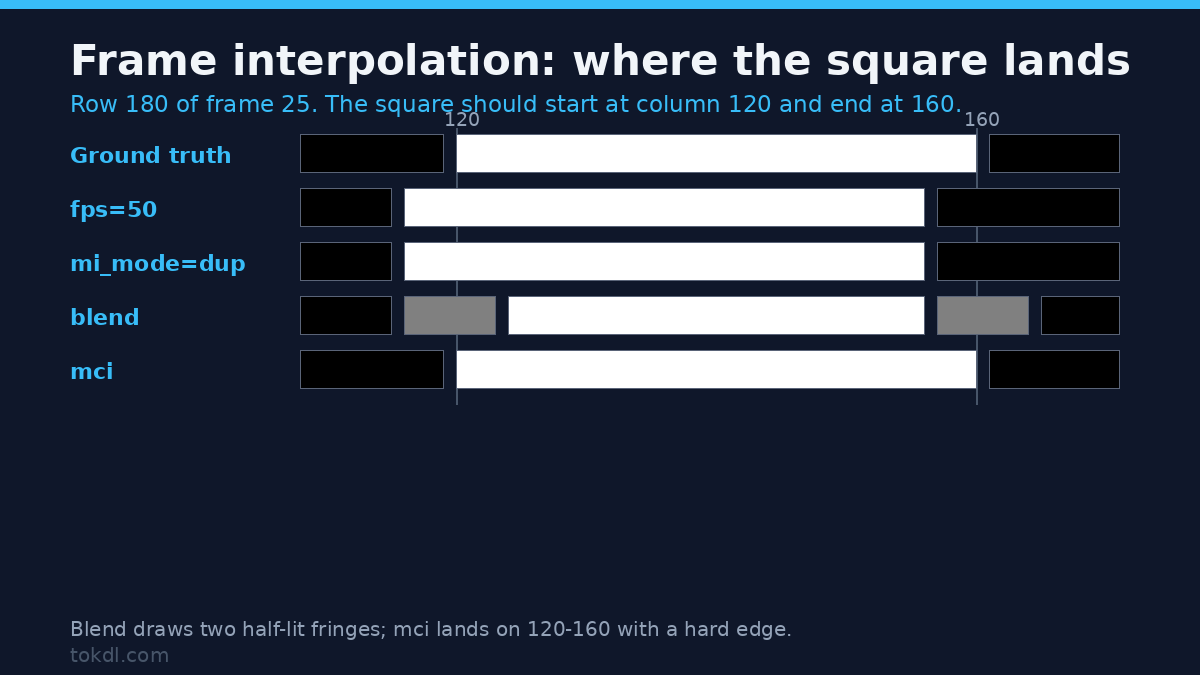
PSNR hides what your eye notices, so I read one row of the frame instead: row 180, at frame 25 of the output, a quarter of a second into the move. The square should sit at columns 120 to 160. Here’s what each mode wrote into the file.
| Mode | Pixels in row 180 | Where the square is |
|---|---|---|
| Ground truth | 120-160 at full white | on the mark |
fps=50 |
116-156 at full white | 4 pixels behind |
mi_mode=dup |
116-156 at full white | 4 pixels behind |
mi_mode=blend |
116-123 at half brightness, 124-156 white, 157-164 at half brightness | two positions at once |
mi_mode=mci |
120-160 at full white | on the mark, hard edge |
That table is the whole argument. Duplication holds the object one source-frame step behind, so the motion reads as a stutter. Blending draws the square twice, once at each neighbouring position, with an 8 pixel half-lit fringe on either side: that’s the ghosting people complain about. Motion compensation put the square exactly where the ground truth had it, with no soft fringe at all. On this clip mci scored 43.72 dB against duplication’s 34.55 dB, a 9.2 dB gap. On the realistic clip the same comparison narrows to 3.7 dB, which tells you how much of the win comes from clean synthetic motion.
How to use frame interpolation in FFmpeg
Step 1: know both frame rates before you pick a filter
ffprobe -v error -select_streams v:0 -show_entries stream=r_frame_rate,nb_frames -of default=nw=1 input.mp4Doubling 25 to 50 is a different job from going 23.976 to 60, and you’ll get a repeating cadence of long and short steps unless the rates divide evenly.
Step 2: run the conversion
ffmpeg -i input.mp4 -vf "minterpolate=fps=50:mi_mode=mci" -c:v libx264 -crf 18 -preset slow -c:a copy output.mp4The fps= option is the output frame rate, not a multiplier. That command was run on this machine as written.
Step 3: check the output length before you ship it
Frame interpolation needs the next frame to work with, so it drops the tail. A 2 second source with 50 frames came back as 97 frames at 50 fps, 1.94 seconds. Going to 60 fps from the same source gave 116 frames in 1.934 seconds, and duplication returned the full 100 frames. If your deliverable has to match a running time, interpolate first and trim afterwards, or you’ll hand over a file that’s 60 ms short.
Step 4: handle the audio separately
Frame interpolation changes picture timing, not audio timing, so a retimed clip needs a matching audio filter. FFmpeg’s atempo accepts factors between 0.5 and 2 only, and it says so bluntly: atempo=0.25 fails with exit code 222 and “Numerical result out of range”. Chain two stages for a 4x slowdown.
ffmpeg -i input.mp4 -filter:a "atempo=0.5,atempo=0.5" -c:a pcm_s16le slow.wavThat chain measured 7.939 seconds of audio from a 2 second tone, which is right. A single atempo=4 in the other direction returned 0.488 seconds.
Smooth slow motion: retime first, interpolate second
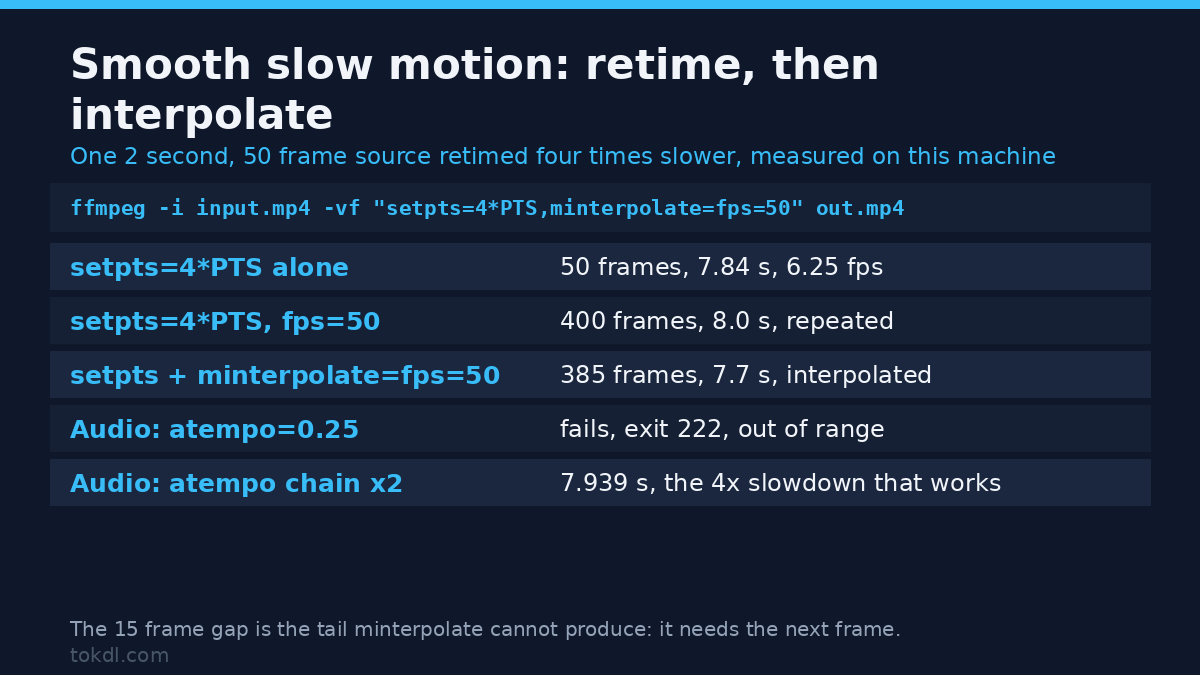
setpts=4*PTS stretches a 2 second clip to 8 seconds and leaves you with 50 frames spread across them, a file that runs at 6.25 fps and looks worse than what you started with. Frame interpolation is what puts real frames on those timestamps.
| Command order | Frames out | Duration | Rate |
|---|---|---|---|
setpts=4*PTS alone |
50 | 7.84 s | 6.25 fps |
setpts=4*PTS,fps=50 |
400 | 8.0 s | 50 fps (frames repeated) |
setpts=4*PTS,minterpolate=fps=50 |
385 | 7.7 s | 50 fps (frames invented) |
All three rows came from the same 2 second, 50 frame source. The fps version is the one to compare against when you’re deciding whether frame interpolation earns its render time: 400 duplicated frames with no new information, against 385 interpolated frames that follow the motion. The 15 frame difference is the tail minterpolate can’t produce.
Where frame interpolation breaks
Fine, fast detail stops being measurable
Motion estimation works on blocks, and a block needs a unique match. Take a pair of 4 pixel stripes on an 8 pixel period and move them 4 pixels per source frame, which is half their own period, and the match is ambiguous: the pattern looks identical whether it moved forward 4 pixels or backward 4 pixels. FFmpeg picked something, and the interpolated frame came out with a row contrast of 28 out of 255, with no stripe pixel above 60. The pattern disappeared for one frame. Move the same stripes 3 pixels per frame instead and the result is exact: contrast 255, all 8 stripe pixels present, identical to the ground truth. That’s why sports jerseys, window blinds and fine fence lines are the footage that produces ghosts and shimmer.
A hard cut is safe in mci, and a double exposure in blend
Scene change detection is the option you’d reach for at a cut, and on this build it changed nothing measurable. I cut between two shots of a moving square and compared the boundary frame. With mi_mode=mci it held 27 lit pixels, a small remnant of the outgoing shot and no trace of the incoming one, and that held with scd=none and scd_threshold=1 too. With mi_mode=blend the same frame held 3281 lit pixels spanning both shots at once, a true double exposure, while plain duplication cut cleanly with no ghost. A cut isn’t a problem for frame interpolation, as long as the mode falls back to one shot instead of averaging two.
The real-content gap
The synthetic square gave mci a 9.2 dB win over duplication. Real detail gave it 3.7 dB. Nothing changed in the encoder, only in how many blocks had an unambiguous match. Expect the smaller number when you judge your own footage, and test a clip before you commit a long render to settings you haven’t checked.
Common mistakes
Turning the search up without measuring. The me=umh and search_param=64 combination cost 29.177 seconds for 100 frames and scored 32.18 dB, below the default’s 33.71 dB. More search doesn’t mean more quality, and frame interpolation runs as slowly as its widest option.
Asking for the rate you already have. A 25 fps clip converted to 25 fps has nothing to invent, and you pay for frame interpolation anyway.
Forgetting the audio. A 4x slowdown needs two atempo stages, and mixing stretched video with untouched audio leaves you with 8 seconds of picture against 2 seconds of sound.
Rendering a whole project to fix one shot. Frame interpolation costs about 120 times a duplication pass on this machine. Do it on the shot that needs it, then put the result back in the timeline.
FAQ
Is frame interpolation the same as optical flow? Optical flow is the motion estimation step inside it. Editors that offer “optical flow” retiming run the same idea as mi_mode=mci, and they fail on the same footage: repeating detail, fast movement, and cuts.
Does frame interpolation make 24 fps footage look like 60 fps? It raises the frame count, not the information. On clean movement the result looks smooth. On film grain, the estimator tracks the grain and the frame turns slightly soft, which is the shimmer you see on televisions with motion smoothing switched on.
Should frame interpolation run before or after scaling? Interpolate at the resolution you shot, then scale. Motion estimation reads block matches from pixels, and scaling first removes the detail it needs to find them. The same order matters for deinterlacing, where scaling first cost 7.5 dB in a test I ran last week.
Can frame interpolation run on a GPU? This build’s minterpolate is CPU-only. On a two CPU container the default mode processed 100 frames of 640×360 in 2.584 seconds, and 1080p is roughly nine times the pixels. Plan the render before you queue it.
The short version
Frame interpolation earns its cost when the movement is clean and you need smooth slow motion or a higher delivery rate. Use mi_mode=mci, leave the search at its defaults, check the output length because the tail gets dropped, and retime the audio with a chained atempo. Then look at a frame near the fastest movement in your clip, because that’s where the estimator either followed the subject or invented a ghost. The pixel read-back above is the test worth repeating: pick a row, print the values, and compare them to what you expected.
If your problem is that the clip is too long rather than too choppy, you want the opposite operation, and my walkthrough of speeding a video up covers the audio side in detail. If the movement stutters because the source has an uneven frame rate, fix that first with a variable frame rate conversion, because frame interpolation can’t smooth a timeline that doesn’t have a steady clock. If you’re still deciding what to shoot, the comparison of frame rate choices explains what each one costs before you ever reach this filter. And for interlaced sources, deinterlacing the footage comes first, since motion estimation on combed frames tracks the combs.
For the filter’s own option list, the FFmpeg filter documentation is the reference this article was tested against, and motion interpolation on Wikipedia covers the display-side history of the same technique.
Measured on a shared container reporting 64 CPUs with a cgroup quota of 2 CPUs (cpu.max 200000 100000) and a load average near 39 during the runs. Pixel values and sizes are exact; the timings describe this machine only. FFmpeg 7.1.5-0+deb13u1, run from the commands printed above.