
How to Extract Frames From a Video: Stills & Thumbnails (2026)
What you get when you extract frames from a video
A still image. One file, saved as PNG or JPEG, at the pixel dimensions of the source video. If your clip is 1920×1080, the still is 1920×1080. Nothing is cropped, nothing is scaled up, and the tool adds no overlay of its own.
That’s the whole deliverable. There’s no separate “frame extractor” category you must trust, because the decoder inside your player already exposes the picture. Every method below is just a way of asking it to hold still and write the frame to disk.
Two choices shape the result before you touch a keyboard: the exact timestamp you want, and the image format you save it in. Those two decide more about the outcome than which tool you use to extract frames from a video.
What you need before you start
Three things, and none of them cost money. The video file itself, in a format your machine can decode, which covers MP4, MOV, MKV and WebM. The timestamp of the moment you want, written as hours, minutes, seconds and milliseconds. And something that can turn a decoded frame into an image file.
If you need one still on a laptop, you can skip installation and use a snapshot button. If you need twenty stills from a ten-minute recording, the command line finishes in seconds where clicking through a player would take an afternoon.
Know the source resolution too. A frame can never hold more detail than the video does, and upscaling a 720p still to 4K makes it bigger rather than sharper. Our resolution comparison explains what each size really contains.
Method 1: extract frames from a video with FFmpeg
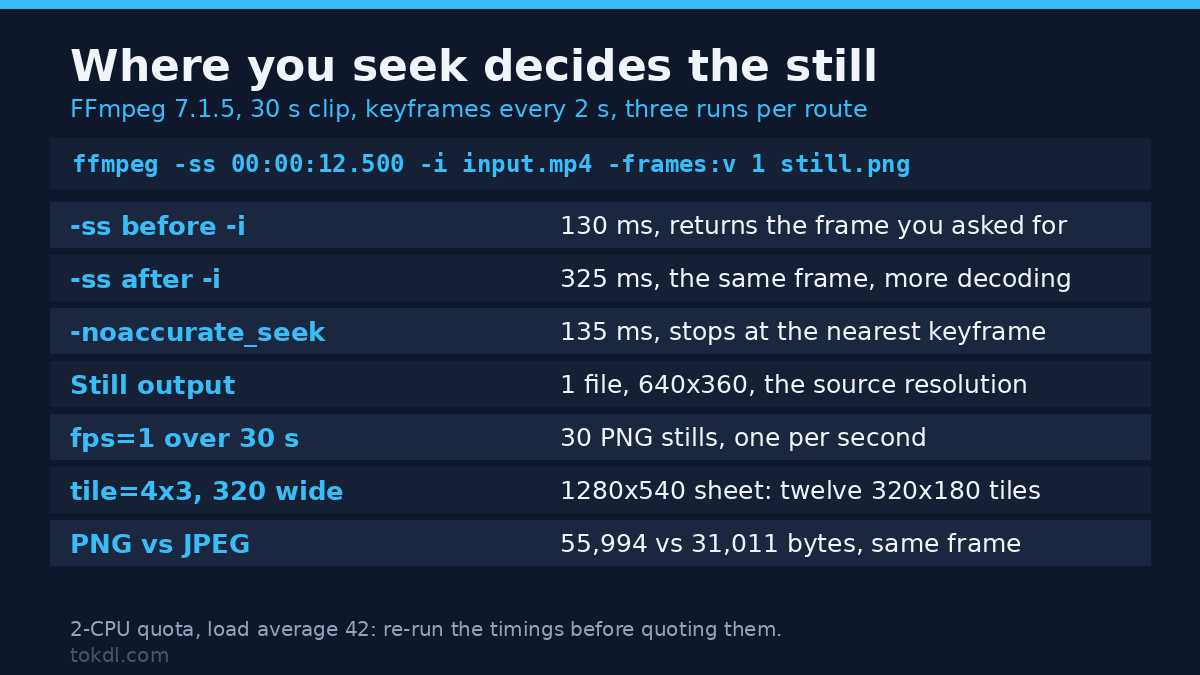
FFmpeg is the decoder that most video software is built on, and it ships a frame-grabbing command that behaves the same on Windows, macOS and Linux. Every flag below is documented in the official FFmpeg documentation. Three parts matter: where you seek, how many frames you keep, and how you name the output.
For a single frame at a known moment:
ffmpeg -ss 00:00:12.500 -i input.mp4 -frames:v 1 still.pngThe -ss value is the timestamp. -frames:v 1 tells FFmpeg to stop after one picture, which is why the command returns in a fraction of a second instead of decoding the whole file. Put -ss before -i for speed: FFmpeg seeks to a keyframe and discards the gap up to your timestamp, so you still get the frame you asked for. Add -noaccurate_seek, or copy the stream instead of re-encoding, when the nearest keyframe before your time is good enough. Put it after -i when you would rather not lean on that default at all.
To pull one still every second across a clip:
ffmpeg -i input.mp4 -vf fps=1 every_second_%04d.pngChange fps=1 to fps=1/10 for one still every ten seconds. Add a scale filter when you want smaller files: -vf "fps=1,scale=1280:-1" keeps the aspect ratio and caps the width at 1280 pixels.
A contact sheet is a grid of stills on a single image, and it’s one more filter away:
ffmpeg -i input.mp4 -vf "fps=1/10,scale=320:-1,tile=4x3" -frames:v 1 sheet.jpgThat yields twelve stills in a four-by-three grid, which is the quickest way to review a long recording before deciding where to cut. If the file won’t open at all, fix that first. More flags, including audio and container options, live in this FFmpeg command list.
Method 2: use the tools already on your machine
You don’t need a terminal to extract frames from a video. Every mainstream player and editor has a snapshot or export-frame control, and it saves at the source resolution rather than at the size of your window.
In VLC, press Shift+S or open Video and choose Take Snapshot while the video is paused. The still lands in your Pictures folder as a PNG, named after the file and its timestamp. VLC is free for Windows, macOS and Linux from VLC’s download page.
On macOS, QuickTime Player hides its export-frame option well: use Edit then Copy while paused, and paste into Preview to get the current frame at full resolution. In DaVinci Resolve, right-click the viewer and choose Grab Still. In Premiere Pro, the camera icon under the program monitor writes the frame to a file.
Windows has no built-in frame export. Its Snipping Tool captures screen pixels, so a still taken that way is only as large as the window you were watching in. Use VLC or an editor instead.
If the clip is your own upload, YouTube Studio already holds frame-based images for it. Studio offers three auto-generated thumbnails per video, drawn from frames inside your file, and you can save the one you keep. That route stops at your own channel.
What these tools can and can’t do
A frame extractor is a decoder bolted to an image encoder. It converts one decoded picture into PNG or JPEG and writes it to disk. That’s the entire mechanism, and it explains why the output looks the same whichever tool you pick.
What it can’t do is invent detail. A still from a 1080p clip is 1080p, however far you scale it afterwards. It also can’t undo motion blur: if the subject moved during the exposure, the frame is soft in the file itself, and sharpening won’t put back information that was never recorded.
Encrypted streams are out of reach, and deliberately so. When a service protects playback with DRM, the player hands the display a decrypted picture but never a decodable file, so a snapshot attempt usually returns a black or frozen frame. That’s a protection measure doing its job, not a setting you’re meant to defeat.
Browser-based “video screenshot” extensions sit in the weakest position of all. They capture what the page painted, which is capped by your window size and your display, so the still is convenient and lossy at the same time.
Rights and responsible use
Every frame in a video was made by somebody. Extracting a still moves no rights with it. It produces a copy of their work, and that copy belongs to them exactly as much as the original video does.
Your own footage is yours, and you can do what you like with a frame from it. Other people’s video is a different matter.
Keeping a frame as a private reference, or quoting one briefly in commentary or a review, sits in a very different place from republishing it as your own thumbnail, dropping it into an advertisement, or printing it on a product. “It is only one image” isn’t a legal position.
Platform rules sit on top of copyright. YouTube’s own fair use explainer walks through how it weighs reused material, and the Terms you accepted when you uploaded or watched carry their own limits. When a still is heading somewhere commercial, ask the rights holder first.
Troubleshooting: when the still comes out wrong
The first frame is black
Many files open on a black or blank frame because the encoder started before the camera was ready. Seek a second or two past zero and grab again. If you’re batch-exporting, trim the clip first so the export begins after the dead air.
The still doesn’t match the timestamp
That’s fast seeking. With -ss before -i and accurate seeking switched off, or with a stream copy, FFmpeg stops at the nearest keyframe, which can be several seconds away. Leave accurate seeking on, which it’s by default, or move -ss after -i: both decode forward to the frame you asked for, and the second one just takes longer.
HDR footage exports flat and grey
An HDR frame carries a different transfer curve than a normal display expects, so it looks washed out and desaturated without tone mapping. Convert the clip to SDR as part of the extraction, or open the PNG in an application that understands the colour space.
Horizontal lines across the image
That’s interlacing, and it only shows up on older broadcast or camcorder files. Add a deinterlace filter during extraction (-vf yadif in FFmpeg) and the combing disappears.
The frame is blurry and never sharpens
Motion blur is baked in at capture time. A slow shutter speed smears anything that moves, and no tool reverses it. Choose a different frame where the subject was still, or change the source camera settings next time.
A screenshot looks softer than the video
Screen capture records your window, not the file. If the player was showing the clip at 60 percent zoom inside a small window, that’s the resolution you saved. Extract from the file itself and the full pixel count comes back.
Frequently asked questions
Can I extract frames from a video without installing anything?
Yes, if your player has a snapshot button. VLC and most desktop players save a still with one keystroke, and no account or upload is involved. For batches of stills you’ll want FFmpeg, which is also free.
Should I save the still as PNG or JPEG?
PNG for anything you’ll edit further. It’s lossless, so nothing is thrown away between saves. JPEG suits a long contact sheet where file size matters more than perfect fidelity.
How do I grab the frame at an exact timestamp?
Either order returns the frame at your timestamp, like ffmpeg -i input.mp4 -ss 00:01:30 -frames:v 1 still.png. A seek before the input is the faster route because it starts at a keyframe and discards the gap; a seek after it decodes from the top of the file and keeps working when accurate seeking is off or the stream is copied rather than re-encoded.
Can I extract a frame from video I didn’t make?
Legally, that depends on what you do with it. A private reference isn’t the same as publishing it, and reusing someone’s frame in your own commercial work needs their permission whatever tool you used.
Does extracting a frame lower the quality of the video?
No, reading frames doesn’t touch the source file. The still is a copy of one decoded picture, and your video keeps its original bitrate and structure.
Can I get a 4K still from a 1080p video?
No. Upscaling adds pixels but no information, so a 1080p frame enlarged to 3840×2160 looks softer rather than sharper. You get a genuinely 4K still only from a 4K source.
Why is my extracted frame black?
You’re almost certainly on the first frame, or the file is still being written by a recorder. Seek a second or two in, and make sure the recording has finished writing before you read it.
Which method should you use to extract frames from a video?
The fastest way to extract frames from a video is the one already installed on your machine, so start there. One still and you’ve got a terminal open: use the FFmpeg command.
One still and you would rather not type anything: use VLC’s snapshot button or Grab Still in your editor. Twenty stills from a long recording: use the fps filter, or a contact sheet when you want to review them on a single page.
All of those stop at the pixels your video genuinely contains. If you need a different size or a different output format afterwards, that becomes a separate conversion job, and turning the clip into a GIF is the same machinery aimed at another destination.
Frame extraction is one of the rare tasks where the honest answer is that you already own the right tool. No purchase, no sign-up, no handing your file to a stranger’s server. Just a decoder asked to hold still.