
How to Downscale 4K to 1080p Without Losing Detail
A phone shoots 4K by default these days, so a ten second clip can land at 35 MB before you’ve trimmed a thing. It’s too big for the group chat, it stalls a slow upload, and your laptop fan spins up just to scrub through it. I wanted to know whether it pays to downscale 4K to 1080p, so I built a test clip and pushed every common setting through FFmpeg instead of trusting a rule of thumb. You lose three quarters of the pixels and almost nothing you can see.
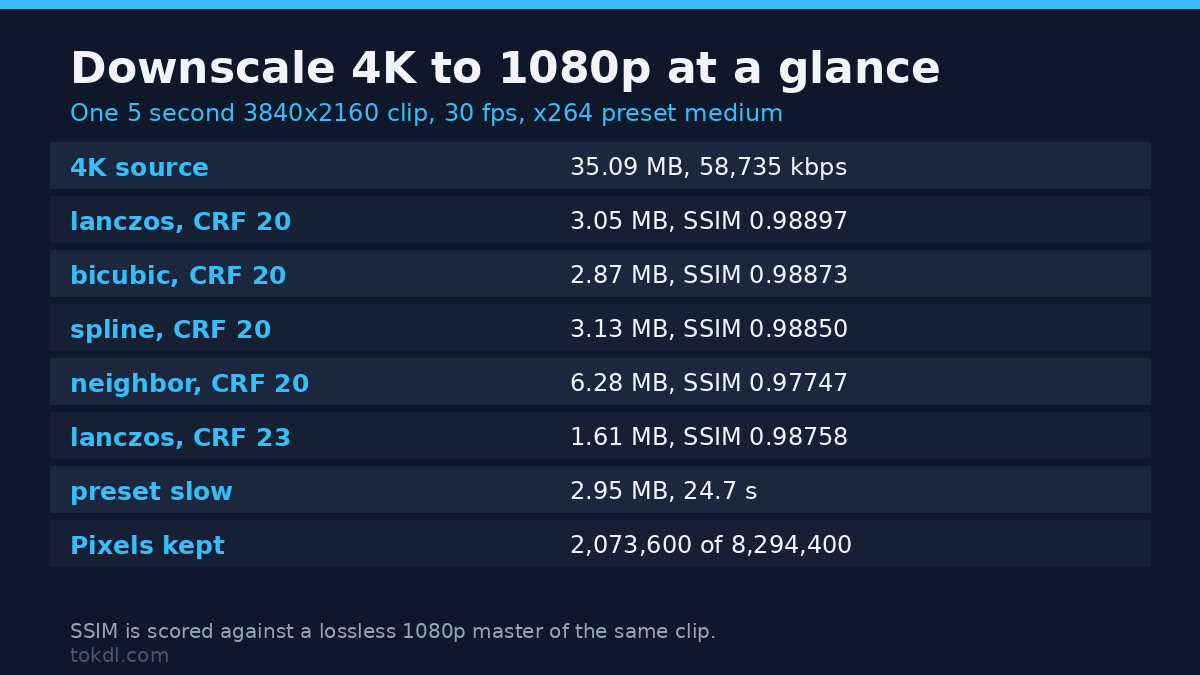
The clip runs 5 seconds at 3840 by 2160 and 30 fps, encoded with x264 at CRF 20. It weighs 35.09 MB and carries 58,735 kbps of video. Beside it I kept a lossless master: the same source scaled to 1920 by 1080 with lanczos and encoded at QP 0, which is mathematically lossless. Every output below is scored against that master with SSIM and PSNR, so the quality column has a fixed reference rather than my impression of a screenshot.
Here’s what the numbers say when you downscale 4K to 1080p, and which settings are worth your time.
Why you’d downscale 4K to 1080p at all
3840 by 2160 holds 8,294,400 pixels. 1920 by 1080 holds 2,073,600. The ratio is exactly four, and that’s the point: you keep a quarter of the picture and drop the rest. No filter puts detail back, but a 1080p screen only has 2,073,600 pixels to show anyway.
The gains arrive together when you downscale 4K to 1080p. The file gets small enough to send, an old laptop decodes it without stuttering, and the upload stops being the slowest part of sharing a clip. On this test the downscaled file came out at 3.05 MB against 35.09 MB of 4K, which is 8.7%. That ratio is specific to this clip, and a later section explains why.
What you give up is resolution, and resolution only matters when something asks for it. If you plan to crop hard on a 4K timeline or deliver to a client whose contract says 4K, keep the big file. If you’re still picking a target resolution for a project, the comparison of 720p, 1080p and 4K covers that decision, and this guide assumes the answer is 1080p.
Check the source before you downscale 4K to 1080p
Two minutes of checking saves a wasted export. Ask the file what it holds first:
ffprobe -v error -select_streams v:0 -show_entries stream=width,height,r_frame_rate -of default=nw=1 clip.mp4
If the width comes back as 1920, stop. Scaling 1080p up to 4K and back down costs quality and disk space for nothing. I tried it: the 4K intermediate came out at 14.83 MB, about five times the direct 1080p encode, and the file that came back scored 0.98665 SSIM against the master where the direct downscale scored 0.98897. Two extra passes bought a two decibel loss and nothing else.
The other thing to check is the aspect ratio. Vertical phone footage is common and cinema files run wider than 16:9, so a command that forces 1920 by 1080 will stretch anything that wasn’t 16:9 in the first place. When proportions vary, fix the height and let the width follow:
ffmpeg -i in.mp4 -vf "scale=-2:1080" -c:v libx264 -crf 20 -preset medium -c:a copy out.mp4
That -2 isn’t a typo. H.264 works on 2×2 blocks of pixels, so both dimensions have to be even, and -2 tells the scaler to derive the missing dimension from the aspect ratio and round it to the nearest even number. On the 4K test clip the same rule produced a clean 1280×720 file at 1.94 MB in 10.8 seconds. Ask for an odd size and FFmpeg stops with width not divisible by 2 (1921x1081), an Error while opening encoder, and no output file at all.
How to downscale 4K to 1080p with FFmpeg
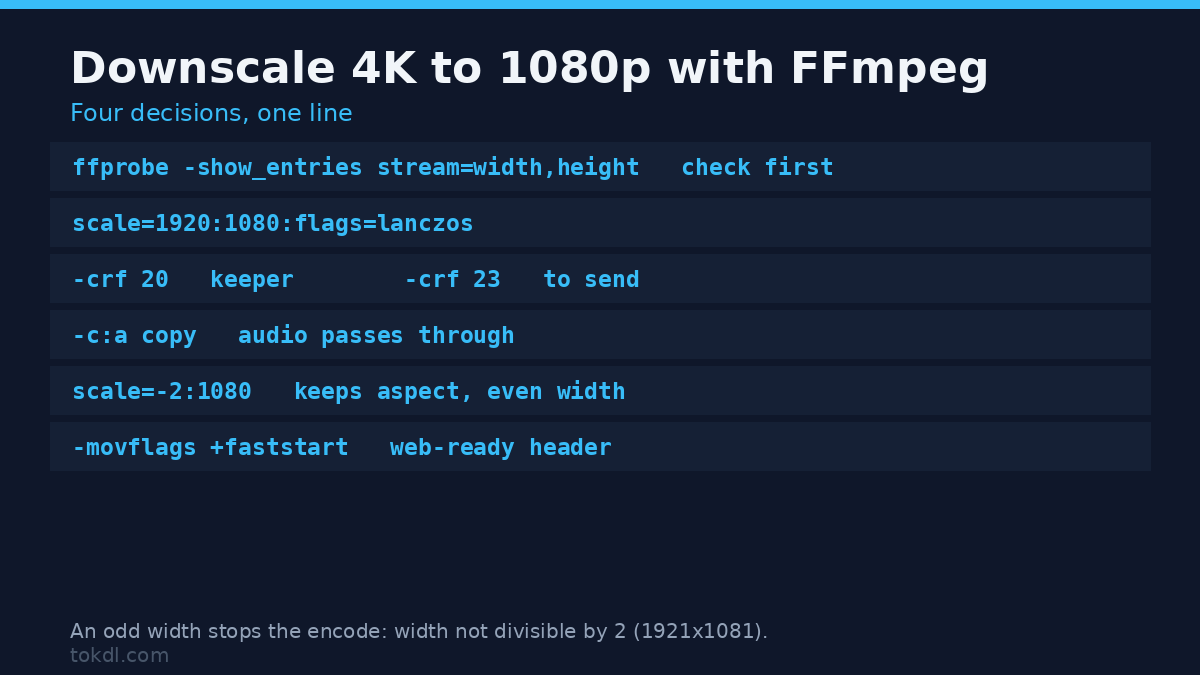
The work is one line, and most of it is settings you’ll reuse for every clip after this one.
ffmpeg -i in.mp4 -vf "scale=1920:1080:flags=lanczos" -c:v libx264 -crf 20 -preset medium -c:a copy -movflags +faststart out_1080p.mp4
Read it left to right and there are four decisions. The scale filter sets the new size, and flags=lanczos picks the resampling kernel. -crf 20 sets the quality target and, with it, the file size. -c:a copy passes the audio through untouched, which saves a generation of quality loss. Those four are what you’ll reuse every time you downscale 4K to 1080p, so it’s worth getting them right once. Every flag here is documented in the scale filter section of the FFmpeg manual.
My test clip had a second problem worth mentioning: it was shaky handheld footage. Scaling doesn’t touch that, so if your clip wobbles, run the two pass stabilizer workflow first and scale the result.
Which scaler flag should you use when you downscale 4K to 1080p?
Four flags are worth testing, and the differences are small enough that you should pick on measurement rather than folklore. I encoded the same 4K source with each one at CRF 20 and preset medium, then scored the lot against the lossless master.
| Scaler flag | File size | Bitrate | SSIM vs master | PSNR | Encode time |
|---|---|---|---|---|---|
| lanczos | 3.05 MB | 4,987 kbps | 0.98897 | 44.91 dB | 19.2 s |
| bicubic | 2.87 MB | 4,682 kbps | 0.98873 | 44.52 dB | 16.9 s |
| spline | 3.13 MB | 5,119 kbps | 0.98850 | 44.72 dB | 23.6 s |
| neighbor | 6.28 MB | 10,399 kbps | 0.97747 | 35.63 dB | 20.9 s |
Lanczos and bicubic sit within 0.0002 SSIM of each other, so that choice is about the picture you have. Lanczos holds fine detail and edges a little better, which is what you want when a frame has text, foliage or fabric in it. Bicubic is the default in most editors, it blends softer, and it’s a fine choice when speed matters more than the last hair of sharpness. Spline cost the most time for no measurable gain, which is the pattern I keep seeing each time I downscale 4K to 1080p with a new clip.
Neighbor is the trap. It got the lowest SSIM and still produced a file twice the size of lanczos at the same CRF. Nearest-neighbour keeps hard, aliased edges, and those are expensive to encode, so you pay in disk space for the worst-looking output of the four.
The CRF setting that decides your file size
CRF moves the file size far more than the scaler does. Same source, same lanczos flag, same preset, one number changed. It’s the setting that decides whether you downscale 4K to 1080p into 3 MB or into 1.6 MB:
| Setting | File size | Bitrate | SSIM vs master | PSNR |
|---|---|---|---|---|
| CRF 20 | 3.05 MB | 4,987 kbps | 0.98897 | 44.91 dB |
| CRF 23 | 1.61 MB | 2,557 kbps | 0.98758 | 43.41 dB |
Dropping from CRF 20 to CRF 23 cut the bitrate by 49% and the file almost in half, and SSIM moved by 0.0014. PSNR fell 1.5 dB, which sounds worse than it is, because the scale is logarithmic and 43 dB is still a clean picture. On a phone screen I can’t tell those two files apart. CRF 20 is the safe answer for a clip you’ll keep, and CRF 23 is the right answer for a clip you’re about to send. The FFmpeg H.264 encoding guide explains how CRF and preset interact.
Two anchors for the rest of the range. Below CRF 18 the files grow fast for a difference nobody sees. Past CRF 26 you lose texture in dark, moving areas, which turns up as blocking on gradients. If you’d rather set a target size than a quality level, work out the bitrate you need with the file size math and pass -b:v instead of -crf.
The preset is the last knob. -preset slow produced 2.95 MB instead of 3.05 MB and spent 24.7 seconds instead of 19.2. That’s a fair trade on a machine you own and a bad trade inside a batch job that has to finish tonight. Medium is the usual middle ground, and the FFmpeg command reference covers the flags worth memorizing.
Downscale 4K to 1080p in an editor instead
Every editor hides the same two decisions behind different labels, so only the labels change when you downscale 4K to 1080p in an editor. Premiere Pro calls the output size Frame Size, in the export dialog under Video. DaVinci Resolve puts it on the Deliver page as resolution. HandBrake puts it on the Dimensions tab, where you set width to 1920 and leave the height locked so the aspect ratio survives.
Two habits make those exports safer. Set the output resolution yourself rather than trusting a preset named after a device, and check what came out with ffprobe before you delete anything. If 4K was only ever the camera default, the cheaper fix is to record at 1080p in the first place.
How much smaller do you get when you downscale 4K to 1080p?
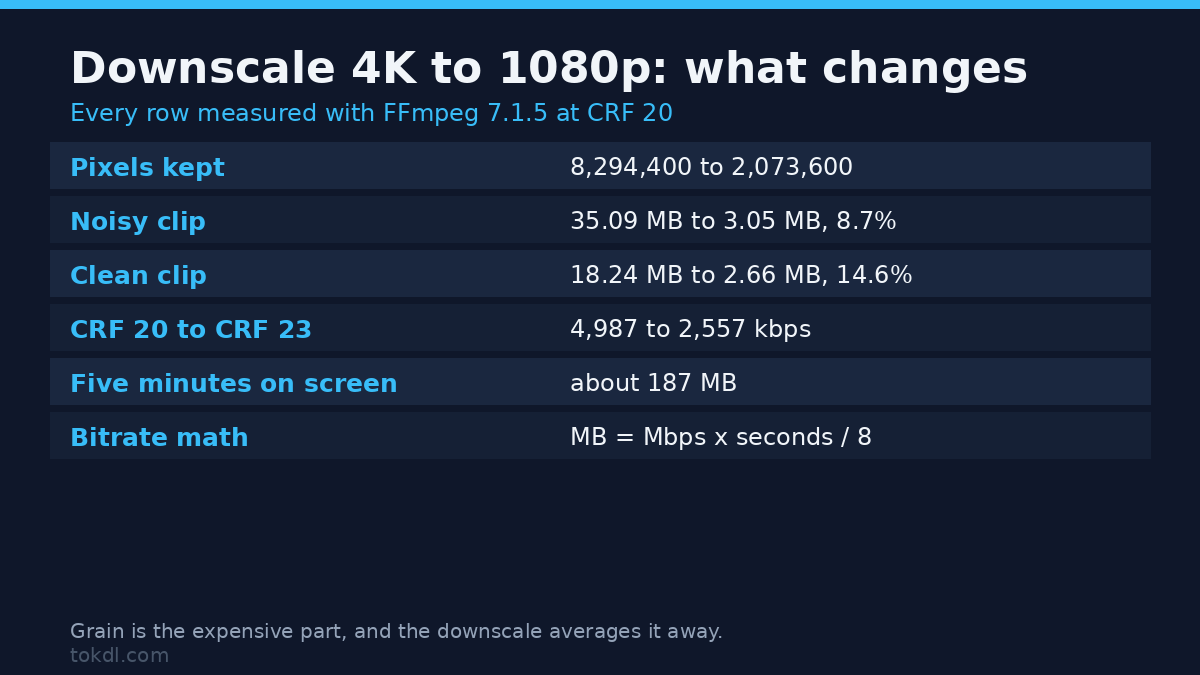
Sizes move for two reasons, and only one of them is pixel count. You keep a quarter of the pixels, so the naive guess is a quarter of the file size. Both of my measurements came in under that: 8.7% for the noisy clip, 14.6% for a clean one, both at CRF 20. CRF holds quality rather than bitrate, and a 1080p frame gives the encoder less area to spend bits on. Texture decides the rest. Noise at 4K is close to incompressible, and a downscale averages that grain away before the encoder sees it, which is why grainy originals save the most.
The bitrate figure is the one to plan with. At 4,987 kbps, five seconds of 1080p is 3.05 MB and five minutes is about 187 MB. That’s the arithmetic from the bitrate guide: megabytes equal megabits per second times seconds, divided by eight.
Common mistakes when you downscale 4K to 1080p
- Upscaling by accident. A 1080p clip pushed up to 4K for quality is bigger and softer at the same time.
- Odd dimensions. H.264 needs even width and height, so use
scale=-2:1080and let the filter pick the safe number. - Re-encoding the audio.
-c:a copykeeps the original track. Re-encode only if you need another codec. - Keeping a 4K bitrate target. A leftover
-b:v 40Mleft in the command when you downscale 4K to 1080p gives you a 1080p file the size of your 4K master. - Downscaling twice. 4K to 720p and back up to 1080p throws detail away twice. Pick the final size and do it once.
- Deleting the original. Keep the 4K master until you’ve watched the small version on the device that matters.
Frequently asked questions
Does it hurt quality to downscale 4K to 1080p?
You lose resolution, which is the point, and you keep everything a 1080p display can show. Averaging four pixels into one also averages away noise and fine grain, which is why a downscaled file often looks cleaner per pixel than the original. What you shouldn’t do is scale, re-encode, and scale again, since every extra pass costs a little sharpness for nothing.
How small does the 1080p file get?
Measure your own clip, because the range is wide. At CRF 20 the noisy test file landed at 8.7% of its 4K version (35.09 MB to 3.05 MB) and a clean file at 14.6% (18.24 MB to 2.66 MB). Grain inflates the 4K original far more than it inflates the downscale. Budget a fifth of the original size and you won’t be disappointed when you downscale 4K to 1080p for a phone, a chat app, or an edit that has to fit on a laptop drive.
Should I use CRF 18, 20 or 23 when I downscale 4K to 1080p?
CRF 18 for a master you’ll edit again, CRF 20 for a keeper, and CRF 23 for anything you’re about to upload. Measured: CRF 23 landed 49% below CRF 20 on bitrate with a 0.0014 SSIM difference, and that’s a deal worth taking for a delivery copy.
Can I downscale 4K to 1080p without re-encoding?
No. Changing the resolution means decoding every frame, resampling it, and encoding a new stream, and that second encode is where quality is decided. A stream copy with -c:v copy keeps the picture exactly as it is, so it can’t change the size. One well-set encode is all you need.
The short version
To downscale 4K to 1080p you need one command and three settings. Check the source with ffprobe, scale with lanczos, and set quality with CRF instead of a bitrate cap. Use CRF 20 for a file you’ll keep and CRF 23 for a file you’ll send, pass the audio through with -c:a copy, and hold onto the 4K master until you’ve watched the small version. On this test that turned 35.09 MB into 1.61 MB and still landed 0.98758 SSIM against a lossless reference. That’s the whole recipe when you downscale 4K to 1080p.
[…] you’re tuning the rest of the export, my breakdown of how to downscale 4K to 1080p covers the resolution side of the same pipeline, and 720p vs 1080p vs 4K covers what those targets […]