
How to Upscale Video to 4K: What Actually Adds Detail
A client asks for a 4K master. You shot the interview at 1080p. So you open a converter, tick the box, wait twenty minutes, and end up with a file that’s three times bigger and looks the same on a 4K screen.
That isn’t a bug. That’s resampling. If you want to upscale video and get something back, you need to know where the detail goes, which scaler suits your footage, and why step order beats the sharpening amount. I measured all three with FFmpeg 7.1.5 on two CPU cores under a hard cgroup quota, so every number is reproducible.
Ahead: why lost detail can’t come back, five scalers compared across three content types, and the sharpening order that costs 1.9 dB when you get it wrong. If you upscale video at the start of a project, read the last section first.
What it means to upscale video
A 1920×1080 frame holds 2,073,600 pixels. A 3840×2160 frame holds 8,294,400, and the extra six million get invented by a formula that reads the pixels around each new position. That formula only knows what’s already in the file: when you upscale video, the detail your 1080p master never recorded stays gone. A 4K file built from 1080p footage is large 1080p.
The reverse trip is easier, and it’s covered in how to downscale 4K to 1080p: throwing detail away is simpler than putting it back.
Why upscaling video can’t recover detail
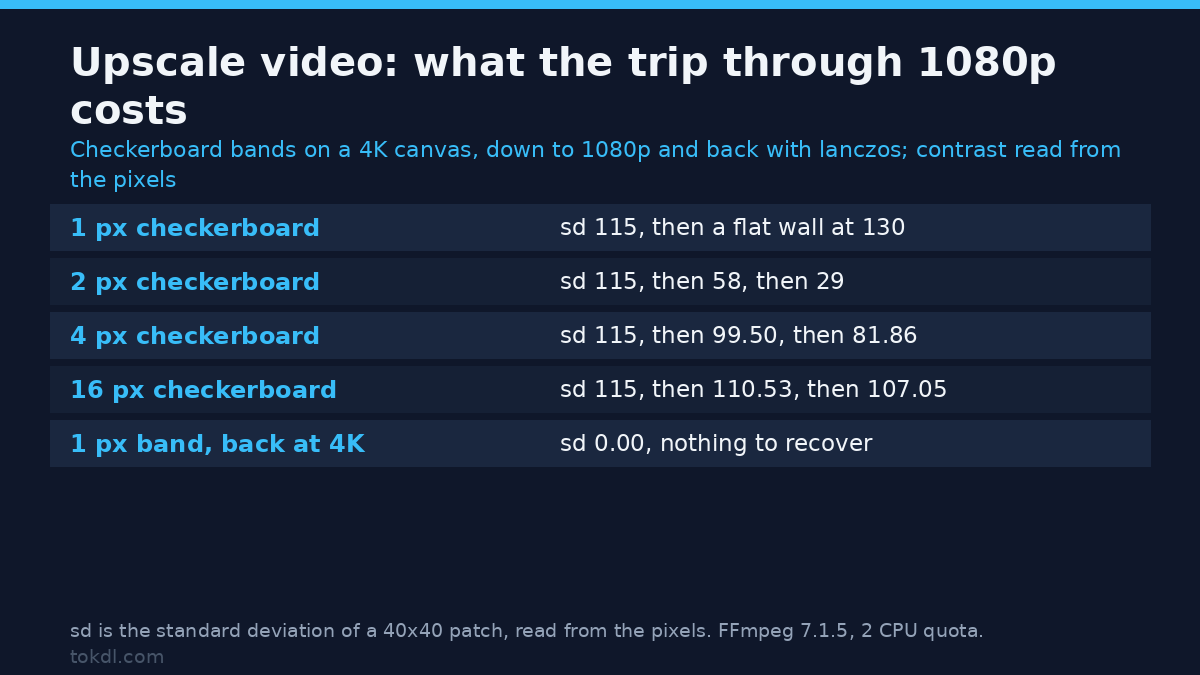
I built a 3840×2160 canvas with four checkerboard bands, each finer than the last, pushed it down to 1080p with lanczos and brought it back, then measured the contrast in each band from the delivered pixels.
| Band in the 4K original | 4K original | Through 1080p | Back at 4K (lanczos) |
|---|---|---|---|
| 1 px checkerboard | sd 115.00, range 15-245 | sd 0.00, flat 130 | sd 0.00, flat 130 |
| 2 px checkerboard | sd 115.00, range 15-245 | sd 58.00, range 72-188 | sd 29.00, range 101-159 |
| 4 px checkerboard | sd 115.00, range 15-245 | sd 99.50, range 30-229 | sd 81.86, range 0-255 |
| 16 px checkerboard | sd 115.00, range 15-245 | sd 110.53, range 8-252 | sd 107.05, range 0-255 |
Top row first. At 4K that band alternates 245 and 15 on a two-pixel period. Through 1080p it collapses to a flat gray wall at 130, and it’s still flat at 130 after returning to 4K. Nothing to sharpen, nothing to recover.
The second row is the quieter cost. A band that survives at half contrast loses half of what’s left, 58 down to 29. Even detail your source did capture doesn’t come home intact when you upscale video for delivery.
That’s the honest answer on AI too. Tools that upscale video with a model don’t find the lost line, they predict a plausible one and paint it in. On faces and text that looks convincing while being invented.
Five scalers, and the metric that lies
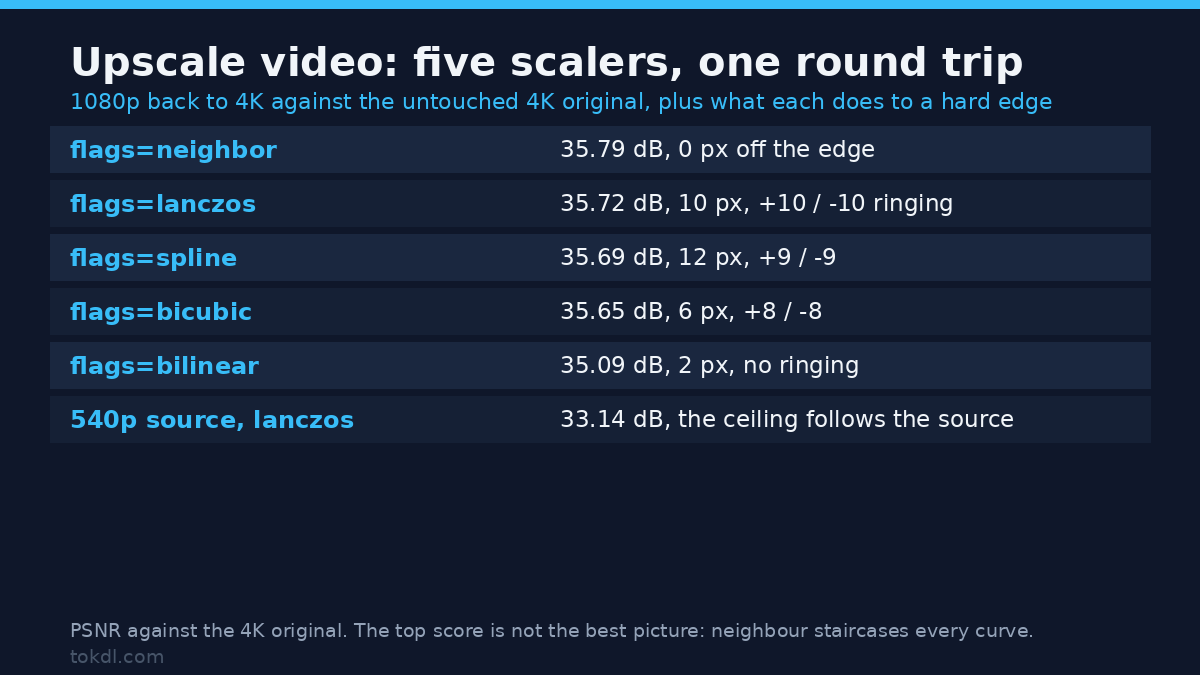
The scale filter offers several resampling algorithms, so I ran the same round trip five times against the untouched 4K original. Every honest answer about how to upscale video starts with knowing this table misleads:
| Filter flags | PSNR vs 4K original | SSIM |
|---|---|---|
| flags=neighbor | 35.79 dB | 0.983726 |
| flags=lanczos | 35.72 dB | 0.978462 |
| flags=spline | 35.69 dB | 0.978357 |
| flags=bicubic | 35.65 dB | 0.978386 |
| flags=bilinear | 35.09 dB | 0.975821 |
| lanczos, from a 540p source | 33.14 dB | 0.963379 |
All five land within 0.7 dB of each other, and the crudest one wins. Read that table alone and you’d set neighbour as your default, so I read the pixels instead.
The last row matters more: a 540p source scored 2.6 dB below the 1080p one. Source resolution sets the ceiling, and no flag choice buys that back.
What each scaler does to an edge, pixel by pixel
Controlled test: a 1920×1080 image, left half value 80, right half 176, one hard vertical edge at x=960. Upscaled to 4K with each flag, then I read the row across the edge one pixel at a time:
| Filter flags | Samples off the plateaus | Ringing |
|---|---|---|
| flags=neighbor | 0 | none, the edge becomes a two-pixel staircase |
| flags=bilinear | 2 | none |
| flags=bicubic | 6 | +8 / -8 |
| flags=lanczos | 10 | +10 / -10 |
| flags=spline | 12 | +9 / -9 |
Now the PSNR table makes sense. Neighbour duplicates pixels, so it blurs nothing and keeps the contrast of everything it reproduces, which is what PSNR rewards. The price is the staircase: every diagonal becomes visible steps. Bicubic and lanczos soften the edge and ring around it, and bilinear softens with no ringing at all.
Ringing is that overshoot you see as a light halo beside a dark edge. Lanczos buys sharpness with a 10-level overshoot, which is why a sharpening pass after you upscale video has to stay gentle.
The right scaler depends on the content
Which flag to use when you upscale video depends on the frame, which is why I ran the same round trip over three content types:
| Content | Best | Middle | Worst |
|---|---|---|---|
| Synthetic pattern, hard edges | neighbor, 35.79 dB | lanczos 35.72, spline 35.69, bicubic 35.65 | bilinear, 35.09 dB |
| Text and screenshots | lanczos, 35.20 dB | spline 35.18, bicubic 34.89 | neighbor, 33.55 dB |
| Smooth, grainy footage | bicubic, 46.91 dB | spline 46.91, lanczos 46.89 | bilinear, 46.59 dB |
The flip between the first two rows is the point. On small text lanczos beats neighbour by 1.65 dB, because a staircase wrecks letterforms. On footage the middle three tie within 0.02 dB, so the flag matters less than what you do next.
My defaults from those numbers: lanczos for footage, lanczos or spline for screen recordings and text, bicubic when I’ll sharpen anyway, bilinear for the softest result with no ringing, and neighbour on purpose for pixel art. When I upscale video of a menu-heavy demo I take lanczos and accept softer icons. Pick neighbour because it topped a PSNR table and every curve gets steps.
Step by step: how to upscale video to 4K with FFmpeg
1. Look at what you have
ffprobe -v error -select_streams v:0 -show_entries stream=width,height,r_frame_rate,pix_fmt -of default=nw=1 input.mp4If it says 1920×1080 at 25 fps, that’s your ceiling. If it says yuv420p, stay in 8-bit unless you have a reason to change.
2. Repair first, then upscale video last
Filters that judge the picture work better at source resolution: deinterlacing, denoising, stabilising and colour work all see more on the 1080p frame and cost less there. Interlaced material is the classic trap, and the combing fix lives in how to deinterlace video.
3. Resample with lanczos
ffmpeg -i input1080.mp4 -vf "scale=3840:2160:flags=lanczos" -c:v libx264 -crf 16 -preset slow -pix_fmt yuv420p output4k.mp4CRF 16 rather than the 20 to 23 you’d use at 1080p, because the same CRF at four times the pixel count doesn’t hold. The gap between a quality target and a bitrate target is covered in constant quality vs average bitrate.
4. Keep both dimensions even
The scale filter’s -2 keeps the dimension it computes divisible by two, because encoders refuse odd dimensions with yuv420p. It won’t rescue a target you typed yourself: I pinned an odd width on a 641×361 source and got exit code 187, the line width not divisible by 2 (1279x719), and no output file.
5. Raise the bitrate for the bigger frame
The same clip at CRF 23 came out 3.03x larger after the upscale, 100,827 bytes at 1080p against 305,088 bytes at 4K. You upscale video by four times the pixel count, so the 4K upload can blow through a cap the 1080p version fitted inside. Fitting a video to an upload size limit covers that.
6. Verify the file, don’t trust the exit code
ffprobe -v error -select_streams v:0 -show_entries stream=width,height -of csv=p=0 output4k.mp4It should print 3840,2160. A command that returns 0 and writes nothing is a real failure mode here, so check the size and the reported resolution. One flag note: -sws_flags lanczos also works as a global default for scale filters that don’t name their own flags, and my check came back byte-identical to flags=lanczos inside the filter, 4,139,237 bytes either way.
Sharpen after you upscale video, never before
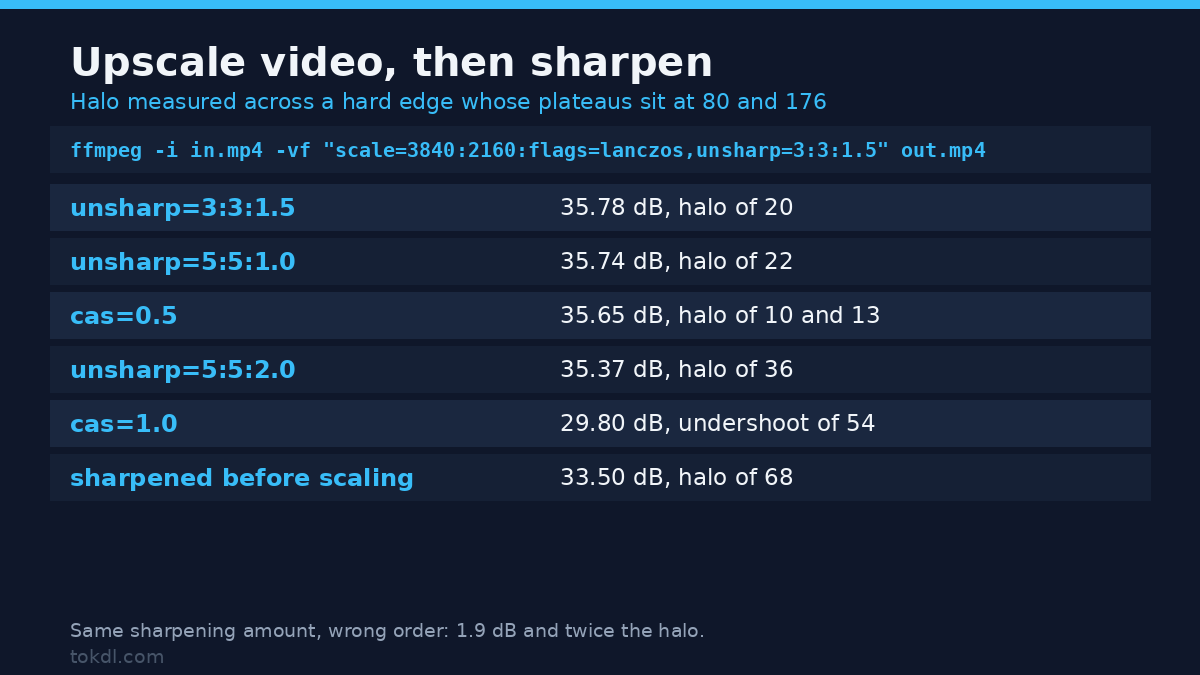
Sharpening is where upscaled files get ruined. I ran five settings on the bicubic 4K upscale, measuring PSNR against the original 4K and the halo on that controlled edge:
| Setting | PSNR vs 4K original | Edge values (80 / 176 plateaus) |
|---|---|---|
| unsharp=3:3:1.5 | 35.78 dB | 60 to 196, halo of 20 |
| unsharp=5:5:1.0 | 35.74 dB | 58 to 198, halo of 22 |
| cas=0.5 | 35.65 dB | 67 to 186, halo of 10 and 13 |
| unsharp=5:5:2.0 | 35.37 dB | 44 to 212, halo of 36 |
| cas=1.0 | 29.80 dB | 26 to 197, undershoot of 54 |
The gentle settings nudged the metric up: unsharp at 3:3:1.5 measured 0.13 dB better than the unsharpened upscale. Doubling the amount pushed the halo to 36 and dropped the metric 0.28 dB. Contrast Adaptive Sharpening behaved differently: cas=0.5 bought a cleaner edge with 10 levels of ringing, while cas=1.0 fell off a cliff at 29.80 dB with a 54-level undershoot.
Then I ran the same sharpening before the scale instead. It measured 33.50 dB against 35.37 dB afterwards, and the halo went from 36 levels to 68. A 1.9 dB gap purely from step order. Edit at source resolution, upscale video, then sharpen on the final frame size.
What it costs to upscale video
What it costs to upscale video is mostly the encoder, not the resample. On 240 frames of 1080p with no encoder in the loop, this box spent 0.65 s with no scale filter, 1.31 s with bilinear, 1.36 s with neighbour, 1.40 s with bicubic, 1.71 s with lanczos and 2.71 s with spline. Writing eight frames of that 4K result losslessly took 3.79 s to 5.05 s, more than the resample of ten times as many frames.
Two disclosures, because timings mean nothing without them. The container reports 64 CPUs while its cgroup quota is 2, and the host sat near a load average of 40. Wall times swing by about 20% on a shared box, so read these as ratios.
Common mistakes
Exporting at 1080p and upscaling afterwards is the most common mistake, and the most expensive: every edit made at 4K on 1080p footage costs four times the render time for no extra detail. Work at source resolution and upscale video once, at the end. Sharpening before the scale is the second, and it doubles the halo while costing the better part of 2 dB.
Choosing a scaler by a quality score alone is the third. Neighbour won my first PSNR table and is still the wrong default for footage, because the metric rewards the staircase that ruins curves and text. The bitrate maths behind the two resolutions is in how to choose the right video bitrate, and the resolution comparison in 720p vs 1080p vs 4K. Last, treating a 4K label as a quality guarantee. YouTube’s own guidance is to upload at the resolution you shot at: support.google.com/youtube/answer/1722171.
FAQ
Does it help to upscale video at all?
It meets a delivery spec and fixes compatibility. It doesn’t add detail: my one-pixel checkerboard went from a standard deviation of 115 to 0.00 and stayed there. Smooth footage is the one place a gentle pass helps: a sharpened lanczos upscale looks crisper than the soft original.
Is AI upscaling better than a plain resample?
For texture and faces it often looks better, because it synthesises plausible detail instead of smearing neighbours. The detail is invented, so on anything technical, keep the original and say what you did.
Which scaler should I use to upscale video with text in it?
Lanczos or spline. In my text test lanczos measured 35.20 dB against neighbour’s 33.55 dB, a 1.65 dB gap that shows up as broken letterforms.
Do I need a fast machine to upscale video to 4K?
Not for the resample, which took 1.31 s to 2.71 s for 240 frames here. You need it for the encoder: eight frames of lossless 4K cost 3.79 s to 5.05 s on a two-core quota.
The short version
To upscale video well, do it at the end of the chain, with lanczos as the default, at a quality target raised for the bigger frame, and sharpen last with a gentle setting. Check the delivered file rather than the exit code, and accept the ceiling: a resample spreads the detail you have, it doesn’t find detail you never shot.