
How to Split a Video Into Parts: Cut Long Files Cleanly (2026)
Ask for a cut at exactly four minutes, and a stream-copy split may hand you back a clip that starts somewhere else. That isn’t a bug, and nothing is wrong with your file. It’s the keyframe grid doing its job.
Splitting is the least glamorous job in video work and one of the most common. A recording runs too long for one upload, a meeting has to go to three different people, or a single take has to become four short clips. Knowing how to split a video properly comes down to one decision: copy, or re-encode.
The good news is that for most files you already own, the fast route works and the picture stays exactly as it was. The catch is that the fast route has rules, and ignoring them is why split files start a beat late or refuse to open at all.
How to Split a Video Without Re-Encoding It
A split is a copy of a section of the file, not a fresh render. When the tool copies the video and audio streams into a new container instead of decoding and re-encoding them, the job finishes in seconds and every frame matches the original.
That method is called stream copy. You give the tool a start time and a length, tell it to copy rather than encode, and it writes a new file containing just that stretch. Nothing is re-compressed, so nothing is lost.
There’s one consequence worth understanding before you type anything. A compressed video stores a full picture at a keyframe, then only the differences for the frames that follow.
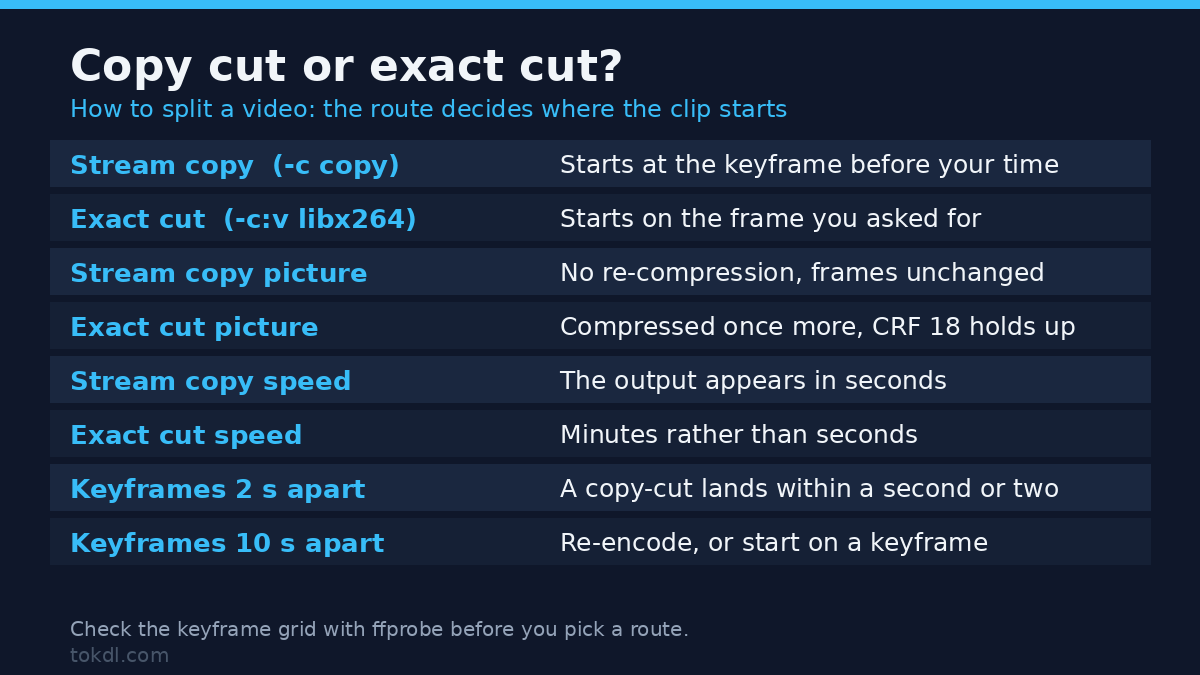
A player can’t start drawing in the middle of that chain, so a stream-copy cut begins at the nearest keyframe at or before your requested time. If the cut has to land on an exact frame, you re-encode that boundary. The mechanics are covered in this guide to keyframe interval settings.
What You Need Before You Start
Three things, and you probably have all of them: the file you want to split, a way to reach it, and enough free disk space. The parts together take up roughly as much room as the original, so a 4 GB recording needs about 4 GB free.
It also helps to know where the cuts belong, so write the times down before you start.
The command-line route below needs FFmpeg, which is free and runs on Windows, macOS and Linux. If you would rather not touch a terminal, the second method covers the editors that already ship with your phone and computer.
Method 1: Split a Video With FFmpeg
FFmpeg gives you both routes from one window: a copy that finishes instantly, and a re-encode when the cut has to be exact. Four commands cover almost every split you’re likely to need.
Find the keyframes first
Knowing where the keyframes sit tells you whether a lossless cut is realistic. This command lists their timestamps in seconds:
ffprobe -v error -select_streams v:0 -skip_frame nokey -show_entries frame=pts_time -of csv=p=0 input.mp4If the numbers come back roughly two seconds apart, a copy-cut will land within a second or two of what you ask for. If they’re ten seconds apart, plan on re-encoding or choose a start time that matches one.
Lossless split in one command
Start time with -ss, length with -t, and copy instead of encode with -c copy:
ffmpeg -ss 00:02:00 -i input.mp4 -t 00:02:30 -c copy part1.mp4That writes a two-and-a-half minute file beginning near the two-minute mark. For the second half, change the start time and drop -t so the command runs to the end of the source:
ffmpeg -ss 00:04:30 -i input.mp4 -c copy part2.mp4The output appears in seconds. Every option used here is documented in the official FFmpeg documentation.
An exact cut, when you need one
Drop the copy flag and let the encoder do the work. When it re-encodes, FFmpeg decodes from the keyframe before your start point and discards the extra frames, so the cut lands where you asked:
ffmpeg -ss 00:02:00 -i input.mp4 -t 00:02:30 -c:v libx264 -crf 18 -c:a aac -b:a 192k part1.mp4That route is slower and compresses the picture once more, so save it for the pieces that genuinely need frame accuracy. A CRF of 18 keeps quality high; raise the number and the file gets smaller and softer.
Equal parts, automatically
When every piece should be about five minutes long, the segment muxer runs the loop for you:
ffmpeg -i input.mp4 -c copy -f segment -segment_time 300 -reset_timestamps 1 part_%03d.mp4The parts come out numbered from part_000.mp4. Treat 300 as a target rather than a promise, because the segmenter still has to respect the keyframes. The reset timestamps flag makes each part start at zero, which keeps players and later joins out of trouble.
Split at chapter marks
Recordings and tutorials often carry chapters already, and their start and end times make natural cut points. This command prints them:
ffprobe -v error -show_chapters -of json input.mp4Feed those times into the copy command above and the parts line up with the chapter list instead of falling a few seconds off it.
Putting the pieces back
Parts cut with stream copy can be joined again with no further encoding, provided you reset their timestamps when you split them. List the files in order inside a text file and run:
ffmpeg -f concat -safe 0 -i parts.txt -c copy joined.mp4The same idea runs in reverse in the guide to merging several clips into a single file.
Method 2: Split a Video With the Tools You Already Have
Every modern phone, laptop and editing app can cut a file in two. The trade-off is that these tools re-encode on export, so the split takes minutes rather than seconds and touches the picture slightly. For a short clip, that’s usually acceptable.
On an iPhone or iPad
Open the video in Photos, tap Edit, and drag the handles at either end of the timeline to mark the section you want to keep. The app then offers to save that selection as a new clip. Run it twice, once for each half, and you’ve got two files without installing anything.
On a Mac
QuickTime Player splits at the playhead. Open the movie, choose View and then Show Clips, move the playhead to the cut point, and pick Edit and then Split Clip. Delete the side you don’t want and save the result. Apple documents the sequence in its guide to splitting a movie into clips.
On Windows
The Photos app edits video without any extra software. Open the clip, choose Edit, drag the timeline down to the section you want, and save a copy. You then repeat the trim for the other half. It re-encodes both times, so a long file will keep you waiting.
In a full editor
DaVinci Resolve, Premiere and the mobile editors all work the same way. Park the playhead where the cut belongs, split the clip, then export each range. It’s the most control and the slowest route.
What about chapters?
Chapter markers don’t split a file. They add navigation points inside one upload, which is what you want when the goal is a single video viewers can skip around. If that’s your actual need, follow the guide to adding YouTube chapters instead of producing five separate files.
What Splitting Tools Actually Do, and Where They Fall Short
Almost every splitter on the market does one of two things, and the label on the page rarely says which. A copy split rewrites the container and leaves the streams untouched. A re-encode split decodes every frame and compresses it again. The first is instant and lossless, the second is exact and slower.
One point gets lost in the marketing. Splitting doesn’t shrink a video. Ten parts taken from a one-gigabyte file still add up to roughly a gigabyte, because the same frames and audio are all still there, just spread across more files.
If you want a smaller file to send or upload, splitting isn’t the tool you need. Compression is, and it’s a separate job with its own settings.
Some limits sit outside any splitter’s reach. A tool can only open a file your device can already play, so material behind a login, a paywall or a copy-protection layer is out of reach.
A few free players and editors do offer stream-copy cutting from a visual timeline, which is a comfortable middle ground when you want lossless output without typing commands. Check what the export settings really say before you trust one, because plenty of them quietly re-encode.
Rights and Responsible Use
Footage belongs to whoever created it, and cutting a file into pieces transfers none of that ownership. If you shot the video, or a client handed it to you with permission to reuse, you’re on solid ground. If it came from someone else’s account, it’s still theirs.
Personal use and publishing are different things. Saving a section of your own recording to check a detail, or sending a colleague a clip of a meeting you both attended, is ordinary practice. Re-uploading someone else’s work in pieces, or passing it off as your own, can breach copyright and the terms of the platform you post to.
Keep the files that show you own what you split. When a video arrives from a client, a colleague or a freelancer, confirm in writing that you may reuse and redistribute it before a cut part leaves your machine. YouTube’s own terms of service are a reasonable baseline for what a host expects of the material you publish.
The tools in this guide work on files you can already open on your own device. They aren’t a route around a paywall, a login wall or a protection layer, and nothing here should be used that way.
Troubleshooting: When the Split Goes Wrong
The clip starts earlier or later than I asked
That’s the keyframe rule, not a mistake in your command. A copy-cut can only begin where a keyframe sits, so the output snaps to the nearest one before your start time. Either re-encode that piece, or move your start time to a timestamp from the ffprobe list above.
There’s a click or a tiny gap at the start
Audio encoders pad the beginning of a stream, and a copy-cut can land between those padding samples, leaving a brief silence or an audible tick at the edit point. Re-encoding the audio for that part removes it.
Every part is the same length, whatever segment time I set
The segment muxer splits on keyframes, so a long keyframe interval forces long parts. If the source only carries a keyframe every ten seconds, no setting will give you three-second chunks. Shorten the keyframe interval on export, or re-encode the file before you segment it.
The output won’t play, or shows a strange duration
That’s timestamp trouble. Copy splits can carry a negative or mismatched start time into the new file, which confuses some players and phones. Add -avoid_negative_ts make_zero to the copy command, or -reset_timestamps 1 when segmenting, and the parts behave.
The parts won’t join back together
Usually a timestamp mismatch rather than a codec problem. Parts cut without reset timestamps each begin somewhere in the middle of the original timeline, and the concat demuxer then produces pauses or a frozen opening frame. Re-cut with reset timestamps and join them with stream copy.
I get a zero-byte file, or the command finishes immediately
Check the argument order. For fast seeking, -ss goes before -i, and the input file has to be named. A start time past the end of the clip also produces an empty file rather than an error message.
Frequently Asked Questions
How to split a video into parts on Windows or Mac?
Both systems ship with an editor that can do it, though neither cuts losslessly by default. On a Mac, QuickTime Player splits at the playhead. On Windows, the Photos app trims a selection and saves a copy, so you repeat it once for each half.
Does splitting a video make the file smaller?
No, and that’s the most common misunderstanding. The parts together take up about as much space as the original, because every frame and every audio sample is still present. Splitting moves the data into more files; it removes none of it.
Why is my cut off by a second or two?
Because a stream-copy cut can only start on a keyframe, and keyframes aren’t evenly spaced in every file. The cut snaps to the nearest one before your requested time. Re-encoding that piece is the only way to land on the exact frame.
Can you split a video without re-encoding it?
Yes, and it’s the fastest option available. A stream copy rewrites the container and leaves the video and audio streams exactly as they were, so the output matches the source frame for frame.
Is splitting a video the same as trimming it?
No. Trimming removes one unwanted section and leaves you with a shorter single file. Splitting divides the video into two or more separate files, each of which stays whole. The two are often used together, and the guide to trimming a single clip covers the other half of the job.
Can I split a video into equal parts automatically?
Yes, with the segment muxer or a batch export setting in your editor. The parts come out close to the length you ask for rather than exactly that length, because the splitter still has to land on keyframes.
Will quality drop when I split a video?
Not with a stream copy, which is lossless by definition. Re-encoding costs a little quality, though at a low CRF value the difference is hard to see. Every re-encode of an already-encoded file compounds the loss, so avoid repeat passes.
Do I need to install anything?
No, not for a one-off. Windows, macOS and iOS all have a built-in editor that will do the job. Install FFmpeg when you want lossless output, precise control of the cut points, or one command you can reuse across a batch of files.
Which Method Should You Use?
Decide from what the cut has to achieve, not from which tool sounds most convenient.
If the cut can land within a second of where you want it, use a stream copy with FFmpeg. It finishes in seconds and changes nothing about the picture.
If the cut must be exact and one re-encode is acceptable, use the same tool without the copy flag. If you would rather not open a terminal, QuickTime on a Mac and the Photos editor on Windows both get the job done.
If you need a dozen pieces of equal length, reach for the segment muxer. And if you only want viewers to jump around inside one video, skip splitting entirely and add chapter markers instead.
Which route fits comes down to whether your cut has to be exact. That’s the real answer to how to split a video: copy when a keyframe is close enough, re-encode when it isn’t.